Denon AVR-1912 Owners Manual - Page 19
Calculate, Measure 2nd - 6th, Detect & Measure Main, When performing Audyssey, Auto Setup over - problems
 |
UPC - 883795001984
View all Denon AVR-1912 manuals
Add to My Manuals
Save this manual to your list of manuals |
Page 19 highlights
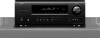
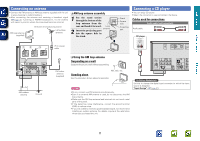
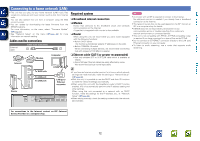
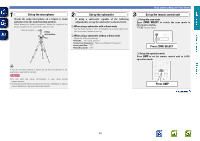
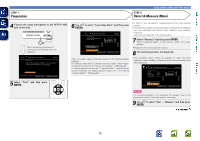
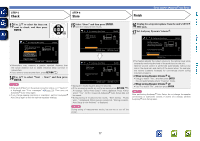
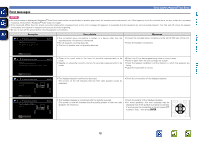
Basic version Advanced version Information STEP 2 (Continued) Detect & Measure (Main) NOTE If "Caution" is displayed: Go to "Error messages" (vpage 18), check any related items, and perform the necessary procedures. If the problem is resolved, return and restart "Audyssey® Auto Setup". When performing Audyssey® Auto Setup over again Press ui to select "Retry", and then press ENTER. When measuring has stopped q Press RETURN B, to the "Cancel Auto Setup?" prompt is displayed. w Press o to select "Yes", then press ENTER. Setting up the speakers again Repeat the operation from step 4 of STEP 1 Preparation . STEP 3 Measure (2nd - 6th) STEP 4 Calculate Set up speakers (Audyssey® Auto Setup) • In STEP 3, you will perform measurements at multiple positions (two to six positions) other than the main listening position. • Just one position can be measured but measuring multiple positions increases the accuracy of the correction of acoustic distortion within the listening area. 10 Move the setup microphone to position 2, use ui to select "Measure", and then press ENTER. The measurement of the second position starts. Measurements can be made in up to six positions. 12 On the STEP 3 screen, use ui to select "Next → Calculate", and then press ENTER. Measuring results are analyzed, and the frequency response of each speaker in the listening room is determined. Audyssey Auto Setup Calculate Now calculating Please wait MultEQ 0% Audyssey Auto Setup Measure (2nd) Please place the microphone at ear height at 2nd listening position. Measure MultEQ [ENTER] Enter [RETURN] Cancel • Analysis takes several minutes to complete. The time required for this analysis depends on the number of speakers connected. The more connected speakers there are, the longer it takes to perform analysis. Next Calculate [ENTER] Enter [RETURN] Cancel vSee overleaf If you want to omit measurements from the next position onward, select "Next Calculate". (Go to STEP4 Calculate ) 11 Repeat step 10, measuring positions 3 to 6. When measurement of position 6 is completed, a "Measurements finished." message is displayed. Audyssey Auto Setup Measure (Finish) Measurements finished. MultEQ Retry Next Calculate [ENTER] Enter [RETURN] Cancel 16
-
 1
1 -
2
-
3
-
4
-
5
-
6
-
7
-
8
-
9
-
10
-
11
-
12
-
13
-
 14
14 -
 15
15 -
 16
16 -
 17
17 -
 18
18 -
 19
19 -
 20
20 -
 21
21 -
 22
22 -
 23
23 -
 24
24 -
25
-
26
-
27
-
28
-
29
-
30
-
31
-
32
-
33
-
34
-
35
-
36
-
37
-
38
-
39
-
40
-
41
-
42
-
43
-
44
-
45
-
46
-
47
-
48
-
49
-
50
-
51
-
52
-
53
-
54
-
55
-
56
-
57
-
58
-
59
-
60
-
61
-
62
-
63
-
64
-
65
-
66
-
67
-
68
-
69
-
70
-
71
-
72
-
73
-
74
-
75
-
76
-
77
-
78
-
79
-
80
-
81
-
82
-
83
-
84
-
85
-
86
-
87
-
88
-
89
-
90
-
91
-
92
-
93
-
94
-
95
-
96
-
97
-
98
-
99
-
100
-
101
-
102
-
103
-
104
-
105
-
106
-
107
-
108
-
109
-
110
-
111
-
112
-
113
-
114
-
115
-
116
-
117
-
118
-
119
-
120
-
121
-
122
-
123
-
124
-
125
-
126
-
127
-
128
-
129
-
130
-
131
-
132
-
133
 |
 |