Denon AVR 2807 Owners Manual - English - Page 13
Setup Mic - remote
 |
UPC - 081757507059
View all Denon AVR 2807 manuals
Add to My Manuals
Save this manual to your list of manuals |
Page 13 highlights
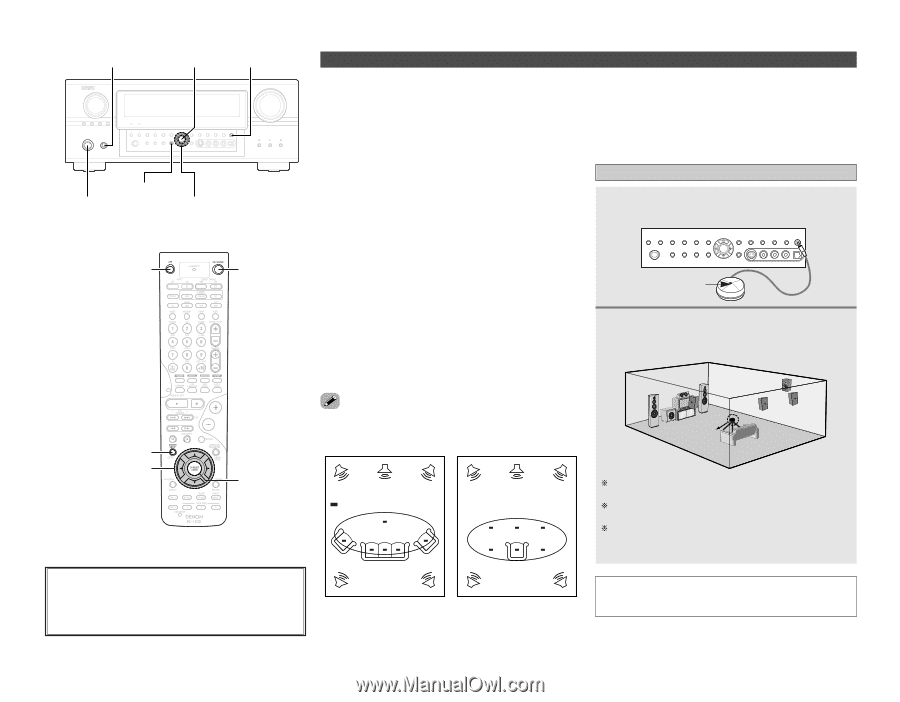
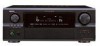
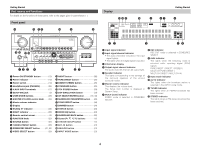
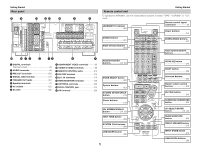
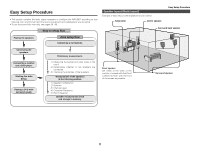
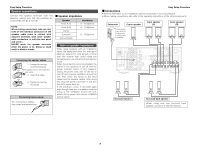
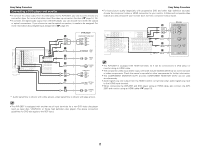
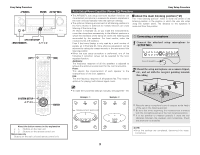
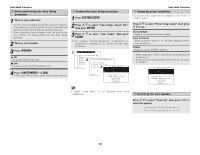
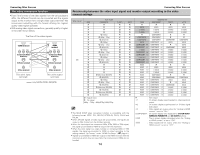
Easy Setup Procedure ENTER SYSTEM SETUP D H F G [OFF] [ON] SYSTEM SETUP D H F G ENTER About the button names in this explanation < > : Buttons on the main unit [ ] : Buttons on the remote control unit Button name only : Buttons on the main unit and remote control unit Easy Setup Procedure Auto Setup/Room Equalizer (Room EQ) Functions • The AVR-2807's auto setup and room equalizer functions use the attached microphone to measure the acoustic properties in the room and automatically make the optimum settings. • The optimum listening environment at all listening positions in the home theater is achieved so multiple listeners can enjoy listening at the same time. As shown in Example q, as you make the measurements, move the microphone successively to the different positions in which the members of the family sit within the listening area surrounded by the speakers. For best results, make the measurements at 6 locations. Even if the home theater is only used by a small number of people, as in Example w, more effective equalization can be achieved by taking the measurements in the area around the listening position. • When the auto setup procedure is performed, one of the following 3 correction curves can be selected for the room equalizer function. Audyssey: The frequency response of all the speakers is adjusted to achieve the optimum environment for the room's acoustics. Front: This adjusts the characteristics of each speaker to the characteristics of the front speakers. Flat: This the frequency response of all speakers flat. This mode is optimum for playing multi-channel signal music. 2 About the main listening position (*M) The "main listening position" refers to either the center of the listening position or the position in which the user sits when using the system alone. The distance to the speakers is measured from this position. q Connecting a microphone 1 Connect the attached setup microphone to . Sound receptor 2 Mount the setup microphone on a camera tripod, etc., and set with the receptor pointing towards the ceiling. • To make the sound field settings manually, see pages 56 ~ 59. Example: q Example: w Microphone ( : Measurement positions) *M *M Place the setup microphone's sound receptor at the height of the ears in the listening position. Be sure that at the beginning, the measurement is started with the microphone set up at the main listening position. It is not possible to measure properly if there are any obstacles between the speakers and microphone. Check that there are no obstacles. NOTE: • Once the settings are completed, disconnect the setup microphone. 9
-
 1
1 -
2
-
3
-
4
-
5
-
6
-
7
-
 8
8 -
 9
9 -
 10
10 -
 11
11 -
 12
12 -
 13
13 -
 14
14 -
 15
15 -
 16
16 -
 17
17 -
 18
18 -
19
-
20
-
21
-
22
-
23
-
24
-
25
-
26
-
27
-
28
-
29
-
30
-
31
-
32
-
33
-
34
-
35
-
36
-
37
-
38
-
39
-
40
-
41
-
42
-
43
-
44
-
45
-
46
-
47
-
48
-
49
-
50
-
51
-
52
-
53
-
54
-
55
-
56
-
57
-
58
-
59
-
60
-
61
-
62
-
63
-
64
-
65
-
66
-
67
-
68
-
69
-
70
-
71
-
72
-
73
-
74
-
75
-
76
-
77
-
78
-
79
-
80
-
81
-
82
-
83
-
84
-
85
-
86
-
87
-
88
 |
 |