Denon AVR 2807 Owners Manual - English - Page 5
Contents - reviews
 |
UPC - 081757507059
View all Denon AVR 2807 manuals
Add to My Manuals
Save this manual to your list of manuals |
Page 5 highlights
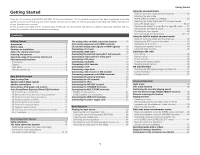
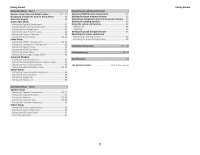
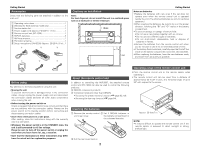
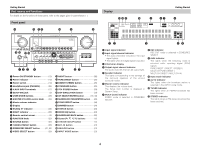
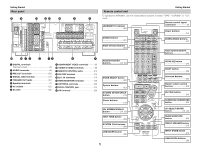
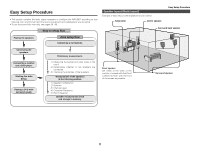
Getting Started Thank you for choosing the DENON AVR-2807 AV Surround Receiver. This remarkable component has been engineered to provide superb surround sound listening with home theater sources such as DVD, as well as providing outstanding high fidelity reproduction of your favorite music sources. As this product is provided with an immense array of features, we recommend that before you begin hookup and operation that you review the contents of this manual before proceeding. Contents Getting Started Accessories 3 Before using 3 Cautions on installation 3 About the remote control unit 3 Inserting the batteries 3 Operating range of the remote control unit 3 Part names and functions Front panel 4 Display 4 Rear panel 5 Remote control unit 5 Easy Setup Procedure Easy to setup flow 6 Speaker layout [Basic layout 6 Speaker connections 7 Connecting a DVD player and monitor 8 Auto Setup/Room Equalizer (Room EQ) Functions 9 q Connecting a microphone 9 w Before performing the Auto Setup procedure 10 e Perform the Auto Setup procedure 10 r Assigning power amplifiers 10 t Switching the front speaker 10 y Preliminary measurements 11 u Speaker measurements 11 i Checking and storing the measurement results 12 Error messages 12 Connecting Other Sources Cable indications 13 The video conversion function 14 Relationship between the video input signal and monitor output according to the video convert settings 14, 15 The analog video to HDMI conversion function 15 Connecting equipment with HDMI terminals [To convert analog video signals to HDMI signals 16 Connecting a TV tuner 16 Connecting a DBS tuner 16 Connecting the external inputs (EXT. IN) terminals 17 Connecting a video camera or video game 17 Connecting a CD player 17 Connecting a turntable 17 Connecting a DVD recorder 18 Connecting a VCR 18 Connecting a tape deck 18 Connecting a CD recorder or MD recorder 19 Connecting equipment with HDMI terminals 19 Connecting the antenna terminals 20 Connecting the XM terminal 20 Connecting the iPod 21 Connecting the RS-232C terminal 21 Connecting the TRIGGER OUT jacks 21 Connecting the MULTI ZONE terminals ZONE2 out connections 21 ZONE2 speaker out connections 22 Connecting the PRE OUT terminals 22 Connecting the power supply cord 22 Basic Operation Playing the input source 23 Selecting the room equalizer mode 24 Turning the sound off temporarily (MUTING 24 Listening over headphones 24 Switching the front speakers 24 Checking the currently playing program source, etc 24 Switching the brightness of the display 24 Getting Started Using the surround modes Types of surround modes and their features 25 Selecting the play mode (PURE DIRECT / DIRECT / STEREO 25 Selecting the Dolby Digital and DTS Surround mode (only with digital input 26, 27 Selecting the Dolby Pro Logic IIx (Pro Logic II) mode 27 Selecting the DTS NEO:6 mode 28 Checking the input signals 28 Surround modes and parameters 29 ~ 31 Using the DENON original surround modes Types of surround modes and their features 32 Selecting the DSP surround simulation 33 Setting the tone control 34 Adjusting the speaker volume 34 Using the fader function 35 Listening to the radio Auto tuning 35 Manual tuning 35 Preset memory 35 Checking the preset stations 36 Recalling preset stations 36 XM Satellite Radio 36 Checking the XM signal strength and Radio ID 37 Channel selection 37 Category search 37 Advanced Operation Night mode 38 User mode function 38 Combining the currently playing sound with the desired image (VIDEO SELECT function 38 Personal memory plus function 38 Playing the iPod 39 Listening to music 39 Viewing still pictures and videos (only for iPods equipped with the slideshow / video function 39 Disconnecting the iPod 39 Multi zone music entertainment system Multi-zone playback using the ZONE2 output terminals 40 Multi-zone playback using the SPEAKER terminals 40 Outputting a program source to amplifier, etc., in the ZONE2 room (ZONE2 SELECT mode 41 Remote control unit operations during multi-source playback 41 Recording (audio and/or video 42 About the memory functions 42 Initialization of the microprocessor (Reset 42 1
-
 1
1 -
 2
2 -
 3
3 -
 4
4 -
 5
5 -
 6
6 -
 7
7 -
 8
8 -
 9
9 -
 10
10 -
 11
11 -
12
-
13
-
14
-
15
-
16
-
17
-
18
-
19
-
20
-
21
-
22
-
23
-
24
-
25
-
26
-
27
-
28
-
29
-
30
-
31
-
32
-
33
-
34
-
35
-
36
-
37
-
38
-
39
-
40
-
41
-
42
-
43
-
44
-
45
-
46
-
47
-
48
-
49
-
50
-
51
-
52
-
53
-
54
-
55
-
56
-
57
-
58
-
59
-
60
-
61
-
62
-
63
-
64
-
65
-
66
-
67
-
68
-
69
-
70
-
71
-
72
-
73
-
74
-
75
-
76
-
77
-
78
-
79
-
80
-
81
-
82
-
83
-
84
-
85
-
86
-
87
-
88
 |
 |