Denon DN S5000 Quick Start Guide
Denon DN S5000 - DJ Table Top Single CD Player Manual
 |
UPC - 081757505185
View all Denon DN S5000 manuals
Add to My Manuals
Save this manual to your list of manuals |
Denon DN S5000 manual content summary:
- Denon DN S5000 | Quick Start Guide - Page 1
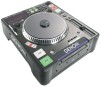
DN-S5000 Quick Start Guide Track Change: Search/Scan: Skip Search: Frame Search: Scratch: Scratch Lever: Hot Disc: Hot Starts: Clear Hot Starts: Alpha Track: Mirror Mix: Pitch Range: Key Adjust: Brake/Echo: Dump/Reverse: Turn the rotary knob (on the upper right - Denon DN S5000 | Quick Start Guide - Page 2
- Denon DN S5000 | Quick Start Guide - Page 3
TABLE TOP SINGLE CD PLAYER DN-S5000 OPERATING INSTRUCTIONS INSTRUCCIONES DE OPERACION FOR ENGLISH READERS PARA LECTORES DE ESPAOÑ L PAGE 116 ~ PAGE 126 PAGINA 27~ PAGINA 47 - Denon DN S5000 | Quick Start Guide - Page 4
problems occur, contact your DENON dealer. 3. Do not place anything inside Do not place metal objects or spill liquid inside the CD player. Electric shock or malfunction may result. Please, record and retain the Model name and serial number of your set shown on the rating label. Model No. DN-S5000 - Denon DN S5000 | Quick Start Guide - Page 5
ENGLISH DEUTSCH FRANÇAIS ESPAÑOL NEDERLANDS SVENSKA TOP PANEL DIAGRAM / OBERES BEDIENFELD-SCHEMA / SCHEMA DU PANNEAU SUPERIEUR / DIAGRAMA DEL PANEL SUPERIOR / OVERZICHT VAN BOVENPANEEL / BILD Ö - Denon DN S5000 | Quick Start Guide - Page 6
• Laat geen vochtigheid, water of stof in het apparaat binnendringen. • Utsätt inte apparaten för fukt, vatten och damm. • Unplug the power cord when not using the set for long periods of time. • Wenn das Gerät eine längere Zeit nicht verwendet werden soll, trennen Sie das Netzkabel vom Netzstecker - Denon DN S5000 | Quick Start Guide - Page 7
CD's, octagonal CD's etc.) cannot be played on this set. Attempting to do so may damage the set. Do not use such CD's. • Benutzen Sie Compact Discs, die das Zeichen tragen. Speziell geformte CD's (herzförmige CDs, achteckige CDs : DO NOT USE THE DENON AMC-22 CD PICK-UP LENS CLEANER FOR THIS - Denon DN S5000 | Quick Start Guide - Page 8
If the disc is replaced during the Seamless Loop mode (maximum 35 seconds between points A and B), the disc can be replaced without worrying about the time. Thanks to the Alpha-Track and Hot Disc functions, sound can be played with the same feel as a dual CD player, even when using a single DN-S5000 - Denon DN S5000 | Quick Start Guide - Page 9
remove a disc once the DN-S5000 has started to draw it in. • Do not load more than once disc at a time or insert anything other than discs. Otherwise loading mechanism may be damaged. w CD drive • This Drive is field replaceable by you. • Optional spare drive is sold separately. e POWER button (¢ON - Denon DN S5000 | Quick Start Guide - Page 10
mechanism may be damaged. • If a problem with Platter rotation arises when the Platter is turning, the Platter stops turning and the pause mode is set. !3 SCRATCH direction select knob Select the Scratch play direction. • BOTH: When Scratch Disc is turned, Scratch sound is output in both directions - Denon DN S5000 | Quick Start Guide - Page 11
DNS5000s are connected by X-EFFECT. @9 TIME, T.TIME button • TIME: A quick push will display mode changes between ELAPSED TIME and REMAIN TIME. • T.TIME: A long push, will display mode changes between TRACK TIME and DISC TIME. • So, you can select display mode from four modes Platter effect function - Denon DN S5000 | Quick Start Guide - Page 12
. w Loop mode indicators • DN-S5000 has Loop mode indicators consist of four sets of A disc with a hair dryer, etc. 2. Precautions on storage • After playing a disc, always unload it from the player. • Always store the disc in the jewel case to protect from dirt or damage. • Do not place discs - Denon DN S5000 | Quick Start Guide - Page 13
Back-Cue function, you can start from exactly same position. The CUE button illuminates solid red when DN-S5000 is ready to start playback. • You can set and change Cue point as follows. • When you started playback. • Track select finished. • manual search. Turn the !2 Scratch Disc to change Cue - Denon DN S5000 | Quick Start Guide - Page 14
- button, the Hot Disc mode is turned off and the player is set back to the normal mode. 5 SAMP. STOP PITCH BEND NOTE: The a MODE button does not function before the Hot Disc data is cleared. 6 SCRATCH You can Scratch in CD or Sampler mode. Also you can select the Scratch sound direction to - Denon DN S5000 | Quick Start Guide - Page 15
can use this function like a Sampler from Alpha-Cue point (Real time Sampler). When the ALPHA OUT is selected, DN-S5000 can playback up to two songs simultaneously. • When playing the Alpha-Track, scratching, Hot Starting, Seamless Looping (Alpha-Track and Hot Start modes) and Hot Disc are possible - Denon DN S5000 | Quick Start Guide - Page 16
from the disc and stop Hot Disc playback. Hot Disc clear When the #3 a CUE button is pressed while pressing the #6 a PITCH BEND - button, the Hot Disc mode is turned off and the player is set back to the normal mode. 5 SAMP. STOP PITCH BEND NOTE: The a MODE button does not function before the - Denon DN S5000 | Quick Start Guide - Page 17
1 and 2 (A3, A4 buttons) must be in the STOP mode otherwise the DN-S5000 will not accept the ALPHA-MODE command. ✽ In the Alpha-Mode, illumination of a MODE button flashes. Monitor the Alpha-Track • You can execute many functions almost same as for the Main Track except, Program, Random - Denon DN S5000 | Quick Start Guide - Page 18
is set, the corresponding A button and FLIP LED light and that button is set to the Hot Start mode. • The BPM is set independently Loop playback, you can force exit from or return in the loop. EXIT: 5 While the Seamless Loop playback, push the EXIT/RELOOP button to exit from loop. DN-S5000 - Denon DN S5000 | Quick Start Guide - Page 19
• The A1 and A2 Hot Starts and Stutter functions cannot be used if both Splice points are set in the Splice mode. t w, r, t e q Splice point setting mode q Push the SPLICE button A / B TRIM B. 6 • When the splice points are cleared, the A button is set back to the Hot Start mode. ENGLISH 17 - Denon DN S5000 | Quick Start Guide - Page 20
for the A point you want to move. The standby mode is set at the A point and the A button 8 illumination flashes Scratch Disc to move the selected point using the manual search function. • Range for moving A point is limited as follows. A point for Loop: Between the beginning of the disc - Denon DN S5000 | Quick Start Guide - Page 21
/ OFF PARAMETERS PUSH ON / OFF A4 buttons are also used for Hot Start, Stutter and Seamless loop playback. However, A3 and A4 Hot Start is played for the Alpha-Track. • The A3 and A4 points set in the Alpha- Track Hot Start mode can be used in the 4 Hot Start mode as well. ENGLISH 19 - Denon DN S5000 | Quick Start Guide - Page 22
ENGLISH Sampler DN-S5000 has two Samplers of 15 seconds length. These Samplers are also used in looping playback. to indicates Sampler Loop mode is set automatically. Play Loop function. Reverse Play i You can play Sampler sound in reverse with push RVS (FLIP) 7 button. In reverse play mode - Denon DN S5000 | Quick Start Guide - Page 23
and the source for which the Platter effect function is to be used can be stored in the preset mode. 5 • After making the desired settings, enter the preset mode and stores the settings at "PRESET (5)". Once the settings are stored, they are automatically set each time the power is turned on. (See - Denon DN S5000 | Quick Start Guide - Page 24
X-EFFECT ALPHA MAIN FADER POWER ON OFF DIGITAL OUT IN LL MAIN RR OUT LINE OUT MONITOR X-EFFECT OUT jack POWER ON OFF DIGITAL OUT IN LL MAIN RR OUT LINE OUT MONITOR 3.5 mm stereo mini cord NOTE: The MEMO data of the two DN-S5000 units is checked when the disc is loaded. X-EFFECT IN - Denon DN S5000 | Quick Start Guide - Page 25
was not completed correctly. In this case, try the above procedure again. • The copied MEMO data are added to the highest number area of the slave DN-S5000 unit. (17) The DN-S5000's software version is displayed. (SYSTEM / DSP / CD DRIVE) (18) PRESET CLEAR : Set all the preset data back to the - Denon DN S5000 | Quick Start Guide - Page 26
ENGLISH 15 PROGRAM/RANDOM/RELAY PLAY/POWER ON PLAY Program play • Up to 25 tracks from one disc can be programmed. • Programs for up to six discs (one program per disc) can be stored in the non-volatile memory for later recall. NOTE: Such functions as Hot Start, Sampler, Mirror Mix, and Platter - Denon DN S5000 | Quick Start Guide - Page 27
play mode, when the one player's playback reaches end of track, 1 another DN-S5000 starts playing. • In the continuous play mode, when the whole tracks on one side are finished, another DN-S5000 starts. • The discs in two DN-S5000s can be played alternately by setting both DN- S5000 to - Denon DN S5000 | Quick Start Guide - Page 28
Pully. Belt Stabilizer Scratch Disc Slip Mat Slip Sheet Motor Pully 3. Remove 3 screws B (< head) and pull out Platter. 4. Remove Belt from Platter. (< head) B Platter B (< head) Platter Belt 5. Mount in the order 4 → 1. ∗ CAUTIONS: • Unplug the power cord before replacing the belt. • Do - Denon DN S5000 | Quick Start Guide - Page 29
ajustarse fácilmente utilizando la función Scratch Disc. Hay dos modos disponibles para el ajuste de A/B. A-B TRIM: para el ajuste de los puntos mientras se reproduce el loop en vivo. A/B MOVE: para mover los puntos utilizando la búsqueda manual. 11. PLATTER MODE (Mejorada) La reproducción estilo - Denon DN S5000 | Quick Start Guide - Page 30
POWER. 2. Conecte el haz de cables RCA entre las salidas del DN-S5000 y las entradas de su mixer. Asegúrese de que las MAIN OUTs son salidas principales y que las ALPHA OUTs son salidas de sonido Alpha-Track. 3. Si su mixer posee la función Fader Start, como nuestros modelos DENON DN-X800 o DN - Denon DN S5000 | Quick Start Guide - Page 31
á expulsar el disco. (Eject lock function) • HOT DISC: Cuando este botón se mantiene pulsado Platter/Scratch Disc Utilice esto para realizar una búsqueda manual y operaciones de curva de tono y scratch. estos botones para la reproducción Hot Start, Seamless Loop y Stutter. • El color de la iluminaci - Denon DN S5000 | Quick Start Guide - Page 32
Cuando hay datos de CD text, éstos se unidades DN-S5000 mediante TRACK REMAIN, DISC ELAPSED y DISC REMAIN. #0 MODE, MIRROR MIX • a (Alpha) MODE: Utilice este botón para activar y desactivar el Alpha-Mode. Los sonidos de reproducción Alpha-Mode salen desde las clavijas ALPHA OUT del Alpha-Mode - Denon DN S5000 | Quick Start Guide - Page 33
ón actual. w Indicadores de modo Loop • DN-S5000 tiene indicadores de modo Loop consistentes en cuatro grupos de A 30 puntos de la parte superior) • Los 30 puntos de la parte superior del visualizador indican (pitch). !2 Indicadores PLATTER MODE • Hay símbolos para Platter Effects DRAG S., BRAKE - Denon DN S5000 | Quick Start Guide - Page 34
Pitch Bend • Con la función PITCH BEND podrá cambiar el pitch de forma temporal. La unidad DN-S5000 tiene tres vías para los botones de la función PITCH BEND y para el botón Scratch Disc. [Botones PITCH BEND +/-] • Pulse el botón #9 PITCH BEND - o $0 + para un PITCH BEND cambio momentáneo de - Denon DN S5000 | Quick Start Guide - Page 35
botones de operaciones cambian a los 2 controles del modo Alpha-Track. (13 → a MODE no funciona hasta que se borren los datos de Hot Disc. 6 SCRATCH Podrá hacer scractch en modo CD o sampler. Además, puede seleccionar la dirección del sonido Scratch (cambiar la dirección del disco Scratch - Denon DN S5000 | Quick Start Guide - Page 36
Cuando está seleccionado el ALPHA OUT, el DN-S5000 puede reproducir dos canciones simultáneamente. • Cuando reproduzca Alpha-Track, es posible realizar las operaciones de scratching, Hot Starting, Seamless Looping (en los modos Alpha-Track y Hot Start) y Hot Disc, igual que con Main Track. NOTA: Las - Denon DN S5000 | Quick Start Guide - Page 37
• Si se reproduce Seamless loop durante esos 1 35 segundos, la reproducción del bucle continuará. NOTA: La función Hot Disc (Disco rápido) no ón del disco saldran de los terminales MAIN OUT. • El botón a MODE parpadeará cuando las señales de reproducción del disco salgan de los terminales - Denon DN S5000 | Quick Start Guide - Page 38
el mismo CD antes de que finalice la primera pista. Mientras se esté en Alpha-Mode, la DN-S5000 no aceptará el comando ALPHA-MODE. ✽ En el Alpha-Mode, la luz del botón ALPHA-MODE parapadea. Control Llamada Memo) w Si los modos Hot Start, Seamless Loop y otros datos para la pista que se usará - Denon DN S5000 | Quick Start Guide - Page 39
pulse el botón EXIT/RELOOP para salir de la función loop. DN-S5000 continua la reproducción después del punto B. RELOOP: Cuando se pulsa el botón EXIT/RELOOP tras salir de la función del loop, Seamless Loop la reproducción retoma desde el punto A. Stutter • Loa puntos A1 y A2 también pueden - Denon DN S5000 | Quick Start Guide - Page 40
ESPAÑOL Splice • Use esta función para saltar una sección entre los puntos A y B. El punto A es el punto desde el cual empieza el salto, el punto B es el punto en el que finaliza el salto. • Las funciones Hot Starts A1 y A2, y Stutter no pueden utilizarse si ambos puntos Splice se encuentran en modo - Denon DN S5000 | Quick Start Guide - Page 41
Seamless Loop, Sampler loop y los puntos de unión A y B pueden ajustarse con más precisión utilizando el botón Scratch Disc. • Hay dos modos de hacer esto. A-B Trim: Recorte los puntos durante la reproducción del bucle. A/B Move: Mueve los puntos utilizando la búsqueda rápida o la búsqueda manual - Denon DN S5000 | Quick Start Guide - Page 42
En modo Sampler, el botón A3 se utiliza para Samper1 y los botones A4 para Sampler2. • Los datos muestreados se almacenan en Stutter y reproducción Seamless Loop. Sin embargo, Hot Start A3 y A4 se utiliza para el Alpha-Track. • Los puntos A3 y A4 establecidos en el modo Alpha-Track Hot Start pueden - Denon DN S5000 | Quick Start Guide - Page 43
ESPAÑOL Sampler La unidad DN-S5000 dispone de dos samplers de 15 segundos de duración. Estas muestras se utilizan también B. El LED EXIT/RELOOP se iluminará también para indicar que el modo Sampler Loop se ha establecido automáticamente. Detener la grabación e Para detener la grabación SAMP - Denon DN S5000 | Quick Start Guide - Page 44
una vez seleccionado y se ajusta el botón PARAMETERS. Después de 4 segundos, sale del menú BRAKE o ECHO. BRAKE TIME: y O cuando se mantiene pulsado el inversa se desactiva cuando se inician los modos Hot Start y Stutter. PLATTER MODE MEMO El ajuste on/off (activado/desactivado) y los datos de - Denon DN S5000 | Quick Start Guide - Page 45
5000 puntos de notas recordatorias se pueden almacenar en la memoria interna para recordarlas después. El número de pistas en un CD función Memo set. • Si se DN-S5000 pueden compararse entre sí cuando las dos unidades están conectadas mediante los terminales X-EFFECT. DN-S5000-1 DN-S5000-2 POWER - Denon DN S5000 | Quick Start Guide - Page 46
dos unidades DN-S5000. DN-S5000-1 DN-S5000-2 POWER ON OFF DIGITAL OUT IN LL MAIN RR OUT LINE OUT MONITOR X-EFFECT OUT jack X-EFFECT ALPHA MAIN FADER X-EFFECT ALPHA MAIN FADER POWER ON OFF DIGITAL OUT IN LL MAIN RR OUT LINE OUT MONITOR X-EFFECT IN jack 3.5 mm stereo mini cord - Denon DN S5000 | Quick Start Guide - Page 47
POWER botón PRESET : preset mode (preselección) → program mode (programa) → random mode 1 (aleatorio) → (Prog.On) • Cuando seleccione "Prog.On", el DN-S5000 establecerá una Cue en la primera pista del programa. • Cuando se selecciona la opción "Memo Set", el programa creado se almacena en la - Denon DN S5000 | Quick Start Guide - Page 48
de forma continua las pistas de los CDs en dos unidades DN-S5000. • Conecte los terminales X-EFFECT IN/OUT entre las dos unidades DN-S5000. q, w w, y e Modo modo. CONT. / SINGLE RELAY Reproducción de encendido (Power On Play) • Cuando la opción "POWER ON PLAY" se activa ("ON") en "⁄4 PRESET ( - Denon DN S5000 | Quick Start Guide - Page 49
12 cm),CD-TEXT. Discos CD-R y CD-RW NOTA: Los discos CD-R o CD-RW DN-S5000, el Platter es conducido por una correa. Utilice el procedimiento que se describe a continuacinó para reemplazar la correa por la correa incluida. 1. Quite un tornillo A (cabeza hexagonal) y extraiga el Scratch Disc
-
 1
1 -
 2
2 -
 3
3 -
 4
4 -
 5
5 -
 6
6 -
 7
7 -
8
-
9
-
10
-
11
-
12
-
13
-
14
-
15
-
16
-
17
-
18
-
19
-
20
-
21
-
22
-
23
-
24
-
25
-
26
-
27
-
28
-
29
-
30
-
31
-
32
-
33
-
34
-
35
-
36
-
37
-
38
-
39
-
40
-
41
-
42
-
43
-
44
-
45
-
46
-
47
-
48
-
49
 |
 |
DN-S5000 Quick Start Guide
Track Change:
Turn the rotary knob (on the upper right side) to desired track.
Search/Scan:
Move the “Fast Search” lever to search forward or search back.
Skip Search:
Quickly shift and release the “Fast Search” lever to its end for 1-min hops.
Frame Search:
Turn the scratch mode knob to “Search” turn the top scratch disc until point is
found, press main CUE to save your new point.
Scratch:
Insert Disc, turn scratch mode Knob to “MAIN”, press lower left PLAY button,
manipulate the top vinyl disc as desired.
Scratch Lever:
Select “Both” for natural scratching. Select “Fwd” to mute the reverse sound
of audio.
Hot Disc:
During play mode, press and hold the “Eject” button for more than 1 sec,
remove disc & insert new. Monitor, mix & play as normal.
Hot Starts:
Press the A1 or A2 button to set a cue point during play. Press the same
button again to re-trigger.
Clear Hot Starts:
Press and hold the “FLIP” button corresponding to the same row for more
than 1 sec.
Alpha Track:
During Main play, press the alpha mode button, select track, monitor & mix
your Alpha track through the mixer.
Mirror Mix:
During Main play, press and hold the alpha mode button for more than 1 sec,
press alpha play to start.
Pitch Range:
Press and hold the “Pitch” button for more than 1 sec, turn rotary knob to
select pitch, (
±
4,10,16,24,100%) press enter to save your new setting.
Key Adjust:
Press the “Pitch” button until the orange “Key Adj.” icon is shown above the
pitch % in the display. Button Cycle; Pitch On -> Pitch & Key On -> All Off.
Brake/Echo:
Press the “Brake/Echo” button once to active “Brake”, twice to activate
“Echo”, a third to turn all off. Button Cycle; Brake -> Echo -> All Off.
Dump/Reverse:
Press the “Dump/Rvs” button once to set “Dump”, twice for “Rvs”, a third to
turn all off. Press the main PLAY/PAUSE to toggle on/off.
Button Cycle; Dump -> Rvs -> All Off.