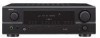
Denon DRA-297 Owners Manual - English
Denon DRA-297 - AV Receiver Manual
 |
UPC - 081757507356
View all Denon DRA-297 manuals
Add to My Manuals
Save this manual to your list of manuals |
Denon DRA-297 manual content summary:
- Denon DRA-297 | Owners Manual - English - Page 1
AM-FM STEREO RECEIVER DRA-297 OPERATING INSTRUCTIONS MODE D'EMPLOI - Denon DRA-297 | Owners Manual - English - Page 2
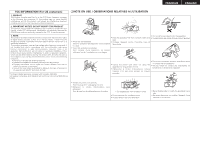
instructions work by a qualified technician to restore the product to its normal operation, e) If the product has been dropped or damaged in any way, and f) When the product exhibits a distinct change in performance - this indicates a need for service. 22. Replacement Parts - When replacement parts - Denon DRA-297 | Owners Manual - English - Page 3
received, including interference that may cause undesired operation. 2. IMPORTANT NOTICE: DO NOT MODIFY THIS PRODUCT This product, when installed as indicated in the instructions contained in this manual, meets FCC requirements. Modification not expressly approved by DENON -003 du Canada. ¢NOTE ON - Denon DRA-297 | Owners Manual - English - Page 4
DENON DRA-297 AM-FM Stereo Receiver. This remarkable component has been engineered to provide outstanding high fidelity reproduction of your favorite music sources. As this product is provided with an immense array of features, we recommend that before you begin hookup and operation that you review - Denon DRA-297 | Owners Manual - English - Page 5
Accessories Before using Cautions on installation Check that the following parts are attached in addition to the main unit: q Operating instructions 1 w Warranty (for North America model only 1 e Service station list 1 r Remote control unit (RC-1053 1 t R6P/AA batteries 2 y AM loop antenna - Denon DRA-297 | Owners Manual - English - Page 6
control unit Operating range of the remote control unit In addition to controlling the DRA-297, the attached remote control unit (RC-1053) can also be used to control the following products: q DENON component products w Component products other than DENON: • Set using the preset memory function - Denon DRA-297 | Owners Manual - English - Page 7
parts, refer to the pages given in parentheses ( ). Front panel Display displayed at w. w Information display e Volume indicator This displays the volume level. r STEREO indicator This lights when an FM stereo broadcast has been received Display @4 PRESET buttons 14) @5 MEMORY button 14) @6 Remote - Denon DRA-297 | Owners Manual - English - Page 8
PRE OUT terminal 11) e AUDIO IN terminals 8) r PRE OUT terminals 11) t VIDEO IN terminals 8) y Speaker terminals 7) u AC outlets 11) i Power supply cord 11) o VIDEO OUT terminals 8) !0 DOCK CONTROL jack 10) !1 XM terminal 10) !2 ANTENNA terminals 9) !3 REMOTE CONTROL jacks 11) System - Denon DRA-297 | Owners Manual - English - Page 9
following optional connection cables (not supplied). Audio cable A Analog connections (Stereo) Signal direction Audio signal (White) (Red) L have been completed. • When making connections, also refer to the operating instructions of the other components. • Be sure to connect the left and right - Denon DRA-297 | Owners Manual - English - Page 10
no problems with the wiring or the ventilation around the unit, switch off the power and contact a DENON service center. Connecting banana plugs Turn clockwise to tighten, then insert the banana plug. Connections ¢ Connections • When making connections, also refer to the operating instructions of - Denon DRA-297 | Owners Manual - English - Page 11
Connections Connecting a DVD player and monitor Connecting a CD player Monitor D VIDEO IN A DVD player D L VIDEO R OUT A AUDIO OUT L L L R R R • Connect a non-DVD video disc player (such as a laser disc, VCD/SVCD, or future high definition disc player) to the DVD/VDP terminals in - Denon DRA-297 | Owners Manual - English - Page 12
AUDIO OUT L L L R R R A AUDIO IN L L L R R R Connecting the antenna terminals An F-type FM antenna cable plug can be connected directly. Direction of broadcasting station FM the AM loop antenna lead terminals do not touch metal parts of the panel. Note to CATV system installer: This - Denon DRA-297 | Owners Manual - English - Page 13
-1R, sold separately) and the DOCK CONTROL jack on the DRA-297 with a mini-jack and assign the iPod to any AUDIO terminal(s). The diagram below shows an example of connections for when the iPod is assigned to the CD-R/TAPE terminals. For instructions on assigning the iPod to a specific terminal, see - Denon DRA-297 | Owners Manual - English - Page 14
remote control unit RCR-C6-16177InInffrraarreedd sseennssoor r + + AUX OUT Ouuttppuut t IInnppuutt InfrareRdRCCre--6t6r1a1n66smitter Infrared retransmitter Extension terminals for future use. NOTE: • For instructions . • Only use the AC OUTLETS for audio equipment. Never use it for hair driers, - Denon DRA-297 | Owners Manual - English - Page 15
Turning the sound off temporarily "A". 3 Set [MODE SELECTOR 2] to "CD/iPod". 4 Press or [POWER ON instructions, refer to the component's manual displayed on the volume level display. About the button names in this explanation < > : Buttons on the main unit [ ] : Buttons on the remote - Denon DRA-297 | Owners Manual - English - Page 16
SHIFT [FM/AM] [CHANNEL] Press DIMMER. The brightness of the display can be adjusted in three steps. The display can also reproduces the sound with extremely high quality. The display that could affect the audio signals are turned remote control unit Button name only : Buttons on the main unit and - Denon DRA-297 | Owners Manual - English - Page 17
mode. Check that the display's "AUTO" indicator turns off. 4 Press TUNING. The frequency changes continuously when the button is held in. • When the manual tuning mode is set, FM stereo broadcasts are received in monaural and the "STEREO" indicator turns off. • "AM" or "FM" can be selected directly - Denon DRA-297 | Owners Manual - English - Page 18
property of their respective owners. ¢ XM READY® SUBSCRIPTIONS Once you have installed the XM Mini-Tuner Dock, inserted the XM Mini-Tuner, connected the XM Dock to your XM Ready® home audio system, and installed the antenna, you are ready to subscribe and begin receiving XM programming. There are - Denon DRA-297 | Owners Manual - English - Page 19
, V.A, CDR, CD: When using a Control Dock for iPod, it is possible to connect with the audio input terminal of the assigned function. 3 Press ENTER. Category search (Remote control unit) 1 Press [F G] in the XM mode. • The current category name is displayed. CAT: Rock Channel category 2 Press - Denon DRA-297 | Owners Manual - English - Page 20
1 Connect the DRA-297 and iPod using the Control Dock for iPod (ASD-1R) ( page 10). 2 Assign the input terminal at "Setting the iPod Assignment" ( page 16). 3 Use INPUT SELECTOR to select the function assigned in step 2. • Display "Remote iPod" on the main unit's display. Remote iPod If the screens - Denon DRA-297 | Owners Manual - English - Page 21
procedure to view photo and video data stored on the iPod on a monitor. 1 Press MODE for at least 2 seconds to switch from the Browse mode to the Remote mode. • "Remote iPod" is displayed on the DRA-297's display. 2 Watching the iPod's screen, press [D H] to select "Photos" or "Video", then press - Denon DRA-297 | Owners Manual - English - Page 22
[TV POWER ON] Operating DENON audio components 1 Set [MODE SELECTOR 1] to "A" or "B". 2 Set [MODE SELECTOR 2] to the position for the component to be operated. 3 Operate the audio component. For details, refer to the component's operating instructions. While this remote control is compatible with - Denon DRA-297 | Owners Manual - English - Page 23
, refer to the component's operating instructions. Some models cannot be operated with this remote control unit. [POWER OFF] [2], [1], [3], [6 7], [VCR CH + -], [8 9], [0], [SKIP +] [MODE SELECTOR 1] ENGLISH Operating the remote control unit [POWER ON] [CHANNEL + -] [TOP MENU], [DISPLAY], [ENTER - Denon DRA-297 | Owners Manual - English - Page 24
remote control unit ¢ Functions of buttons for the different devices [Front] Device operated MODE SELECTOR 1 MODE SELECTOR 2 OFF ON CHANNEL - CHANNEL + 1 2 3, A/B 0, SKIP + 6 7 8, VCR CH - 9, VCR CH + MENU DHFG DIMMER ENTER STATUS VIDEO SELECT PURE DIRECT CD player or iPod CD/iPod Display Display - Denon DRA-297 | Owners Manual - English - Page 25
Operating the remote control unit [Rear] Device operated CD player or iPod MODE SELECTOR 1 MODE SELECTOR 2 CD/iPod POWER Power on/off NUMBER (0 ~ 9, +10) Channels BAND FM/AM/XM switching A, AUDIO Memory block B, SUBTITLE Memory block C, ANGLE Memory block D, PICT ADJ. Memory block - Denon DRA-297 | Owners Manual - English - Page 26
ENGLISH Operating the remote control unit [MODE SELECTOR 1] [A] [MODE SELECTOR 2] Setting the punch through function "Punch Through" is a function allowing you to operate 1, 2, to set. No. CD 1 DVD/VDP 2 TAPE/CD-R/MD 3 VCR 4 No setting 0 Operating the remote control unit 23 ENGLISH - Denon DRA-297 | Owners Manual - English - Page 27
malfunctioning. • Turn off the power and contact a 7 DENON customer service center. • DRA-297's XM connectors and the • Check that the connection are XM Mini-Tuner and Home Dock is not correct. properly connected. 10, 15 • The signal cannot be received. • Reposition your XM Mini-Tuner and 15 - Denon DRA-297 | Owners Manual - English - Page 28
and impedance: Frequency response: 1 Vp-p, 75 Ω/ohms 5 Hz ~ 10 MHz - +1, -3 dB ¢ Tuner section Receiving Range: Usable Sensitivity: 50 dB Quieting Sensitivity: S/N (IHF-A): Total Harmonic Distortion (at 1 kHz): [FM] (note: µV at 75 Ω/ohms, 0 dBf = 1 x 10-15 W) 87.5 MHz ~ 107.9 MHz 1.0 µV (11 - Denon DRA-297 | Owners Manual - English - Page 29
Denon Aiwa Hitachi JVC Konka Magnavox Mitsubishi Panasonic Philips Pioneer Sanyo Sony Toshiba Zenith VDP Denon , 083, 084 055 009 ASA Asha Audio Dynamic Audiovox Beaumark Broksonic Calix Candle Canon Capehart 088 Grundig 087 Harley Davidson 086, 093 Harman Kardon 088 Hi-Q 006, 087, 088, 089 - Denon DRA-297 | Owners Manual - English - Page 30
ENGLISH FRANCAIS Radix Randex RCA Realistic Ricoh Salora Samsung Sanky Sansui Sanyo SBR Scott Sears Sentra Sharp Shogun Sony STS Sylvania Symphonic Tandy Tashiko Tatung Teac 088 088 007, 013, 019, 023, 058, 063, 064, 065, 073, 080, 082, 087 009, 021, 031, 033, 049, 053, 081, 087, 088, 091, 094, - Denon DRA-297 | Owners Manual - English - Page 31
, 009, 017, 036, 037, 071, 141, 143, 147 005, 010, 030, 050, 051, 056, 079, 085, 127, 131, 132, 145, 147 Philips Pioneer Portland Price Club Proscan Proton Pulsar Quasar Radio Shack RCA Realistic Saisho Samsung Sansui Sanyo SBR Schneider Scott Sears Sharp Siemens Signature Simpson Sony Soundesign - Denon DRA-297 | Owners Manual - English - Page 32
012, 013, 014, 017 Magnavox Marantz MCS Onkyo Optimus Philips Pioneer Sears Sony Teac Technics Wards Yamaha Zenith CDR Denon Philips MD Denon Kenwood Onkyo Sharp Sony TAPE Denon Aiwa Carver Harman/Kardon JVC Kenwood Magnavox Marantz Onkyo 006, 015, 035 016, 028, 035 016, 024 025, 027 017, 020, 021 - Denon DRA-297 | Owners Manual - English - Page 33
TOKYO, JAPAN www.denon.com Denon Brand Company, D&M Holdings Inc. Printed in China 00D 511 4540 105
-
 1
1 -
 2
2 -
 3
3 -
 4
4 -
 5
5 -
 6
6 -
 7
7 -
8
-
9
-
10
-
11
-
12
-
13
-
14
-
15
-
16
-
17
-
18
-
19
-
20
-
21
-
22
-
23
-
24
-
25
-
26
-
27
-
28
-
29
-
30
-
31
-
32
-
33
 |
 |

AM-FM STEREO RECEIVER
DRA-297
OPERATING INSTRUCTIONS
MODE D’EMPLOI