Dewalt D28112 Instruction Manual
Dewalt D28112 Manual
 |
View all Dewalt D28112 manuals
Add to My Manuals
Save this manual to your list of manuals |
Dewalt D28112 manual content summary:
- Dewalt D28112 | Instruction Manual - Page 1
1-800-4-DEWALT • www.dewalt.com INSTRUCTION MANUAL GUIDE D'UTILISATION MANUAL DE INSTRUCCIONES INSTRUCTIVO DE OPERACIÓN, CENTROS DE SERVICIO Y PÓLIZA DE GARANTÍA. ADVERTENCIA: LÉASE ESTE INSTRUCTIVO ANTES DE USAR EL PRODUCTO. D28110, D28112, D28402, D28402N Heavy-Duty Small Angle Grinder Petites - Dewalt D28112 | Instruction Manual - Page 2
away from heat, oil, sharp edges or moving parts. Replace damaged cords immediately. Damaged cords increase the risk of electric shock. • When operating a power tool outside, use an outdoor extension cord marked "W-A" or "W." These cords are rated for outdoor use and reduce the risk of electric - Dewalt D28112 | Instruction Manual - Page 3
replacement parts. Follow instructions in the Maintenance section of this manual. Use of unauthorized parts or failure to follow maintenance instructions may create a risk of electric shock or injury. Additional Specific Safety Instructions for Grinders • Check that the grinding wheel backing flange - Dewalt D28112 | Instruction Manual - Page 4
cord. Contact with a "live" wire will make exposed metal parts of the tool "live" and shock the operator. • Do not use Type 11 (flaring cup) wheels on this tool. Using inappropriate accessories the tool with a new or replacement wheel, or a new or replacement wire brush installed, hold the tool in a - Dewalt D28112 | Instruction Manual - Page 5
Switch H. Threaded Clamp Nut (D28402, D28402N) I. Guard B. Lock-Off Lever J. Lock On Button (D28402) C. Spindle Lock Button K. Dust Ejection System D. Spindle (not shown) (DES) E. Side Handle L. Slider Switch (D28110, F. 4-1/2" Grinding Wheel D28112) G. Anti-Lockup Backing Flange - Dewalt D28112 | Instruction Manual - Page 6
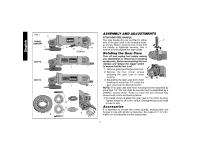
brush, motor and bearing failure. 3. Re-install screws to attach the gear case to the motor housing. Tighten screws to 18 in./lbs. torque. Overtightening could cause screws to strip. Accessories It is important to choose the correct guards, backing pads and flanges to use with grinder accessories - Dewalt D28112 | Instruction Manual - Page 7
4-1/2" Grinding Wheels Wire Wheels English Type 27 guard Type 27 guard Type 27 guard Type 27 guard backing flange Type 27 hubbed wheel 3" wire cup brush 4" wire wheel Type 27 depressed center wheel threaded clamp nut WARNING: Accessories must be rated for at least the speed recommended on - Dewalt D28112 | Instruction Manual - Page 8
spindle and the operator to provide maximum operator protection. rubber backing pad sanding disc threaded clamp nut Type 27 guard hubbed sanding flap disc Type 27 guard backing flange non-hubbed sanding flap disc threaded clamp nut 4. Close the guard latch to secure the guard on the gear case - Dewalt D28112 | Instruction Manual - Page 9
not use tool and take the tool and guard to a service center to repair or replace the guard. MOUNTING AND REMOVING GUARD (D28110) O N 1. Loosen screw. Align the lugs (N) on the guard with slots (O) on the gear case. 2. Push the guard down until the guard lug engages and rotates freely in the - Dewalt D28112 | Instruction Manual - Page 10
threaded spindle. Thread of accessory must match thread of spindle. 1. Backing flange is retained to the grinder by an O-ring on the spindle. Remove backing flange by pulling and twisting flange away form the machine. 2. Thread the wheel on the spindle by hand. 3. Depress the spindle lock button and - Dewalt D28112 | Instruction Manual - Page 11
(pilot) is not against the wheel. 4. While depressing the spindle lock button, tighten the clamp nut with a wrench. Backing Flange 5. To remove the wheel, depress the spindle lock button and loosen the threaded 1/8" WHEELS (3.31mm) clamp nut with a wrench. NOTE: If the wheel spins after the - Dewalt D28112 | Instruction Manual - Page 12
hub on the clamp nut into the center of sanding disc and backing pad. 4. Tighten the clamp nut by hand. Then depress the spindle lock button while Q turning the sanding disc until the sanding disc and clamp nut are snug. 5. To remove the wheel, grasp and turn the backing pad and sanding pad - Dewalt D28112 | Instruction Manual - Page 13
or removing or installing attachments or accessories. Before reconnecting the tool, turn the switch on and off as previously described to ensure that the tool is off. 1. Thread the wheel on the spindle by hand. 2. Depress spindle lock button and use a wrench on the hub of the wire wheel or brush to - Dewalt D28112 | Instruction Manual - Page 14
. 2. Place the wheel on the backing flange, centering the wheel on the raised section (pilot). 3. Install the threaded clamp nut with the raised section (pilot) facing away from the wheel. 4. Depress the spindle lock button and tighten clamp nut with a wrench. 5. To remove the wheel, grasp and turn - Dewalt D28112 | Instruction Manual - Page 15
product SAFETY and RELIABILITY, repairs, maintenance and adjustments should be performed by a DEWALT factory service center, a DEWALT authorized service center or other qualified service personnel. Always use identical replacement parts. Accessories Recommended accessories for use with your tool - Dewalt D28112 | Instruction Manual - Page 16
warranty, DEWALT tools are covered by our: 1 YEAR FREE SERVICE DEWALT will maintain the tool and replace worn parts caused by normal use, for free, any time during the first year after purchase. 90 DAY MONEY BACK GUARANTEE If you are not completely satisfied with the performance of your DEWALT Power - Dewalt D28112 | Instruction Manual - Page 17
NOUS FAIRE PART DE VOS COMMENTAIRES CONCERNANT CET OUTIL OU TOUT AUTRE OUTIL DEWALT, COMPOSEZ SANS FRAIS LE : 1 800 433-9258. (1-800-4-DEWALT). Rè , on ne doit utiliser que des rallonges conçues pour cet usage, comme celles de type « W-A » ou « W », afin de réduire les risques de choc électrique. - Dewalt D28112 | Instruction Manual - Page 18
Français inférieur entraînera une chute de tension se traduisant par une perte de puissance et une surchauffe. Le tableau ci-dessous illustre les calibres que l'on doit utiliser selon la longueur de la rallonge et l'intensité nominale indiquée sur la plaque signalé- tique. En cas de doute, - Dewalt D28112 | Instruction Manual - Page 19
les directives précisées à la section « Entretien » du présent guide afin de prévenir les risques de choc électrique ou de blessure. Directives opérateur recevra une décharge électrique. • Ne pas utiliser les meules de type 11 (boisseau conique) sur cet outil. Ne pas utiliser les bons accessoires - Dewalt D28112 | Instruction Manual - Page 20
Français tourner pendant une minute. Si la meule présente une fissure ou un défaut non détecté, elle éclatera en moins d'une minute. Si la brosse métallique présente des broches métalliques mal fixées, les broches seront détectées. Ne jamais démarrer l'outil si une personne se trouve dans la - Dewalt D28112 | Instruction Manual - Page 21
la meule. Les grands panneaux ont tendance à s'affaisser sous leur poids. Il faut placer le support sous le panneau, des deux côtés, près du trait de coupe et près du bord du les parties exposées du FIG. 1 C D28402 D28402N F D28110 D28112 S 20 IA B J K (D28402) L L K G H K Français - Dewalt D28112 | Instruction Manual - Page 22
(fig. 1) A. Interrupteur à palette (D28402, D28402N) B. Levier d'arrêt C. Bouton de ˚ de l'outil. 2. Enlever les quatre vis d'angle fixant le carter d'engrenages au boîtier du moteur tre réparé et remonté dans un centre de service DEWALT pour éviter d'endommager les brosses, le moteur et - Dewalt D28112 | Instruction Manual - Page 23
dispositif de protection MONTAGE ET DÉPOSE DU DISPOSITIF DE PROTECTION (D28112, D28402, D28402N) MISE EN GARDE : Arrêter et débrancher l'outil avant d' DEWALT sont pourvus d'un dispositif de protection prévu pour une utilisation avec des meules à moyeu déporté (type 27) et les meules sur moyeu (type - Dewalt D28112 | Instruction Manual - Page 24
po Brosses métalliques à touret Français Dispositif de protection de type 27 Dispositif de protection de type 27 Dispositif de protection de type 27 Dispositif de protection de type 27 Bride tournante sur collet battu Meule à moyeu de type 27 Brosse métallique forme coupelle de 3 po Brosse - Dewalt D28112 | Instruction Manual - Page 25
23-24 pour connaître les bons accessoires. REMARQUE : Le meulage de bordure et la coupe peuvent être réalisés au moyen de meules de type 27 conçues à cet effet. Écrou de serrage fileté AVERTISSEMENT : Les accessoires doivent être classés au moins pour la vitesse recommandée indiquée sur l'étiquette - Dewalt D28112 | Instruction Manual - Page 26
la pièce. Soulever l'outil de la surface avant de l'éteindre. Attendre que l'outil cesse de tourner avant de le poser à plat. INTERRUPTEUR À PALETTE (D28402 D28402N) MISE EN GARDE : Avant de brancher l'outil à la source d'alimentation, enfoncer et relâcher l'interrupteur à palette (A) une fois - Dewalt D28112 | Instruction Manual - Page 27
rebrancher l'outil, l'allumer et l'éteindre selon les indications données précédemment pour s'assurer que l'outil est éteint. Les meules à moyeu déporté de type 27 G doivent être utilisées avec les brides incluses. Se reporter à la page 22 du présent mode d'emploi pour en savoir plus. 1. Poser - Dewalt D28112 | Instruction Manual - Page 28
çonnage ou de meulage profond. Afin de réduire le risque de blessure grave, restreindre l'utilisation de ces meules avec un dispositif de protection de type 27, ce qui assure une coupe et un entaillage peu profond (moins de 1/2 po de profondeur). Le côté ouvert du dispositif de protection doit être - Dewalt D28112 | Instruction Manual - Page 29
qui permet à l'outil de fonctionner à une vitesse élevée. La vitesse de ponçage est supérieure lorsque l'outil fonctionne à une vitesse élevée. 3. Maintenir un angle de 5˚ à 10˚ entre l'outil et la surface de la pièce. 4. Déplacer constamment l'outil vers l'avant et l'arrière pour éviter de cr - Dewalt D28112 | Instruction Manual - Page 30
qui permet à l'outil de fonctionner à une vitesse élevée. La vitesse de ponçage est supérieure lorsque l'outil fonctionne à une vitesse élevée. 3. Maintenir un angle de 5˚ à 15˚ entre l'outil et la surface de la pièce. Le disque de ponçage doit entrer en contact avec environ 1 po de surface - Dewalt D28112 | Instruction Manual - Page 31
déplacer soudainement et vivement. Montage et utilisation de meules de coupe (type 1) Les meules de coupe incluent les meules au tranchant de diamant page 23 pour en savoir plus. MONTAGE D'UN DISPOSITIF DE PROTECTION FERMÉ (TYPE 1) MISE EN GARDE : Arrêter et débrancher l'outil avant d'effectuer - Dewalt D28112 | Instruction Manual - Page 32
fonctionne à une vitesse élevée. 3. Lorsqu'une coupe est engagée et qu'une encoche est réalisée dans la pièce, ne pas modifier l'angle de coupe. Le fait de modifier l'angle risque de faire plier la meule, ce qui peut la briser. 4. Retirer l'outil de la surface de la pièce avant de - Dewalt D28112 | Instruction Manual - Page 33
recommandés pour cet outil sont vendus séparément chez les dépositaires locaux ou dans les centres de service autorisés. Pour obtenir plus d'information sur les accessoires, communiquer avec DEWALT Industrial Tool Co., 701 East Joppa Road, Baltimore, MD 21286, aux États-Unis; composer le 1 (800 - Dewalt D28112 | Instruction Manual - Page 34
Instrucciones de seguridad generales ¡ADVERTENCIA! Lea todas las instrucciones hasta comprenderlas. No ajustarse a las instrucciones siguientes puede ser causa de choque eléctrico, incendio o lesiones graves. CONSERVE ESTAS INSTRUCCIONES ÁREA DE TRABAJO • Mantenga el área de trabajo limpia y bien - Dewalt D28112 | Instruction Manual - Page 35
,2-30,4 30,4-60,9 60,9-91,4 Amperaje Más No más Calibre del cordón AWG de de 0 - 6 18 16 16 14 6 - los guantes apartados de las piezas en movimiento. Las partes móviles pueden atrapar las prendas de vestir sueltas, las . • Cuando no las utilice, guarde las herramientas fuera del alcance de - Dewalt D28112 | Instruction Manual - Page 36
cable. El contacto con un cable con "corriente eléctrica" hará que las partes metálicas expuestas de la herramienta tengan "corriente eléctrica" y el operador sufra • No se recomienda el uso de accesorios no especificados en este manual, que constituyen un riesgo. El uso de elevadores de tensión que - Dewalt D28112 | Instruction Manual - Page 37
herramienta con frecuencia, especialmente después de un uso intensivo. A menudo se acumulan sobre las superficies interiores polvo y suciedad que contienen partículas metálicas, que pueden provocar riesgo de descarga eléctrica. • DNo haga funcionar esta herramienta durante períodos prolongados. La - Dewalt D28112 | Instruction Manual - Page 38
Español FIG. 1 C D28402 D28402N F D28110 D28112 S IA B J K (D28402) L L K G H K • Sujete los paneles grandes para lados, cerca de la línea de corte y cerca del borde del panel. ADVERTENCIA: Parte del polvo generado al lijar, serrar, esmerilar y taladrar con máquinas herramienta, así - Dewalt D28112 | Instruction Manual - Page 39
D28402, D28402N) I. Protector B. Palanca de bloqueo J. Botón de bloqueo (D28402N o remover cualquier ˚ 2. Enlever les quatre vis d'angle fixant le 90˚ carter d'engrenages un centro de servicio DEWALT. El no darle el manual. La velocidad nominal de los accesorios debe ser superior a Español 38 - Dewalt D28112 | Instruction Manual - Page 40
REMOCIÓN DEL PROTECTOR (D28112, D28402, D28402N) PRECAUCIÓN: Apague y desenchufe lija con discos para lijar con- vencionales. Algunos modelos DEWALT se proveen con un protec- tor diseñado para engranajes. No se debe poder girar el protector manual- mente cuando el cerrojo está cerrado. No haga - Dewalt D28112 | Instruction Manual - Page 41
Discos de esmerilar de 4-1/2" Discos de alambre Protector tipo 27 Protector tipo 27 Protector tipo 27 Protector tipo 27 Brida de respaldo Disco con cubo tipo 27 Cepillo de alambre con forma de copa de 3" Disco de alambre de 4" Disco con centro hundido tipo 27 Tuerca de fijación roscada 3. - Dewalt D28112 | Instruction Manual - Page 42
sobre una superficie. Tuerca de fijación roscada INTERRUPTOR DE PALETA (D28402, D28402N) PRECAUCIÓN: Antes de conectar la herramienta a una fuente de energ ía, oprima y suelte el interruptor de paleta (A) una vez [D28402: sin oprimir el botón de bloqueo (J)] para asegurarse de que el - Dewalt D28112 | Instruction Manual - Page 43
del interruptor hacia adentro. Para apagar la her- ramienta mientras funciona en modo continuo, oprima la parte posterior del interruptor y suéltelo. BOTÓN DE BLOQUEO (D28402) El botón de bloqueo (J) ofrece mayor comodidad para usos más prolonga- dos. Para bloquear la herramienta, empuje - Dewalt D28112 | Instruction Manual - Page 44
de centro G hundido Tipo 27 se deben utilizar con las bridas provistas. Consulte la página 39 de este manual por más información. 1. Instale la brida de respaldo no roscada D (G) en el eje (D) con la parte elevada (piloto) contra el disco. Hale y gire de la brida antes de colocar el disco para - Dewalt D28112 | Instruction Manual - Page 45
que la herramienta funcione a alta velocidad. La velocidad de esmerilado es mayor cuando la herramienta opera a alta velocidad. 3. Ubíquese de manera que la parte inferior abierta del disco esté en dirección opuesta a usted. 4. Una vez que se comienza un corte y se realiza una muesca en el trabajo - Dewalt D28112 | Instruction Manual - Page 46
o accesorios. Antes de reconectar la herramienta, encienda y apague el interruptor como se describió previamente para asegurarse de que la herramienta esté apagada. PRECAUCIÓN: Después de terminar de usar la herramienta para lijar, se debe reinstalar el protector correcto para el disco de - Dewalt D28112 | Instruction Manual - Page 47
PRECAUCIÓN: El disco o el cepillo no deben tocar el protector cuando se los ensambla ni cuando están en uso. Puede provocar un daño indetectable al accesorio, haciendo que los alambres se desprendan del disco o el cubo del accesorio. MONTAJE DE CEPILLOS DE ALAMBRE CON FORMA DE COPA Y DISCOS DE - Dewalt D28112 | Instruction Manual - Page 48
MONTAJE DEL PROTECTOR CERRADO (TIPO 1) PRECAUCIÓN: Apague y desenchufe la herramienta antes de realizar cualquier ajuste o de retirar o instalar suplementos o accesorios. Antes de reconectar la herramienta, encienda y apague el interruptor como se describió previamente para asegurarse de que la - Dewalt D28112 | Instruction Manual - Page 49
herramienta. PRECAUCIÓN: Nunca utilice solventes u otros químicos abrasivos para limpiar las partes no metálicas de la herramienta. Use únicamente una tela limpia y seca. Lubricación Las herramientas DEWALT son lubricadas apropiadamente en fábrica y están listas para usar. Reparaciones Para asegurar - Dewalt D28112 | Instruction Manual - Page 50
servicio autorizados y franquiciados en la República Mexicana, donde podrá hacer efectiva su garantía y adquirir partes, refacciones y accesorios originales. Garantía limitada por tres años DEWALT reparará, sin cargo, cualquier falla que surja de defectos en el material o la fabricación del producto - Dewalt D28112 | Instruction Manual - Page 51
IMPORTADOR: DEWALT S.A. DE C.V. BOSQUES DE CIDROS ACCESO RADIATAS NO. 42 COL. BOSQUES DE LAS LOMAS, 3A. SECCIÓN, CP 05120 DELEGACIÓN CUAJIMALPA, MÉXICO, D.F TEL. 5 326 7100 R.F.C.: BDE810626-1W7 - Dewalt D28112 | Instruction Manual - Page 52
Tool Co., 701 East Joppa Road, Baltimore, MD 21286 (MAR06) Form No. 641881-00 D28110, D28112, D28402, D28402N Copyright © 2005, 2006 DEWALT The following are trademarks for one or more DEWALT power tools: the yellow and black color scheme; the "D" shaped air intake grill; the array of pyramids on
-
 1
1 -
 2
2 -
 3
3 -
 4
4 -
 5
5 -
 6
6 -
 7
7 -
8
-
9
-
10
-
11
-
12
-
13
-
14
-
15
-
16
-
17
-
18
-
19
-
20
-
21
-
22
-
23
-
24
-
25
-
26
-
27
-
28
-
29
-
30
-
31
-
32
-
33
-
34
-
35
-
36
-
37
-
38
-
39
-
40
-
41
-
42
-
43
-
44
-
45
-
46
-
47
-
48
-
49
-
50
-
51
-
52
 |
 |

D28110, D28112, D28402, D28402N
Heavy-Duty Small Angle Grinder
Petites meuleuses angulaires de service intensif
Esmeriladoras angulares pequeñas para trabajo pesado
INSTRUCTION MANUAL
GUIDE D'UTILISATION
MANUAL DE INSTRUCCIONES
INSTRUCTIVO DE OPERACIÓN, CENTROS DE SERVICIO Y PÓLIZA
DE GARANTÍA.
ADVERTENCIA:
LÉASE ESTE INSTRUCTIVO
ANTES DE USAR EL PRODUCTO.
If you have questions or comments, contact us.
Pour toute question ou tout commentaire, nous contacter.
Si tiene dudas o comentarios, contáctenos.
1-800-4-D
E
WALT • www.dewalt.com