Dewalt DW718 Instruction Manual
Dewalt DW718 Manual
 |
View all Dewalt DW718 manuals
Add to My Manuals
Save this manual to your list of manuals |
Dewalt DW718 manual content summary:
- Dewalt DW718 | Instruction Manual
- Page 1
ctenos. 1-800-4-DEWALT • www.dewalt.com INSTRUCTION MANUAL GUIDE D'UTILISATION MANUAL DE INSTRUCCIONES INSTRUCTIVO DE OPERACIÓN, CENTROS DE SERVICIO Y PÓLIZA DE GARANTÍA. ADVERTENCIA: LÉASE ESTE INSTRUCTIVO ANTES DE USAR EL PRODUCTO. DW7187 Miter Saw Laser System Système laser pour scie à onglets - Dewalt DW718 | Instruction Manual
- Page 2
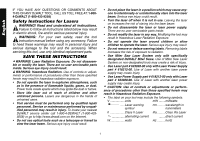
, read the tool instruction manual before using any accessory. Failure to heed these warnings may result in personal injury and serious damage to the tool and the accessory. When servicing this tool, use only identical replacement parts. SAVE THESE INSTRUCTIONS WARNING! Laser Radiation Exposure. Do - Dewalt DW718 | Instruction Manual
- Page 3
dated July 26, 2001. Installation of Miter Saw Laser System WARNING: Read all instructions for the Installation of Laser Power Supply and the Installation of Laser before proceeding with the Installation of the Miter Saw Laser System. INSTALLATION OF LASER POWER SUPPLY (LPS) WARNING: Disconnect the - Dewalt DW718 | Instruction Manual
- Page 4
Save the screws to assemble the laser in Step 4. Retain the cover for future use if laser is removed. Rotate the guard to provide access to screws. A 3. Tuck the wire connection into the area in the laser as shown. Attach the laser to the saw. 4. Attach the laser with the screws removed in Step - Dewalt DW718 | Instruction Manual
- Page 5
with an ON/OFF switch (B). The Miter Saw Laser System is independent of the machine's trigger switch. Compound Miter and Sliding Miter Saws LASER ADJUSTMENT 1. Set the miter saw to 0˚ miter and 0˚ bevel. Cut the end of a board up to 6" (152mm) wide to make end of board square with fence. NOTE - Dewalt DW718 | Instruction Manual
- Page 6
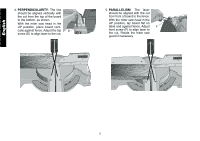
to align laser to the cut. 5. PARALLELISM: The laser should be aligned with the cut from front of board to the fence. With the miter saw head in the UP position, lay board flat on table and against fence. Adjust F front screw (F) to align laser to the cut. Rotate the miter saw guard if necessary - Dewalt DW718 | Instruction Manual
- Page 7
Through the access hole in the lower guard, rotate the miter saw guard if necessary, adjust side screw (G) to align laser to the edge of the board. When adjusting the laser to the right of blade, apply a continuous force to the hex wrench while making adjustment to maintain contact with screw until - Dewalt DW718 | Instruction Manual
- Page 8
• Avoid touching any sharp points of the blade with your hands or fingers. • Dust build-up can block the laser and prevent it from accurately indicating the line of cut. • Follow miters saw's instruction manual to remove and install blade. • With blade removed from saw, clean pitch and build-up from - Dewalt DW718 | Instruction Manual
- Page 9
1-800-4-DEWALT for a free replacement. Troubleshooting Guide Laser line moves from side to side during chopping motion. See Laser Adjustment Step 4 or Step 7. Laser line is not parallel to line at 0˚ miter. See Laser Adjustment Step 5 or Step 8. A reflection of the laser appears on the blade - Dewalt DW718 | Instruction Manual
- Page 10
TOUT AUTRE OUTIL DEWALT, APPELEZ-NOUS SANS FRAIS AU NUMÉRO SUIVANT : 1 (800) 4-DEWALT (1-800-433-9258) Directives de sécurité pour lasers AVERTISSEMENT ! érience. Les lasers sont dangereux entre les mains d'utilisateurs inexpérimentés. • La réparation de l'outil doit être exécutée uniquement par - Dewalt DW718 | Instruction Manual
- Page 11
symboles suivants. V volts mW ........milliwatts ......Symbole de mise nm ..........longueur d'onde en garde du laser en nanomètre II Laser classe II IIIa ..........Laser classe IIIa courant alternatif ........courant continu W watts Hz ..........hertz ÉTIQUETTES DE MISE EN GARDE - Dewalt DW718 | Instruction Manual
- Page 12
Français 2. Fixez les connexions au bloc d'alimentation du laser. INSTALLATION DU LASER 1. Enlevez les quatre vis (A). Conservez les vis pour assembler le laser à l'étape 4. Conservez le couvercle pour un usage ultérieur si le laser est enlevé. Tournez le pare-main pour accéder aux vis. A 3. - Dewalt DW718 | Instruction Manual
- Page 13
laser pour scie à onglets AVERTISSEMENT : Lisez toutes les directives d'installation du bloc B d'alimentation et du laser avant d'utiliser le système au laser laser pour scie à onglets est pourvu d'un interrupteur marche/arrêt (ON/OFF) (B). Le système au laser LASER allumer le laser, enfoncer l' - Dewalt DW718 | Instruction Manual
- Page 14
être aligné avec la coupe, de l'avant de la planche au guide. La tête de la scie à onglets se trouvant en haut, poser la planche à plat sur la table et F contre le guide. Régler la vis avant (F) pour aligner le laser avec la coupe. Tourner le pare-main de la scie à onglets s'il y a lieu - Dewalt DW718 | Instruction Manual
- Page 15
contact avec la vis jusqu'à ce que le réglage soit terminé. G Le laser doit être aligné avec le bord de la planche. Refaire les étapes 4-6 l'onglet 0˚ et au biseau 0˚. b. Tournez la vis avant (F) pour régler la raie laser en parallèle avec le bord de l'équerre de charpentier. F 9. Réglage du trait - Dewalt DW718 | Instruction Manual
- Page 16
- Dewalt DW718 | Instruction Manual
- Page 17
la garantie, les outils, les outils DEWALT sont couverts par notre : SERVICE D'ENTRETIEN GRATUIT D'UN AN DEWALT entretiendra l'outil et remplacera les pi rement satisfait des performances de votre outil électrique, laser ou de votre marteau-cloueur DEWALT pour quelque raison que ce soit, vous pouvez - Dewalt DW718 | Instruction Manual
- Page 18
10 de la section Réglage du laser. La raie laser n'est pas visible sur la pièce, le laser ne brille pas. Si vous travaillez par temps chaud, éteignez le laser pour le laisser refroidir. Allumez le laser. Si le laser n'est toujours pas visible, composez le 1 (800) 4-DEWALT (1 (800) 433-9258). Fran - Dewalt DW718 | Instruction Manual
- Page 19
su propia seguridad, lea el manual de instrucciones de la herramienta antes chispas que pueden encender el polvo o despedir humo. • Guarde el láser fuera del alcance de los niños y láser para sierra ingletadora sólo con las sierras ingletadoras DEWALT específicamente diseñadas para su uso. El uso del - Dewalt DW718 | Instruction Manual
- Page 20
de la fuente de alimentación. 1. Retire los dos tornillos de la empuñadura de la sierra ingletadora con la llave Torx T20 que se suministra. Guarde los tornillos para el montaje de la fuente de alimentación láser (LPS) del paso 4. Conserve la cubierta de la empuñadura para usarla en el - Dewalt DW718 | Instruction Manual
- Page 21
manera tal que la sección más ancha del conector se ubique contra la parte inferior del mango de la sierra ingletadora y encaje la LPS al mango. en el paso 1. INSTALACIÓN DEL LÁSER 1. Retire los cuatro tornillos (A). Guarde los tornillos para montar el láser en el paso 4. Conserve la cubierta para - Dewalt DW718 | Instruction Manual
- Page 22
los tornillos que se retiraron en el paso 1. NOTA: Cuanto más ancha sea la tabla, más preciso debe ser el ajuste. Utilización del sistema laser láser de la sierra ingletadora ADVERTENCIA: Lea todas las instruc- ciones brindadas en Instalación de la fuente de alimentación láser e Instalación del - Dewalt DW718 | Instruction Manual
- Page 23
4. PERPENDICULARIDAD: La línea debe estar alineada verticalmente con el corte desde la parte superior de la tabla hasta la parte inferior, como se muestra. Con la cabeza de la sierra ingletadora hacia arriba, coloque la tabla E en forma vertical contra el reborde. Ajuste el tornillo - Dewalt DW718 | Instruction Manual
- Page 24
6. RANURA FINA: Asegure el cabezal de la sierra ingletadora en la posición hacia abajo. Coloque la tabla plana sobre la mesa y contra el reborde alineando el borde de la tabla a cualquiera de los lados de la hoja (se muestra a la izquierda). A través del orificio de acceso en la guarda de seguridad - Dewalt DW718 | Instruction Manual
- Page 25
sus manos o dedos. • La acumulación de polvo puede bloquear el láser y evitar que indique con precisión la línea de corte. • Siga las instrucciones del manual de la sierra ingletadora para retirar e instalar hojas. • Una vez que ha retirado la hoja de la sierra, quite la resina y la acumulación de - Dewalt DW718 | Instruction Manual
- Page 26
la garantía e información sobre reparaciones, visite nuestra página web www.dewalt.com o dirígase al centro de servicio más cercano. Esta garantía con el rendimiento de la herramienta eléctrica, el láser o la clavadora DEWALT, no tiene más que devolver el producto dentro de los 90 días siguientes - Dewalt DW718 | Instruction Manual
- Page 27
. Si está trabajando en clima caluroso, apague el láser y permita que se enfríe. Encienda el láser. Si el láser aún no es visible, llame al 1-800-4-DEWALT (1-800-433-9258). Español 26 - Dewalt DW718 | Instruction Manual
- Page 28
Industrial Tool Co., 701 East Joppa Road, Baltimore, MD 21286 (JUL05) Form No. 629480-00 DW7187 Copyright © 2005 DEWALT The following are trademarks for one or more DEWALT power tools: the yellow and black color scheme; the "D" shaped air intake grill; the array of pyramids on the handgrip
-
 1
1 -
 2
2 -
 3
3 -
 4
4 -
 5
5 -
 6
6 -
 7
7 -
8
-
9
-
10
-
11
-
12
-
13
-
14
-
15
-
16
-
17
-
18
-
19
-
20
-
21
-
22
-
23
-
24
-
25
-
26
-
27
-
28
 |
 |

DW7187 Miter Saw Laser System
Système laser pour scie à onglets DW7187
Sistema láser para sierra ingletadora DW7187
INSTRUCTION MANUAL
GUIDE D'UTILISATION
MANUAL DE INSTRUCCIONES
INSTRUCTIVO DE OPERACIÓN, CENTROS DE SERVICIO Y PÓLIZA
DE GARANTÍA.
ADVERTENCIA:
LÉASE ESTE INSTRUCTIVO
ANTES DE USAR EL PRODUCTO.
If you have questions or comments, contact us.
Pour toute question ou tout commentaire, nous contacter.
Si tiene dudas o comentarios, contáctenos.
1-800-4-D
E
WALT • www.dewalt.com