Dewalt DWX726 Instruction Manual
Dewalt DWX726 Manual
 |
View all Dewalt DWX726 manuals
Add to My Manuals
Save this manual to your list of manuals |
Dewalt DWX726 manual content summary:
- Dewalt DWX726 | Instruction Manual - Page 1
, contáctenos. 1-800-4-DEWALT • www.dewalt.com INSTRUCTION MANUAL GUIDE D'UTILISATION MANUAL DE INSTRUCCIONES INSTRUCTIVO DE OPERACIÓN, CENTROS DE SERVICIO Y PÓLIZA DE GARANTÍA. ADVERTENCIA: LÉASE ESTE INSTRUCTIVO ANTES DE USAR EL PRODUCTO. DWX726 Rolling Miter Saw/Planer Stand Plate-forme mobile - Dewalt DWX726 | Instruction Manual - Page 2
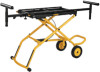
English DWX726 Universal Miter Saw/Planer Stand Components List A. Mounting rails B. Work support arm C. Storage foot D. Wheels E. Leg extension F. Vertical locking knob G. Horizontal locking knob H. Extension arm I. Handle FIG. 1 H I G H F E 2 A D B C - Dewalt DWX726 | Instruction Manual - Page 3
most miter saws and planers and to provide portability for those units, both in the field and in the shop. If you have any problem with alignment or mounting, call 1-800-4-DEWALT (1-800433-9258). SAFETY RULES WARNING: For your own safety, read the tool instruction manual before using any accessory - Dewalt DWX726 | Instruction Manual - Page 4
English Carton Contents 1 Rolling miter saw/planer stand 1 Leg extension 1 Storage foot 2 Wheel/storage foot connector (left and right) 2 Extension work support assembly 1 Handle 2 Wheel 2 Axle 2 Work support arms (1 with black cap) 1 Hardware bag: 2 Cord wrap brackets (L, R) 6 M8 x 15 mm - Dewalt DWX726 | Instruction Manual - Page 5
with curved washer (M) for later adjustment. NOTE: The screw will be tightened completely later in the assembly. 3. Attach the other wheel/storage-foot connector in the same manner. K ATTACHING THE WHEELS (FIG. 5) 1. Continuing with stand upside down, remove washer/nut (Q, R) from axle. Insert axle - Dewalt DWX726 | Instruction Manual - Page 6
with both hands. 3. Use the thumb of your left hand to push down on the red activating lever (V). 4. Lift up on the handle to release the safety mechanism, then raise or lower the stand. After raising the stand a few inches, release the red activating lever. The stand will automatically lock into - Dewalt DWX726 | Instruction Manual - Page 7
English FIG. 8 V I I V 4. Insert the assembled extension work support arm (B) with the small black cap (inset, Fig. 10) into the hole (W) of the stand closest to the red activating lever. Push the arm in to lock in place. 5. Repeat for other work support arm on opposite end. Push the arm in to - Dewalt DWX726 | Instruction Manual - Page 8
HAZARD. Refer to your tool manufacturer's instructions regarding the securing of your miter saw or planer to a stand or supporting surface. Secure the tool according to both the instructions in this manual and those in your tool manufacturer's manual before operating. Failure to heed these warnings - Dewalt DWX726 | Instruction Manual - Page 9
are assembling. NOTICE: To prevent binding and/or inaccuracy, ensure the plywood is not warped or uneven. If binding and/or inaccuracy occurs, replace the plywood with a non-warped, even piece of plywood. PRODUCT STABILITY TEST (FIG. 16-17) The rolling miter saw/planer stand is designed to be used - Dewalt DWX726 | Instruction Manual - Page 10
installing and removing accessories, before adjusting or changing use two or more people to perform the stability test or serious injury could result. WARNING: The cuttinghead MUST be raised on all miter saws, compound miter saws and sliding compound miter saws. All sliding compound miter saws - Dewalt DWX726 | Instruction Manual - Page 11
has gas assist lifting and may raise unexpectedly when lever is released. Refer to To Raise and Lower the Stand under Assembly to adjust the stand to the desired height. TO EXTEND THE EXTENSION WORK SUPPORTS (FIG. 18) 1. Turn the horizontal lock knob (G) counterclockwise. 2. Slide the extension work - Dewalt DWX726 | Instruction Manual - Page 12
may have other rights which vary in certain states or provinces. In addition to the warranty, DEWALT tools are covered by our: 1 YEAR FREE SERVICE DEWALT will maintain the tool and replace worn parts caused by normal use, for free, any time during the first year after purchase. 90 DAY MONEY BACK - Dewalt DWX726 | Instruction Manual - Page 13
English FREE WARNING LABEL REPLACEMENT: If your warning labels become illegible or are missing, call 1-800-4-DEWALT (1-800-433-9258) for a free replacement. 11 - Dewalt DWX726 | Instruction Manual - Page 14
Français Plate-forme mobile pour scie à onglet/raboteuse DWX726 Description de l'établi FIG. 1 A A. Rails de fixation B. Bras de support d'ouvrage C. Pied de rangement D. Roues H E. Rallonge de pied F. Bouton de verrouillage vertical G. Bouton de verrouillage horizontal I H. Rallonge - Dewalt DWX726 | Instruction Manual - Page 15
du montage, veuillez appeler le 1-800-4-DEWALT (1-800-433-9258). RÈGLES DE à été conçu pour être utilisé comme support de scies à onglet et de raboteuses. Il matériels. • Ne pas monter sur la table de travail. Il est dangereux de grimper, Suivre soigneusement les instructions d'installation. Arrimer - Dewalt DWX726 | Instruction Manual - Page 16
2 Bras de support (1 avec embout noir) 1 Sac de quincaillerie : 2 Crochets pour enrouler le cordon électrique (G, D) 6 Vis à tête ronde M8 x 15 mm 1 Vis à tête ronde M8 x 25 mm 6 Rondelles d'appui courbées 2 Boutons de verrouillage de rallonge 1 Rondelle de blocage M8 1 Vis à tête ronde M6 x 10 mm - Dewalt DWX726 | Instruction Manual - Page 17
Français INSTALLATION DE LA RALLONGE DE PIED (FIG. 2, 3) IMPORTANT : Disposer la plateforme à l'envers sur le sol ou sur une table plane et stable, comme illustré en figure 2. FIG. 2 INSTALLATION DU RACCORD DE ROUE/PIED DE RANGEMENT (FIG. 4) 1. Avec la plateforme toujours à l'envers, insérez le - Dewalt DWX726 | Instruction Manual - Page 18
opposé des roues, à l'aide d'une vis à tête ronde M8 x 25 mm (S) et d'une rondelle de blocage sur un côté et une vis à tête ronde M6 x 10 mm (T) et une rondelle de blocage sur l'autre côté. 2. Serrez fermement à l'aide de la clé hexagonale fournie à cet effet. INSTALLATION DU PIED DE RANGEMENT (FIG - Dewalt DWX726 | Instruction Manual - Page 19
érieure. 2. Resserrez le bouton de verrouillage vertical (F). 3. Faire de même avec l'autre support télescopique. 4. Insérez le dispositif du bras de support télescopique (B) avec le petit embout noir (encadré, fig. 10) dans le trou (W) de la plateforme le plus proche du levier d'activation rouge - Dewalt DWX726 | Instruction Manual - Page 20
la scie à onglet ou la raboteuse du secteur avant de les assembler à la plateforme. Tout démarrage accidentel comporte des risques de dommages support, se reporter aux instructions du fabricant de votre outil. Avant toute utilisation, arrimer soigneusement l'outil en suivant les instructions de - Dewalt DWX726 | Instruction Manual - Page 21
être positionnée de façon à ce que l'outil soit arrimé parfaitement sur les rails de fixation. Dans cette impossibilité, composer le 1(800) 4-DEWALT (1-800-433-9258) pour une assistance technique. AVERTISSEMENT : RISQUES D'INSTABILITÉ. Si les trous de montage de l'outil ne s'alignent pas sur les - Dewalt DWX726 | Instruction Manual - Page 22
Français AVERTISSEMENT : RISQUES D'INSTABILITÉ. Toute quincaillerie utilisée doit être d'un grade 2 minimum. Elle doit dépasser d'au moins 31,8 mm (1-1/4 po) la base de la scie installée. AVIS : pour prévenir tout grippage et/ou toute perte de précision, s'assurer que le contreplaqué n'est ni - Dewalt DWX726 | Instruction Manual - Page 23
TÉLESCOPIQUES (FIG. 18) 1. Tournez le bouton de verrouillage horizontal (G) vers la gauche. 2. Étirez ou repoussez le support télescopique (H), en fonction de la longueur de la pièce à travailler. 3. Resserrez le bouton de verrouillage horizontal. 4. Répétez l'opération de l'autre côté. RÉGLAGE - Dewalt DWX726 | Instruction Manual - Page 24
l'outil. Pour plus de détails relatifs à la couverture de la garantie et aux réparations sous garantie, visiter le site Web www.dewalt.com ou composer le 1-800-4-DEWALT (1-800-433-9258). Cette garantie ne s'applique pas aux accessoires ni aux dommages causés par des réparations réalisées ou tentées - Dewalt DWX726 | Instruction Manual - Page 25
de la garantie, les outils DEWALT sont couverts par notre : SERVICE D'ENTRETIEN GRATUIT DE 1 AN DEWALT entretiendra l'outil et remplacera les des performances de votre outil électrique, laser ou de votre marteau-cloueur DEWALT pour quelque raison que ce soit, vous pouvez le retourner accompagné d'un - Dewalt DWX726 | Instruction Manual - Page 26
DWX726 Base de soporte rodante para sierra para corte de ingletes/cepiladora Lista de piezas A. Rieles de montaje B. Brazo de apoyo de la pieza de trabajo C. - Dewalt DWX726 | Instruction Manual - Page 27
base, llame a 1-800-4-DEWALT (1-800-433-9258). REGLAS DE SEGURIDAD ADVERTENCIA : Para su seguridad, lea el manual de instrucciones de la herramienta antes trabajo. Es peligroso treparse, sentarse o pararse sobre el soporte. No use las extensiones del soporte como si fueran escaleras o andamios. • - Dewalt DWX726 | Instruction Manual - Page 28
en conformidad con ANSI Z87.1. • Use SIEMPRE gafas de seguridad. Los Arandela de fijación M8 1 Tornillo de cabeza abombada M6 de 10 mm 1 Arandela de fijación M6 1 Llave hexagonal Herramientas requeridas el soporte, ni tampoco ninguna de sus partes. Podría producir lesiones corporales o daños - Dewalt DWX726 | Instruction Manual - Page 29
la misma forma. INSTALACIÓN DE LAS RUEDAS (FIG. 5) 1. Siguiendo con el soporte boca abajo, retire la arandela/tuerca (Q, R) del eje. Inserte el eje (P) desde la parte interior del conector de rueda/pie para almacenamiento. Español 27 - Dewalt DWX726 | Instruction Manual - Page 30
2. Coloque una de las ruedas (D) en el eje con la parte más larga del FIG. 6 cubo de la rueda mirando hacia adentro. (S) y una arandela de fijación en un lado, y con un tornillo de cabeza abombada M6 x 10 mm (T) y arandela de fijación en el otro lado. 2. Ajuste bien con la llave hexagonal incluida - Dewalt DWX726 | Instruction Manual - Page 31
deseada, coloque la pieza superior (H1) del soporte para tareas en la parte superior del orificio para el brazo del soporte para tareas (B). Inserte la vertical (F). FIG. 9 FIG. 10 W H H1 E B Español 2. Sujete la barra de sujeción (I) con ambas manos. 3. Use el pulgar de su mano izquierda - Dewalt DWX726 | Instruction Manual - Page 32
para el soporte para enrollar el cable (X) en el orificio (T) desde la parte externa del soporte. Coloque la arandela y la tuerca en el tornillo del soporte enrollar el cable. FIG. 11 FIG. 12 Z X A manual como las del manual del fabricante de su herramienta antes de operarla. El no respetar - Dewalt DWX726 | Instruction Manual - Page 33
de modo que la herramienta quede directamente apernada en los rieles de montaje. Si esto no es posible, por favor llame al 1-800-4-DEWALT (1-800-433-9258) para recibir asistencia técnica. ADVERTENCIA: PELIGRO DE INESTABILIDAD. Si los orificios de montaje de la herramienta no quedan alineados con - Dewalt DWX726 | Instruction Manual - Page 34
ADVERTENCIA: PELIGRO DE INESTABILIDAD. Todos los accesorios de montaje que utilice deberán ser como mínimo grado 2. Los accesorios de montaje deberán tener 31,8 mm (1-1/4 pulg.) más de largo que el grosor de la base de la herramienta que está montando. AVISO: ara evitar que la herramienta se trabe - Dewalt DWX726 | Instruction Manual - Page 35
de modo que la pata delantera quede FF a 63,5 mm (2-1/2 pulg.) del piso. 3. Con una persona delante del soporte y la otra detrás, levante la parte delantera del soporte ligeramente, quite el bloque de madera y permita que el soporte caiga al suelo. 4. Realice la misma prueba con el bloque de - Dewalt DWX726 | Instruction Manual - Page 36
para transportar el soporte. FIG 19 Accesorios ADVERTENCIA: Debido a que no se han probado con este producto otros accesorios que no sean los que ofrece DEWALT, el uso de dichos accesorios podría ser peligroso. Para reducir el riesgo de lesiones, con este producto deben usarse sólo los accesorios - Dewalt DWX726 | Instruction Manual - Page 37
autorizados y franquiciados en la República Mexicana, donde podrá hacer efectiva su garantía y adquirir partes, refacciones y accesorios originales. Garantía limitada de tres años DEWALT reparará sin cargo cualquier defecto ocasionado por materiales defectuosos o mano de obra, durante tres años - Dewalt DWX726 | Instruction Manual - Page 38
DE DINERO DE 90 DÍAS Si por alguna razón no estuviera plenamente satisfecho con el rendimiento de la herramienta eléctrica, el láser o la clavadora DEWALT, puede devolver el producto dentro de los 90 días siguientes a la fecha de compra acompañado del recibo de compra. De esta manera, se le - Dewalt DWX726 | Instruction Manual - Page 39
- Dewalt DWX726 | Instruction Manual - Page 40
Industrial Tool Co., 701 East Joppa Road, Baltimore, MD 21286 (JUN11) Part No. N116787 DWX726 Copyright © 2011 DEWALT The following are trademarks for one or more DEWALT power tools: the yellow and black color scheme; the "D" shaped air intake grill; the array of pyramids on the handgrip; the kit
-
 1
1 -
 2
2 -
 3
3 -
 4
4 -
 5
5 -
 6
6 -
 7
7 -
8
-
9
-
10
-
11
-
12
-
13
-
14
-
15
-
16
-
17
-
18
-
19
-
20
-
21
-
22
-
23
-
24
-
25
-
26
-
27
-
28
-
29
-
30
-
31
-
32
-
33
-
34
-
35
-
36
-
37
-
38
-
39
-
40
 |
 |

INSTRUCTION MANUAL
GUIDE D'UTILISATION
MANUAL DE INSTRUCCIONES
INSTRUCTIVO DE OPERACIÓN, CENTROS DE SERVICIO Y PÓLIZA DE
GARANTÍA.
ADVERTENCIA:
LÉASE ESTE INSTRUCTIVO ANTES DE
USAR EL PRODUCTO.
If you have questions or comments, contact us.
Pour toute question ou tout commentaire, nous contacter.
Si tiene dudas o comentarios, contáctenos.
1-800-4-D
E
WALT • www.dewalt.com
DWX726
Rolling Miter Saw/Planer Stand
Plate-forme mobile pour scie à onglet/raboteuse
Base de soporte rodante para sierra para corte de ingletes/cepiladora