Dymo 69110 Quick Start Guide
Dymo 69110 Manual
 |
View all Dymo 69110 manuals
Add to My Manuals
Save this manual to your list of manuals |
Dymo 69110 manual content summary:
- Dymo 69110 | Quick Start Guide - Page 1
Quick Start Guide - Dymo 69110 | Quick Start Guide - Page 2
© 2007 Sanford, L.P. All rights reserved. DYMO and LabelWriter are registered trademarks of Sanford, L.P. All other trademarks are the property of their respective holders. - Dymo 69110 | Quick Start Guide - Page 3
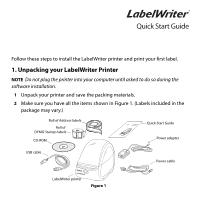
the software installation. 1 Unpack your printer and save the packing materials. 2 Make sure you have all the items shown in Figure 1. (Labels included in the package may vary.) Roll of Address labels Roll of DYMO Stamps labels CD-ROM LabelWriter Quick Start Quick Start Guide Power adapter - Dymo 69110 | Quick Start Guide - Page 4
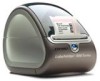
path and tear bar Cable channel Form-feed button and LED Label spool Label eject button Figure 2 LabelWriter Printer Features Your LabelWriter printer is a direct thermal printer and does not use ink or toner. Instead, the printer uses heat from a thermal print head to print on specially treated - Dymo 69110 | Quick Start Guide - Page 5
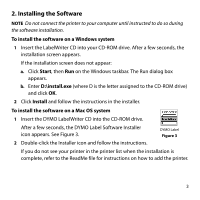
Mac OS system 1 Insert the DYMO LabelWriter CD into the CD-ROM drive. After a few seconds, the DYMO Label Software Installer icon appears. See Figure 3. DYMO Label Figure 3 2 Double-click the Installer icon and follow the instructions. If you do not see your printer in the printer list when the - Dymo 69110 | Quick Start Guide - Page 6
3. Connecting your LabelWriter Printer NOTE Do not connect the printer to your computer until instructed to do so during the software installation. E1988N50109O2IIU.6TTN.1E5PPE. LWuUUPIrUMTTSO::o.T21pWSE.M40EeDoR0VP-Pd/S-/2e-lUN-4N::P00NP9-9LVo-0.1Y2:.5840T018/CA9E86S30AH2z-2M4a0x100.0604A - Dymo 69110 | Quick Start Guide - Page 7
press the guide tightly against the side of the label roll, leaving no gap between the roll and the spool. See Figure 8. NOTE The label roll must fit snugly against both sides of the label spool, with no gaps, to avoid drifting as the labels feed through the printer. 6 Insert the label spool into - Dymo 69110 | Quick Start Guide - Page 8
. If the printer does not feed the labels, make sure the first label is fully inserted and then press the form-feed button. 8 Close the top cover. You are now ready to print your first label. Figure 10 5. Printing your First Label To print your first label 1 Start DYMO Label Software by doing one - Dymo 69110 | Quick Start Guide - Page 9
have a tape printer, two buttons allow you to easily switch between the Label and Tape Editors. Store your favorite addresses in the Address Book; automatically insert them on your label. Figure 11 For complete details on using the software, refer to the DYMO Label Software User Guide, located on - Dymo 69110 | Quick Start Guide - Page 10
Stamps™ You can now print postage right from your desktop using your LabelWriter 400 Turbo label printer. All you need is DYMO Stamps™ software, your LabelWriter printer, DYMO Stamps labels, and an Internet connection. To install DYMO Stamps and print postage 1 Sign up for your USPS account with - Dymo 69110 | Quick Start Guide - Page 11
LabelWriter 400 Turbo from the Printer dropdown list under Printer Selection. 6 Click Test Print to print a voided postage label. You are now ready to start printing actual postage whenever you need it. Refer to the DYMO Stamps online Help for more information about using the software. You can add - Dymo 69110 | Quick Start Guide - Page 12
10 - Dymo 69110 | Quick Start Guide - Page 13
- Dymo 69110 | Quick Start Guide - Page 14
or directly from DYMO. Visit www.dymo.com or call 1.800.426.7827. DYMO Stamps labels are regulated by the United States Postal Service, and must be purchased through the link in DYMO Stamps software or through your Endicia postage account. Troubleshooting or Customer Service Visit www.dymo.com or
-
 1
1 -
 2
2 -
 3
3 -
 4
4 -
 5
5 -
 6
6 -
 7
7 -
8
-
9
-
10
-
11
-
12
-
13
-
14
 |
 |

Quick Start Guide