Dymo LabelManager® 120P User Guide 1
Dymo LabelManager® 120P Manual
 |
View all Dymo LabelManager® 120P manuals
Add to My Manuals
Save this manual to your list of manuals |
Dymo LabelManager® 120P manual content summary:
- Dymo LabelManager® 120P | User Guide 1 - Page 1
LabelManager 120P Basic label maker with easy-to-use smart keys LM120P_Cover_US.indd 1 User Guide www.dymo.com 8/22/2007 10:18:32 AM - Dymo LabelManager® 120P | User Guide 1 - Page 2
5 Inserting the Tape Cassette 6 Using the Label Maker for the First Time 6 Getting to Know the Label Maker 7 Power ...7 LCD Display 8 Settings ...8 CAPS Mode 8 Num Lock 9 Backspace 9 Navigation Keys 9 Cancel ...9 Formatting Your Label 9 Changing the Font Size 9 Adding Font Styles 10 - Dymo LabelManager® 120P | User Guide 1 - Page 3
Caring for Your Label Maker 13 Troubleshooting 14 Documentation Feedback 15 Environmental Information 16 3 - Dymo LabelManager® 120P | User Guide 1 - Page 4
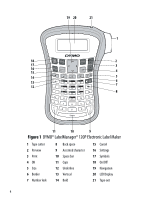
16 Cancel OK 15 4 14 5 13 12 6 7 8 C A c a p s c e n t Space 11 10 9 Figure 1 DYMO® LabelManager® 120P Electronic Label Maker 1 Tape cutter 2 Preview 3 Print 4 OK 5 Size 6 Border 7 Number lock 8 Back space 9 Accented character 10 Space bar 11 Caps 12 Underline 13 Vertical 14 Bold - Dymo LabelManager® 120P | User Guide 1 - Page 5
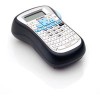
About Your New Label Maker With the DYMO® LabelManager® 120P electronic label maker, you can create a wide variety of high-quality, self-adhesive labels. You can choose to print your labels in many different font sizes and styles. The label maker uses DYMO D1 tape cassettes in widths of 3/8" (9 mm) - Dymo LabelManager® 120P | User Guide 1 - Page 6
the Tape Cassette Your label maker comes with one tape cassette. Visit www.dymo.com for information about purchasing additional tape cassettes. To insert the tape cassette 1. Lift the tape cassette cover to open the tape compartment. See Figure 3. Figure 3 Ç Before using the label maker for - Dymo LabelManager® 120P | User Guide 1 - Page 7
width of the tape cassette currently in the label maker and press }. You are now ready to print your first label. To print a label 1. Enter text to create a simple label. 2. Press . 3. Press the cutter button to cut the label. Congratulations! You printed your first label. Continue reading to - Dymo LabelManager® 120P | User Guide 1 - Page 8
number of characters displayed will vary due to proportional spacing. With DYMO's exclusive graphical display, most of the formatting you add is Settings The key displays the Language, Label Width, and Contrast submenus. These features are described later in this User Guide. CAPS Mode The C a p - Dymo LabelManager® 120P | User Guide 1 - Page 9
review and edit your label Label You can choose several format options to enhance the appearance of your labels. Changing the Font Size Two font sizes are available for your labels: Normal and Large. The font size applies to all characters on a label. The font size key toggles the font from one size - Dymo LabelManager® 120P | User Guide 1 - Page 10
font sizes. Adding Font Styles You can choose different font styles: Normal Bold Vertical The style you select applies to all characters. Styles can be used with alphanumeric characters and some symbols. The font style keys toggle the style on and off. To add bold text ♦ Press . To print - Dymo LabelManager® 120P | User Guide 1 - Page 11
through the rows of symbols. 3. When you locate the symbol, press } to add the symbol to your label. Adding International Characters The label maker supports the extended Latin character set using RACE technology. After pressing the Accent key, repeatedly pressing a letter scrolls through - Dymo LabelManager® 120P | User Guide 1 - Page 12
move beyond the character to continue entering text. Printing Options You can preview your label and adjust the printing contrast. Previewing Your Label You can preview your label prior to printing. To preview your label Press . ♦ Preview The label length is displayed, then the text scrolls - Dymo LabelManager® 120P | User Guide 1 - Page 13
give you long and trouble-free service, while requiring very little maintenance. Clean your label maker from time to time to keep it working properly. Clean the cutter blade each time you replace the tape cassette. To clean the cutter blade 1. Remove the tape cassette. Press and Print head hold - Dymo LabelManager® 120P | User Guide 1 - Page 14
Troubleshooting Review the following possible solutions if you encounter a problem while using your label maker. Problem/Error Message Solution No display • Ensure the label maker is turned on. • Replace discharged batteries. Poor Print Quality • Replace batteries or attach power adapter. • - Dymo LabelManager® 120P | User Guide 1 - Page 15
, and User Guide page number • Brief description of instructions that are inaccurate or unclear, areas where more detail is needed, and so on We also welcome your suggestions about additional topics you would like to see covered in the documentation. Send email messages to: [email protected] - Dymo LabelManager® 120P | User Guide 1 - Page 16
Environmental Information The equipment that you have bought requires the extraction and use of natural resources for its production. It may contain substances that are hazardous to health and the environment. In order to avoid the dissemination of those substances in our environment, and to - Dymo LabelManager® 120P | User Guide 1 - Page 17
17 - Dymo LabelManager® 120P | User Guide 1 - Page 18
26 M220P-UK_WEU.indd 26 931487 www.sanford.com Produced by: DYMO Stamford CT 06902 800-426-7827: www.dymo.com ©2007 A Newell Rubbermaid Company 10-07-2007 15:12:24
-
 1
1 -
 2
2 -
 3
3 -
 4
4 -
 5
5 -
 6
6 -
 7
7 -
8
-
9
-
10
-
11
-
12
-
13
-
14
-
15
-
16
-
17
-
18
 |
 |

www.dymo.com
LabelManager
120P
Basic label maker with easy-to-use smart keys
User Guide
LM120P_Cover_US.indd 1
LM120P_Cover_US.indd
1
8/22/2007 10:18:32 AM
8/22/2007
10:18:32 AM