Dymo LabelManager 450 User Guide 1
Dymo LabelManager 450 Manual
 |
View all Dymo LabelManager 450 manuals
Add to My Manuals
Save this manual to your list of manuals |
Dymo LabelManager 450 manual content summary:
- Dymo LabelManager 450 | User Guide 1 - Page 1
Professional Labelmaker User Guide US AUS NZ w - Dymo LabelManager 450 | User Guide 1 - Page 2
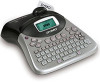
USB Connector AC Power Connector Auto-cutter LCD Display Label cassette door release Power Settings Memory Language Preview/Insert Tab CAPS www.dymo.c om Label Exit Font Size/Style Font Figure 1 ExecuLabel LM450 Professional Labelmaker Manual Cutter Print Cancel Navigation Arrows & OK Clear/ - Dymo LabelManager 450 | User Guide 1 - Page 3
warranty registration card and return it to the appropriate Customer Support address within seven days of purchase. Visit www.dymo.com/registration for details. Getting Started Follow the instructions in this section to print your first label. Connecting the Power The labelmaker can operate on AC or - Dymo LabelManager 450 | User Guide 1 - Page 4
passes between the guideposts. If necessary, turn the spool clockwise to tighten the ribbon. 3. Insert the cassette with the label and ribbon positioned between the print head and pinch roller. See Figure 5. Figure 5 4. Press firmly until cassette clicks into place. When positioned correctly, you - Dymo LabelManager 450 | User Guide 1 - Page 5
labelmaker. You can change the default time format by following the instructions in Changing the Time Format Changing the Cutting Option on page 13. 3. Remove the label. Congratulations! You have printed your first label. Continue reading to learn more about the options available for creating labels - Dymo LabelManager 450 | User Guide 1 - Page 6
know when a feature is selected. See Figure 7. Font and Size Style Scroll BIG CAPS mode Multiple Lines Fixed Length Align/Justify Underline/Box Mixed label printer or you can print labels from your computer using DYMO LabelMANAGER software. Your labelmaker connects to your computer using the USB - Dymo LabelManager 450 | User Guide 1 - Page 7
LM450 Quick Start Guide for installation instructions and the DYMO LabelMANAGER Software User Guide for information about designing and printing labels. Formatting Your Label You can choose from a number of formatting options to enhance the appearance of your labels. The labelmaker remembers - Dymo LabelManager 450 | User Guide 1 - Page 8
DYMO ExecuLabel LM450 Text Background Figure 9 Background patterns are not available for 6 mm label. To set the box style 1. Press the key. 2. Select a frame style and then press . On multi-line labels, all lines are underlined. In box style mode , but will not print on the label. 2. Type the text - Dymo LabelManager 450 | User Guide 1 - Page 9
of the label. Using Tabs You can add tabs to a label to align text on multiline labels. Tabs are left justified and the default spacing is 2.0" (50 mm). To change the tab can be added to your labels. Adding Symbols The labelmaker supports the extended symbol set as shown in Figure 10: Figure 10 9 - Dymo LabelManager 450 | User Guide 1 - Page 10
symbol to your label text. Adding International Characters The labelmaker supports the extended add the date and time to your labels. Changing the Date Format You can choose from is automatically updated with the current date when the label is actually printed. To add the date 1. Press . Preview - Dymo LabelManager 450 | User Guide 1 - Page 11
on your label in the format specified. Printing Options You can print multiple copies of a label at one time, print serialized labels, print fixed-length labels, review label text and format, and adjust the printing contrast. Printing Multiple Copies You can print up to 16 copies of a label at one - Dymo LabelManager 450 | User Guide 1 - Page 12
remains in effect until you change it. To set the label length 1. Press Shift + . 2. Press the up arrow to select Fixed Length On and then press . 3. Use the arrow keys to set the length. 4. Press . After you print the label, you must reset the fixedlength label setting to OFF; otherwise, all - Dymo LabelManager 450 | User Guide 1 - Page 13
remains active until you reset the alignment. Changing the Cutting Option You can choose to have each label automatically cut after printing or you can manually cut the labels using the key. By default, labels are cut automatically. When manual cutting is selected and you print multiple copies or - Dymo LabelManager 450 | User Guide 1 - Page 14
Recall and then Label, Format, or Last Printed. A list of memory locations is displayed similar to storing a label or format. 3. Select a label or format to recall and press . Caring for Your Labelmaker Your labelmaker is designed to give you long and trouble-free service, while requiring very - Dymo LabelManager 450 | User Guide 1 - Page 15
Battery low Batteries almost discharged. Tape Jam Motor is stalled due to label jam. Too many pages Exceeded maximum number of format breaks allowed. Page not empty Tape size too small Set Fixed-length label selected and the length necessary to print the label exceeds the selected length. Solution - Dymo LabelManager 450 | User Guide 1 - Page 16
User Guide page number • Brief description of content (instructions that are inaccurate or unclear, areas where more detail is needed, and so on) We also welcome your suggestions about additional topics you would like to see covered in the documentation. Send email messages to: documentation@dymo - Dymo LabelManager 450 | User Guide 1 - Page 17
The following table provides a list of telephone numbers to reach DYMO Sales and Support departments. You can also reach DYMO at www.dymo.com. Country Australia Canada Mexico New Zealand United States Telephone 1800/ 633 868 (800) 263-6105 +01 5368 2066 0800 803 966 (203) 588-2500 - Dymo LabelManager 450 | User Guide 1 - Page 18
transmitted in any form or by any means or translated into another language without the prior written consent of DYMO Corporation. ExecuLabel is a trademark of DYMO Corporation. DYMO is a registered trademark of Esselte Corporation. All other trademarks are the property of their respective holders.
-
 1
1 -
 2
2 -
 3
3 -
 4
4 -
 5
5 -
 6
6 -
 7
7 -
8
-
9
-
10
-
11
-
12
-
13
-
14
-
15
-
16
-
17
-
18
 |
 |

Professional Labelmaker
User Guide
w
US
AUS
NZ