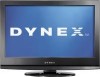
Dynex DX-24LD230A12 User Manual (English)
Dynex DX-24LD230A12 Manual
 |
View all Dynex DX-24LD230A12 manuals
Add to My Manuals
Save this manual to your list of manuals |
Dynex DX-24LD230A12 manual content summary:
- Dynex DX-24LD230A12 | User Manual (English) - Page 1
24" LCD TV/DVD combo DX-24LD230A12 USER GUIDE - Dynex DX-24LD230A12 | User Manual (English) - Page 2
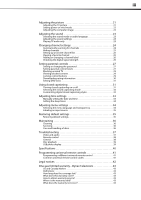
ii Dynex DX-24LD230A12 24" LCD TV/DVD combo Contents CHILD SAFETY 1 Important safety instructions 2 Warnings 2 Cautions 3 Installing the stand or wall-mount bracket 4 Installing the stand 4 Installing a wall-mount bracket 4 TV/DVD combo components 5 Package contents 5 Front 5 Back 5 Side - Dynex DX-24LD230A12 | User Manual (English) - Page 3
different universal remote control 41 Common universal remote control codes 41 Legal notices 42 One-year limited warranty - Dynex Televisions 43 US and Canada Market 43 Definitions 43 How long does the coverage last 43 What does this warranty cover 43 How to obtain warranty service 43 Where - Dynex DX-24LD230A12 | User Manual (English) - Page 4
iv - Dynex DX-24LD230A12 | User Manual (English) - Page 5
of TV stand does not fit all. Use only a TV stand rated for the weight of your TV. • Carefully read and understand all enclosed instructions for TV. Make sure that you place or install the TV where it cannot be pushed, pulled over, or knocked down. • Make sure that you route all cords and cables - Dynex DX-24LD230A12 | User Manual (English) - Page 6
2 DX-24LD230A12 Important safety instructions Important safety instructions CAUTION RISK OF ELECTRIC SHOCK DO NOT OPEN This symbol indicates that dangerous voltage constituting a risk of electric shock is present within your TV/DVD combo. This label is located on the back of your TV/DVD combo. - Dynex DX-24LD230A12 | User Manual (English) - Page 7
safety instructions DX-24LD230A12 3 Power source Operate your TV/DVD combo only from the type of power source indicated on the marking label. If you are not sure of the type of power supplied to your home, consult an electrician or your local power company. Cautions Damage requiring service Unplug - Dynex DX-24LD230A12 | User Manual (English) - Page 8
4 DX-24LD230A12 Installing the stand or wall-mount bracket Installing the stand or wall-mount bracket Notes • • If you plan to wall-mount your TV/DVD combo, do not install the stand. Store the stand and stand screws in case you decide to use the stand in the future. Installing the stand To - Dynex DX-24LD230A12 | User Manual (English) - Page 9
TV/DVD combo components TV/DVD combo components Package contents • AC power cord • Remote control and batteries (2 AAA) • Stand with screws • Component video cable • Audio cable • Quick Setup Guide Front Back PB PR DX-24LD230A12 5 # Item 1 Remote sensor 2 Power indicator Description Receives - Dynex DX-24LD230A12 | User Manual (English) - Page 10
6 DX-24LD230A12 Side TV/DVD combo components Remote control # Item 1 Disc slot 2 MENU 3 EJECT 4 STOP / CHANNEL 5 PLAY / CHANNEL 6 VOLUME -/+ 7 INPUT 8 (Power) Description Insert a disc (DVD or CD) into this slot to change mode and begin playback. Press to open the on-screen menu. For more - Dynex DX-24LD230A12 | User Manual (English) - Page 11
Making connections DX-24LD230A12 7 # Button 11 FAV 12 DVD controls 13 (Mute) TV/DVD combo has several connection types for connecting devices to your TV/DVD combo. For the best video quality, you should connect a device to the best available connection. Use the following tables to identify cables - Dynex DX-24LD230A12 | User Manual (English) - Page 12
8 DX-24LD230A12 Connection type and jack Digital optical audio (SPDIF) Cable connectors Making connections Connecting power To connect the power: • Connect the AC power cord to the AC connector on the back of your TV/DVD combo, then plug the other end into a power outlet. Analog audio Red White - Dynex DX-24LD230A12 | User Manual (English) - Page 13
Making connections DX-24LD230A12 9 4 Turn on your TV/DVD combo, then turn on the cable or satellite box. 5 Go through the setup wizard described on page 16. Notes An HDMI cable carries both audio and video. You do not need to use any audio cables. 6 To watch TV, press INPUT to open the INPUT - Dynex DX-24LD230A12 | User Manual (English) - Page 14
10 DX-24LD230A12 Making connections Using composite video cable (good) To connect a cable or satellite box using composite video: 1 Turn off your TV/DVD combo and all connected equipment. 2 Connect the incoming cable from the cable wall jack to the cable-in jack on the cable or satellite box. 3 - Dynex DX-24LD230A12 | User Manual (English) - Page 15
service personnel to correct the problem. PB PR 3 If you are connecting a DVI device, connect an audio cable with stereo mini plug (not provided) to the PC/DVI AUDIO IN jack on the back of your TV/DVD combo and to the AUDIO OUT jack on the DVI device. 4 Reconnect the power cord to your TV/DVD combo - Dynex DX-24LD230A12 | User Manual (English) - Page 16
12 DX-24LD230A12 Making connections Connecting a component video device To connect a component video device: 1 Make sure that your TV/DVD combo's power cord is unplugged and the component video device is turned off. 2 Connect a component video cable (provided) to the COMPONENT IN/Y, PB, PR jacks - Dynex DX-24LD230A12 | User Manual (English) - Page 17
Making connections DX-24LD230A12 13 Connecting a computer Tip Some computers have an HDMI jack. You can use an HDMI cable to connect the computer for a better picture. Using VGA To connect a computer using VGA: 1 Make sure that your TV/DVD combo's power cord is unplugged and the computer is turned - Dynex DX-24LD230A12 | User Manual (English) - Page 18
14 DX-24LD230A12 Making connections Connecting a USB flash drive To connect a USB flash drive: • Make sure the TV/DVD combo is on, then plug a USB flash drive into the USB IN port on the back. Back of TV/DVD combo Connecting headphones The TV/DVD combo speakers are muted when headphones are - Dynex DX-24LD230A12 | User Manual (English) - Page 19
the remote control DX-24LD230A12 15 Connecting a basic home theater system Using digital audio To connect a basic home theater system using digital audio: 1 Make sure that your TV/DVD combo's power cord is unplugged and the home theater system is turned off. 2 Connect a digital optical audio cable - Dynex DX-24LD230A12 | User Manual (English) - Page 20
time, picture mode, and TV signal source. To set up your TV/DVD combo: 1 Make sure that you have: • Installed the remote control batteries. (See page 15 for details). • Connected an antenna, cable TV, or satellite TV. (See page 8 to page 11 for details.) • Connected the power cord. (See page 8 for - Dynex DX-24LD230A12 | User Manual (English) - Page 21
DX-24LD230A12 17 Understanding the basics Turning your TV/DVD combo on or off To turn your TV/DVD combo on or off: 1 Make sure that the power cord is connected to a power outlet. 2 Press (Power) to turn on your TV/DVD combo. 3 Press (Power) again to turn off your TV/DVD combo. Your TV/DVD combo - Dynex DX-24LD230A12 | User Manual (English) - Page 22
picture viewer only supports JPEG format images (with ".jpg" file extensions) and not all JPEG files are compatible with the TV/DVD combo. For example, progressive JPEG files are not compatible. Unless otherwise noted, all tasks in this section are based on using the remote control. Note Only those - Dynex DX-24LD230A12 | User Manual (English) - Page 23
on-screen menus DX-24LD230A12 19 3 Press TV mode. Menu items that are not selectable are grayed out. Menus in this manual are described in TV mode, unless otherwise indicated. The screens shown in this manual are for explanation purposes and may vary from the actual screens on your TV/DVD combo - Dynex DX-24LD230A12 | User Manual (English) - Page 24
20 DX-24LD230A12 Using the on-screen menus Picture menu (TV mode) Navigating the menus Press MENU to open the on-screen menu. Press or to move the cursor on the screen or to adjust a selected item. Audio menu (TV mode) Press or to select menu options. Settings menu (TV mode) Parental Controls - Dynex DX-24LD230A12 | User Manual (English) - Page 25
DX-24LD230A12 21 • Digital channel information-Displays the channel number, station name, channel label (if present), broadcast program name, TV rating Press GUIDE to show the digital program guide, which you set this control too high, dark • Custom-Lets you manually customize the picture settings. - Dynex DX-24LD230A12 | User Manual (English) - Page 26
22 DX-24LD230A12 Adjusting the picture • Overscan-This feature extends part of the display past the visible area to use your TV/DVD combo for in-store display, you can set vivid mode as your power on default, regardless of the picture mode you select when turning off the TV/DVD combo. Note If you - Dynex DX-24LD230A12 | User Manual (English) - Page 27
- Resets all audio settings to factory defaults. 4 Press EXIT to close the menu. Playing TV audio only You can turn off the picture on your TV/DVD combo and listen to the program audio only. To play TV audio only: 1 Press MENU. The on-screen menu opens with the Picture menu displayed. 3 Press - Dynex DX-24LD230A12 | User Manual (English) - Page 28
if you have cable TV and do not have a cable TV box. Your TV/DVD combo scans for analog and digital channels in your area. • Cable/Satellite Box-Select this option if you use a cable or satellite TV box. Your TV/DVD combo will not scan for channels because the cable or satellite TV box provides the - Dynex DX-24LD230A12 | User Manual (English) - Page 29
Changing channel settings DX-24LD230A12 25 Hiding channels You can hide channels in the channel list. When you press CH or CH , your TV/DVD combo skips the hidden channels. You can still tune to a hidden channel by pressing the number buttons for the channel. To hide channels: 1 Press MENU. The - Dynex DX-24LD230A12 | User Manual (English) - Page 30
26 DX-24LD230A12 Viewing a favorite channel To view a favorite channel: 1 Press FAV. The can check the digital signal strength to determine if you need to adjust your antenna or digital cable input. The higher the signal strength, the less likely you are to experience picture degradation. To - Dynex DX-24LD230A12 | User Manual (English) - Page 31
Setting parental controls 2 Press or to highlight Channel. The Channel menu opens. The digital TV signal strength is indicated by the color bar beside the Channel Strength option. DX-24LD230A12 27 4 The Enter Password screen opens. If you are adding a password, use the number buttons to enter 0000. - Dynex DX-24LD230A12 | User Manual (English) - Page 32
28 DX-24LD230A12 Setting parental controls U.S. TV ratings (content-based) All All ratings are blocked FV Fantasy violence L Adult language S Sexual situations V Violence D Sexually suggestive dialog U.S. movie (MPAA) ratings None G PG PG-13 R NC-17 X Movie not rated General - Dynex DX-24LD230A12 | User Manual (English) - Page 33
off your TV/DVD combo, then turn it back on. Locking control buttons You can lock the TV control buttons on the left side of your TV/DVD combo. When the control buttons on your TV/DVD combo are locked, you can only operate the TV/DVD combo with the remote control. To lock control buttons: 1 Press - Dynex DX-24LD230A12 | User Manual (English) - Page 34
30 DX-24LD230A12 Setting parental controls 3 Press or to highlight Parental Controls, then press ENTER/ . 4 The Enter Password screen opens. Use the number buttons to enter your password. 5 The Parental Controls sub-menu opens. Press or to highlight RRT5, then press ENTER/ . Open Source Notice - Dynex DX-24LD230A12 | User Manual (English) - Page 35
DX-24LD230A12 31 Setting DVD locks A DVD is usually encoded with a rating level to indicate the recommended audience age. You can select the content rating level allowed for playback on your TV/DVD combo. To set DVD captioning on or off with the remote control: • Press CCD repeatedly to select - Dynex DX-24LD230A12 | User Manual (English) - Page 36
32 DX-24LD230A12 3 Press or to highlight Closed Caption, then press ENTER/ . Using closed captioning 4 Press or to highlight Analog Caption or Digital Caption, then press or to select the closed caption mode you want. Open Source Notice Reset to Default 4 Press or to highlight Caption Control, - Dynex DX-24LD230A12 | User Manual (English) - Page 37
time settings DX-24LD230A12 33 5 Press to close the menu. Adjusting time settings Manually setting the date and time To manually set the date and time: 1 Press Mode to Auto: • The time is set automatically based on a digital TV signal. • You can only change the Time Zone and Daylight Savings - Dynex DX-24LD230A12 | User Manual (English) - Page 38
DX-24LD230A12 Adjusting menu settings Setting the sleep timer You can set the amount of time before your TV/DVD combo automatically turns off. To set the sleep timer with the remote control French), or Español (Spanish). Language Transparency Power On In Vivid Mode Picture Audio Settings Channel - Dynex DX-24LD230A12 | User Manual (English) - Page 39
Restoring default settings DX-24LD230A12 35 Labeling an input source You can add a label to settings Caution When you restore default settings, all the settings (except the password and parental rating) you have customized are reset. Restoring default settings To restore default settings: 1 Press - Dynex DX-24LD230A12 | User Manual (English) - Page 40
insecticide liquid near your TV/DVD combo. Such chemicals may cause damage and discoloration to the exposed surfaces. Servicing Do not try to repair your TV/DVD combo yourself. There are no user-serviceable parts inside. Turn off your TV/DVD combo, unplug the power cord, then contact an authorized - Dynex DX-24LD230A12 | User Manual (English) - Page 41
Troubleshooting DX-24LD230A12 37 Troubleshooting Warning Do not try to repair your TV/DVD combo yourself. Contact authorized service personnel. Video and audio Problem Solution Picture does not fill the screen. There are black bars around the picture. No picture (screen is not lit) and no sound - Dynex DX-24LD230A12 | User Manual (English) - Page 42
. • Refer to the User Guide that accompanied your universal remote control and contact the manufacturer if problems persist. General Problem Solution No power • Make sure that the power cord is correctly connected to your TV/DVD combo and a power outlet. • Unplug the power cord, wait 60 seconds - Dynex DX-24LD230A12 | User Manual (English) - Page 43
"Locking control buttons" on page 29. • Unplug the power cord, wait a few seconds, then plug the cord back in and turn on your TV/DVD combo. TV/DVD combo • Make sure that the sleep timer is not keeps turning off turned on. See "Setting the sleep timer" on page 34. Disc playback Problem Playback - Dynex DX-24LD230A12 | User Manual (English) - Page 44
DX-24LD230A12 Specifications Specifications Specifications are subject to change without notice. Warranty Parts: 1 year Labor: 1 year Dimensions and weight Without stand: 23.1 x 15.9 x 2.8 in (585.7 x 403.3 x 71.4 mm) With stand: 23.1 x 17.0 x 7.2 in (585.7 x 432.6 x 181.9 mm) Without stand - Dynex DX-24LD230A12 | User Manual (English) - Page 45
universal remote control has a code search feature, run a code search to identify a code that matches your TV/DVD combo. See your universal remote control's instructions for details. • If your universal remote control has a "Learn" feature, you can manually program it using the Dynex TV remote to - Dynex DX-24LD230A12 | User Manual (English) - Page 46
DX-24LD230A12 Legal notices FCC Part 15 This device complies with Part with the instructions, may cause equipment off and on, the user is encouraged to try to dealer or an experienced radio/TV technician for help. FCC code, please call the Dynex support line at 1-800-305-2204. This source code - Dynex DX-24LD230A12 | User Manual (English) - Page 47
pay all labor and parts charges. This warranty lasts as long as you own your Dynex Product during the Warranty Period. Warranty coverage terminates if you sell or otherwise transfer the Product. How to obtain warranty service? If you purchased the Product at a Best Buy or Future Shop retail store - Dynex DX-24LD230A12 | User Manual (English) - Page 48
www.dynexproducts.com US and Canada Market - (800) 305-2204 Distributed by Best Buy Purchasing, LLC 7601 Penn Ave. South, Richfield, MN 55423 U.S.A. © 2011 BBY Solutions, Inc. All rights reserved. DYNEX is a trademark of BBY Solutions, Inc. Registered in some countries. All other products and brand
-
 1
1 -
 2
2 -
 3
3 -
 4
4 -
 5
5 -
 6
6 -
 7
7 -
8
-
9
-
10
-
11
-
12
-
13
-
14
-
15
-
16
-
17
-
18
-
19
-
20
-
21
-
22
-
23
-
24
-
25
-
26
-
27
-
28
-
29
-
30
-
31
-
32
-
33
-
34
-
35
-
36
-
37
-
38
-
39
-
40
-
41
-
42
-
43
-
44
-
45
-
46
-
47
-
48
 |
 |

24” LCD TV/DVD combo
DX-24LD230A12
USER GUIDE