Dynex DX-LDVD19-10A User Manual (English)
Dynex DX-LDVD19-10A - 19" LCD TV Manual
 |
UPC - 600603125263
View all Dynex DX-LDVD19-10A manuals
Add to My Manuals
Save this manual to your list of manuals |
Dynex DX-LDVD19-10A manual content summary:
- Dynex DX-LDVD19-10A | User Manual (English) - Page 1
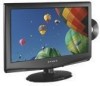
DX-LDVD19-10A_09-0340.book Page 1 Tuesday, April 28, 2009 4:43 PM 19" LCD TV/DVD Combo DX-LDVD19-10A USER GUIDE - Dynex DX-LDVD19-10A | User Manual (English) - Page 2
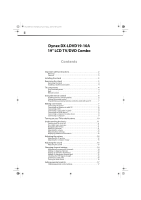
4:43 PM ii Dynex DX-LDVD19-10A 19" LCD TV/DVD Combo Contents Important safety instructions 2 Warnings 2 Cautions 2 Installing the stand 3 Removing the stand 3 Removing the stand 4 Installing a wall-mount bracket 4 TV components 4 Front and side panels 4 Back 4 Remote control 5 Using the - Dynex DX-LDVD19-10A | User Manual (English) - Page 3
Advanced playback 23 JPEG disc playback 23 Screen saver 23 DVD system setup 23 Playable discs 24 Troubleshooting 25 Video and audio 25 Remote control 25 General 25 Maintenance 25 Cleaning 25 Care and handling of discs 25 Servicing 26 Specifications 26 Legal notices 26 One-year limited - Dynex DX-LDVD19-10A | User Manual (English) - Page 4
DX-LDVD19-10A_09-0340.book Page iv Tuesday, April 28, 2009 4:43 PM iv - Dynex DX-LDVD19-10A | User Manual (English) - Page 5
a wall mount rated for the weight of your TV and that has been recommended by this TV manufacturer, listed in this manual, or otherwise listed by an independent laboratory as suitable for your TV. One size of wall mount does not fit all. • Follow all instructions supplied by the TV and wall mount - Dynex DX-LDVD19-10A | User Manual (English) - Page 6
Tuesday, April 28, 2009 4:43 PM 2 DX-LDVD19-10A Important safety instructions Important safety instructions CAUTION RISK OF ELECTRIC SHOCK DO NOT OPEN This symbol indicates that dangerous voltage constituting a risk of electric shock is present within your TV. This label is located on the back of - Dynex DX-LDVD19-10A | User Manual (English) - Page 7
, April 28, 2009 4:43 PM Installing the stand DX-LDVD19-10A 3 • If your TV does not operate normally by following the operating instructions. Adjust only those controls that are covered by the operating instructions because incorrect adjustment of other controls may result in damage and will often - Dynex DX-LDVD19-10A | User Manual (English) - Page 8
secure your TV to the stand, then pull the stand off the TV. Remove screws Installing a wall-mount bracket If you want to attach the TV to a wall-mount bracket (not provided), you should first remove the stand. To attach your TV to a wall-mount bracket: Warning: These servicing instructions are for - Dynex DX-LDVD19-10A | User Manual (English) - Page 9
Tuesday, April 28, 2009 4:43 PM TV components DX-LDVD19-10A 5 Back PC AUDIO IN HDMI ## Component Description 9 (Component) AUDIO IN jacks Connect the audio output (L and R) from a component device to these jacks. For more information, see "Connecting a component video device" on page 10. 10 - Dynex DX-LDVD19-10A | User Manual (English) - Page 10
DX-LDVD19-10A Using the remote control DVD. 15 FWD Press to fast forward a DVD. 16 MENU Press to go to the root menu on a DVD. 17 PLAY/ENTER 18 , , , and Arrow keys 19 ANGLE Press to play a DVD. Press to navigate in the on-screen DVD a digital sub-channel. 27 GUIDE 28 MUTE Press to display - Dynex DX-LDVD19-10A | User Manual (English) - Page 11
both your set-top box and your TV. Five such remotes are listed on the chart, but many other compatible models are available in the market. For more help, call technical support for your universal remote control or set-top box manufacturer, or call the Dynex Customer Care Center at 1-800-305-2204 - Dynex DX-LDVD19-10A | User Manual (English) - Page 12
4:43 PM 8 DX-LDVD19-10A Making connections Making connections Cautions: Check the terminals for position and type before making any connections. Loose connections can result in image or color problems. Make sure that all connections are tight and secure. The external audio/video equipment shown in - Dynex DX-LDVD19-10A | User Manual (English) - Page 13
4:43 PM Making connections DX-LDVD19-10A 9 Connecting a VCR To connect a VCR (option 1): 1 Make sure that your TV's power cord is unplugged VIDEO IN R AUDIO IN L VIDEO IN Camcorder or game R AUDIO IN L S-VIDEO IN R AUDIO IN L VIDEO IN COMPONENT IN Pb Video cable AUDIO-L and R cables S-Video - Dynex DX-LDVD19-10A | User Manual (English) - Page 14
28, 2009 4:43 PM 10 DX-LDVD19-10A Turning on your TV for the first time Connecting a component video device To connect a component video device: 1 Make sure that your TV's power cord is unplugged and the component video device is turned off. 2 Connect a component video cable to the COMPONENT OUT - Dynex DX-LDVD19-10A | User Manual (English) - Page 15
DX-LDVD19-10A 11 • Press CH+/CH- to highlight Auto Channels Search, then press ENTER/VOL+ The Auto Channels Search sub-menu opens. PICTURE Channels Auto Channels Search AUDIO CHANNELS SETTINGS Choose your TV EXIT EXIT Settings menu Settings Parental Controls Closed Caption Time Menu Settings - Dynex DX-LDVD19-10A | User Manual (English) - Page 16
4:43 PM 12 DX-LDVD19-10A Understanding the basics Notes: Depending on the signal source selected, you may see different options on your screen. The above menus are shown in TV mode. Menu items that are not selectable are grayed out. Menus in this manual are described in TV mode, unless otherwise - Dynex DX-LDVD19-10A | User Manual (English) - Page 17
2009 4:43 PM Adjusting the picture DX-LDVD19-10A 13 Displaying additional information To display additional information: • Press INFO to show an information banner. The information banner shows current program information such as channel number, video input source, and resolution. • Digital mode - Dynex DX-LDVD19-10A | User Manual (English) - Page 18
, 2009 4:43 PM 14 DX-LDVD19-10A Adjusting the sound • V-Position channels. Also available by pressing MTS/SAP on the remote control. Options include: • MONO-Select this option if Channels Auto Channels Search AUDIO CHANNELS SETTINGS Choose your TV source Antenna Cable Start 0 Analog Channels 0 - Dynex DX-LDVD19-10A | User Manual (English) - Page 19
4:43 PM Changing channel settings DX-LDVD19-10A 15 All available channels are can delete channels from the channel list so that your TV skips the channels when you press CH+/CH-. You can Ch 3.0 Ch 10.1 WCAU-DT Ch 13.0 Ch 14.2 ATSC-2 Ch 19.0 Ch 5.1 KPI-DT Ch 11.1 MBC DTV Ch 14.1 ATSC-3 Ch 14 - Dynex DX-LDVD19-10A | User Manual (English) - Page 20
-10A_09-0340.book Page 16 Tuesday, April 28, 2009 4:43 PM 16 DX-LDVD19-10A Changing channel settings Adding or changing a channel label If a channel is not already labeled, you can label the channel to make it easier to identify. - Dynex DX-LDVD19-10A | User Manual (English) - Page 21
parental controls DX-LDVD19-10A 17 3 Press CH+ or CH- to highlight Audio Only, press ENTER/VOL+ to open sub-menu, then press CH+/- to select On. 4 Press EXIT to close the menu. Notes: If Audio Only is set to On, the backlight should automatically turn off 5 seconds after last remote command - Dynex DX-LDVD19-10A | User Manual (English) - Page 22
-0340.book Page 18 Tuesday, April 28, 2009 4:43 PM 18 DX-LDVD19-10A Setting parental controls • Button Lock-Set to On to lock the buttons on the front of the TV. • Block Unrated TV-Set to On to block TV programs that are not rated. • USA Parental Locks-Select this sub-menu to change US parent - Dynex DX-LDVD19-10A | User Manual (English) - Page 23
controls DX-LDVD19-10A 19 3 Press CH+ or CH- to highlight Parental Controls, then press ENTER/VOL+. The Enter Password screen opens. Settings Parental Controls Controls USA Parental Locks MPPA Rating None G PG PG-13 R NC-17 X TV Ratings ALL FV L S V D None TV-Y TV-Y7 TV-G TV-PG TV-14 TV-MA - Dynex DX-LDVD19-10A | User Manual (English) - Page 24
DX-LDVD19-10A Using closed captioning 2 Press VOL+ or VOL- to highlight SETTINGS, then press ENTER/CH-. The Settings menu opens. Settings Parental Controls CC2 to CC4-For other modes of video related broadcast information. • Text1-For a program guide or other information displayed by broadcasters. - Dynex DX-LDVD19-10A | User Manual (English) - Page 25
Adjusting time settings DX-LDVD19-10A 21 • Digital menu opens. Settings Parental Controls Closed Caption Time Menu to select Custom or Auto. To set the time manually, select Custom. When Auto is selected, the time the amount of time you want your TV to wait before it automatically turns off - Dynex DX-LDVD19-10A | User Manual (English) - Page 26
, 2009 4:43 PM 22 DX-LDVD19-10A Adjusting menu settings 3 Press CH or CH- to select the time interval that you want your TV to remain on, then press ENTER to confirm the setting. menu. Note: You can also press SLEEP on the remote control to set the sleep timer. Adjusting menu settings Selecting - Dynex DX-LDVD19-10A | User Manual (English) - Page 27
2009 4:43 PM DVD Playback DX-LDVD19-10A 23 4 Press CH DVD Playback Basic playback To load and play a DVD: 1 Press DVD on the remote control to enter DVD mode. 2 When the TV displays "OPEN," place a DVD decoded by software and displayed through the video output interface or on the television screen - Dynex DX-LDVD19-10A | User Manual (English) - Page 28
DX-LDVD19-10A DVD Playback Press PREV or NEXT to move between pictures. Press PAUSE to stop on the current picture. Press PLAY/ENTER to resume normal playback. Screen saver This TV employs a screen saver mode to help protect the screen during static video LCD TV/DVD combo remembers the DVD chapter - Dynex DX-LDVD19-10A | User Manual (English) - Page 29
is 1 Troubleshooting Warning: Do not try to repair your TV yourself. Contact authorized service personnel. Video and audio Problem Solution No picture or sound (the screen is not lit) • Make sure that the power cord is plugged into a power outlet. • Press POWER on your TV or the remote control - Dynex DX-LDVD19-10A | User Manual (English) - Page 30
Do not try to repair your TV/DVD combo yourself. There are no user-serviceable parts inside. Turn off your TV/DVD combo, unplug the power cord, then contact an authorized service center. Note: If the problem is not solved by using these troubleshooting instructions, turn off your TV, then turn it - Dynex DX-LDVD19-10A | User Manual (English) - Page 31
limits for a class B digital device, pursuant to Part 15 of the FCC Rules. These limits are designed not installed and used in accordance with the instructions, may cause harmful interference to radio communications. or obligation. For service and support call (800) 305-2204. DX-LDVD19-10A 27 - Dynex DX-LDVD19-10A | User Manual (English) - Page 32
DX-LDVD19-10A_09-0340.book Page 28 Tuesday, April 28, 2009 4:43 PM 28 DX-LDVD19-10A Legal notices - Dynex DX-LDVD19-10A | User Manual (English) - Page 33
-10A_09-0340.book Page 29 Tuesday, April 28, 2009 4:43 PM Legal notices DX-LDVD19-10A 29 One-year limited warranty Dynex Products ("Dynex") warrants to you, the original purchaser of this new DX-LDVD19-10A ("Product"), that the Product shall be free of defects in the original manufacture of the - Dynex DX-LDVD19-10A | User Manual (English) - Page 34
DX-LDVD19-10A_09-0340.book Page 30 Tuesday, April 28, 2009 4:43 PM 30 DX-LDVD19-10A Legal notices - Dynex DX-LDVD19-10A | User Manual (English) - Page 35
DX-LDVD19-10A_09-0340.book Page 31 Tuesday, April 28, 2009 4:43 PM Legal notices DX-LDVD19-10A 31 - Dynex DX-LDVD19-10A | User Manual (English) - Page 36
DX-LDVD19-10A_09-0340.book Page 1 Tuesday, April 28, 2009 4:43 PM www.dynexproducts.com (800) 305-2204 Distributed by Best Buy Purchasing, LLC 7601 Penn Ave. South, Richfield, MN 55423 U.S.A. © 2009 Best Buy Enterprise Services, Inc. All rights reserved. DYNEX is a trademark of Best Buy Enterprise
-
 1
1 -
 2
2 -
 3
3 -
 4
4 -
 5
5 -
 6
6 -
 7
7 -
8
-
9
-
10
-
11
-
12
-
13
-
14
-
15
-
16
-
17
-
18
-
19
-
20
-
21
-
22
-
23
-
24
-
25
-
26
-
27
-
28
-
29
-
30
-
31
-
32
-
33
-
34
-
35
-
36
 |
 |
19" LCD TV/DVD Combo
DX-LDVD19-10A
USER GUIDE
DX-LDVD19-10A_09-0340.book
Page 1
Tuesday, April 28, 2009
4:43 PM