Edimax IC-3116W Installation Guide
Edimax IC-3116W Manual
 |
View all Edimax IC-3116W manuals
Add to My Manuals
Save this manual to your list of manuals |
Edimax IC-3116W manual content summary:
- Edimax IC-3116W | Installation Guide - Page 1
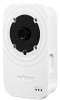
IC-3116W Quick Installation Guide (English) 11-2013 / v1.0 - Edimax IC-3116W | Installation Guide - Page 2
and the setup screen may appear slightly different from those shown in this QIG. For more information about this product, please refer to the user manual on the CD-ROM. The software and specifications are subject to change without notice. Please visit our website www.edimax.com for updates. All - Edimax IC-3116W | Installation Guide - Page 3
Contents 4 I-2. Back Panel 4 I-3. LED Status 5 I-4. Product Label 6 I-5. Reset 6 II. Hardware Installation 7 III. Camera Setup 8 III-1. Installing & Using EdiView Finder 8 III-1-1. Windows 8 III-1-2. Mac 13 III-2. WPS (Wi-Fi Protected Setup 16 III-3. Web-Based Management Interface 17 III - Edimax IC-3116W | Installation Guide - Page 4
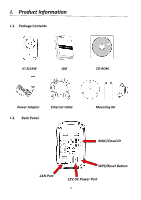
I. Product Information I-1. Package Contents IC-3116W QIG CD-ROM Power Adapter I-2. Back Panel Ethernet Cable Mounting Kit MAC/Cloud ID LAN Port WPS/Reset Button 12V DC Power Port 4 - Edimax IC-3116W | Installation Guide - Page 5
to cloud server. Power Green Quick Flashing Network camera is restarting. Slow Flashing (1 x per second) On Network camera is starting up OR network camera is not connected to cloud server. Network camera is connected to the local network. LAN Green Quick Flashing LAN activity (transferring - Edimax IC-3116W | Installation Guide - Page 6
connection) as described later in III-4. Myedimax.com. I-5. Reset If you experience problems with your network camera, you can reset the camera back to its factory default settings. This resets all settings back to default. 1. Press and hold the WPS/Reset button found on the back panel for at least - Edimax IC-3116W | Installation Guide - Page 7
Installation Follow the instructions below to ensure your camera is properly connected and ready for setup. 1. Use an Ethernet cable to connect the network camera's LAN port to a router/switch/access point's LAN port, as shown below. 2. Connect the power adapter to the network camera's power port - Edimax IC-3116W | Installation Guide - Page 8
III. Camera Setup Your network camera can be up and running in just a few minutes. First, please follow the instructions below for Windows or Mac in III-1. Installing & Using EdiView Finder to install the EdiView Finder software and connect your camera to your wireless network. Or you can follow III - Edimax IC-3116W | Installation Guide - Page 9
-screen instructions to install the EdiView Finder software utility. 4. When installation is complete, select "Launch EdiView Finder Utility" before clicking "Finish". Or double click the "EdiView Finder Utility" icon on your desktop to launch EdiView Finder. 5. EdiView Finder will list all cameras - Edimax IC-3116W | Installation Guide - Page 10
this IP address into the URL bar of a web browser on the same local network to access your network camera's web-based configuration interface. 6. Double click your camera and then choose "Yes" or "No" if you wish to set up a wireless connection. If you choose "No" please go to step 10. The IC-3116W - Edimax IC-3116W | Installation Guide - Page 11
your wireless network from the list and enter the correct password in the "Password" field, before clicking "OK". This is the wireless network which your camera will connect to. 8.Unplug the Ethernet cable from your network camera and click "Next". Please wait a moment for the camera to detect - Edimax IC-3116W | Installation Guide - Page 12
9.When the connection is detected as shown below, please click "Next". 10. Enter a name and password for your camera. The password will be used later to log in to your camera remotely via its cloud ID, web interface or via the EdiView smartphone app. Click "OK" to continue. 12 - Edimax IC-3116W | Installation Guide - Page 13
11. The next screen will indicate that setup is complete. The camera is operational and ready for use. Click "OK" and a preview window showing a live stream from your camera may open. III-1-2. Mac EdiView Finder for Mac will not set up your network camera's wireless connection. After this chapter, - Edimax IC-3116W | Installation Guide - Page 14
bar of a web browser on the same local network to access your network camera's web-based configuration interface. 4. Double click your network camera and wait a moment for the network camera to obtain an IP address and test the cloud connection. EdiView should display "Success" as shown below. 14 - Edimax IC-3116W | Installation Guide - Page 15
12. Enter a name and password for your camera. The password will be used later to log in to your camera remotely via its cloud ID, web interface or via the EdiView smartphone app. Click "Next" to continue. 13. The next screen will indicate that setup is complete. The camera is operational and ready - Edimax IC-3116W | Installation Guide - Page 16
length of time to activate its WPS. Please check the instructions for your wireless router/access point for how long you need to hold down its WPS button to activate WPS. 2. Within two minutes, press the WPS/Reset button on the network camera for 2 - 5 seconds to activate WPS. The green LAN LED - Edimax IC-3116W | Installation Guide - Page 17
. You can access the web-based management interface with a web browser on a smartphone or computer. 1. Enter the network camera's IP address into the URL bar of a web browser. The camera's IP address can be found by opening EdiView Finder, as displayed below: Internet Explorer is recommended. 17 - Edimax IC-3116W | Installation Guide - Page 18
warnings/prompts appear, please select "Run" or "Allow" or similar, depending on your browser. 3. Enter the username and password for your network camera (default username: admin default password: 1234). The network camera's webbased management interface will then be displayed in your browser. 18 - Edimax IC-3116W | Installation Guide - Page 19
manual for more information about using the web-based configuration interface. Mac users please continue to III-3-1. Wireless Settings to set up your camera's wireless connection. III-3-1. Wireless Settings The "Wireless" page of the web-based management interface allows you to configure the network - Edimax IC-3116W | Installation Guide - Page 20
A C B D E 20 - Edimax IC-3116W | Installation Guide - Page 21
Shared Key Enter your Wi-Fi password. E Save Settings Click "Save Settings" to save your settings. 3. After the settings are saved, remove the Ethernet cable from your network camera. Your camera should now be connected to your Wi-Fi. III-3-1-2. Computer 1. Select "Setup" in the top right corner - Edimax IC-3116W | Installation Guide - Page 22
. This is the wireless network which your camera will connect to. D WPA Pre Shared Key Enter your Wi-Fi password. E Save Settings Click "Save Settings" to save your settings. 4. After the settings are saved, remove the Ethernet cable from your network camera. Your camera should now be connected - Edimax IC-3116W | Installation Guide - Page 23
's green power LED must display on for this function to work. 1. Identify your network camera's cloud ID. The cloud ID is displayed in EdiView Finder (see III-1.) and on the product label on the back of the network camera (see I-4.). The cloud ID is a string of 12 characters consisting of numbers - Edimax IC-3116W | Installation Guide - Page 24
If any other security warnings/prompts appear, please select "Run" or "Allow" or similar, depending on your browser. 4. Enter your camera's password (default password: 1234) and click "OK" to see a live stream from your network camera. 24 - Edimax IC-3116W | Installation Guide - Page 25
from any Internet connection. The network camera's green LED must display on for this function to work. 1. Search the Apple app store or Google Play for "EdiView". Download and install the EdiView app. 2. Run the EdiView app. iOS users select "Add new camera" and Android users select "Yes - Edimax IC-3116W | Installation Guide - Page 26
3. Select your network camera, enter the password when prompted (default password is 1234) and tap "OK". iOS: 26 - Edimax IC-3116W | Installation Guide - Page 27
Android: 4. Android users select the camera name and tap "Done". iOS users tap "Live" from the menu across the bottom of the screen. 27 - Edimax IC-3116W | Installation Guide - Page 28
Android: iOS: For more detailed guidance on using the EdiView app, please refer to the user manual. 28 - Edimax IC-3116W | Installation Guide - Page 29
, if not installed and used in accordance with the instructions, may cause harmful interference to radio communications. However, not authorized. This transmitter is restricted for use with the specific antenna tested in the application for certification. The antenna(s) used for this transmitter - Edimax IC-3116W | Installation Guide - Page 30
/108/EC, 2006/95/EC, 2009/125/EC oleelliset vaatimukset ja muut asiaankuuluvat määräykset. WEEE Directive & Product Disposal At the end of its serviceable life, this product should not be treated as household or general waste. It should be handed over to the applicable collection point for the - Edimax IC-3116W | Installation Guide - Page 31
of Conformity We, Edimax Technology Co., Ltd., declare under our sole responsibility, that the equipment described below complies with the requirements of the European R&TTE directive (1999/5/EC, 2006/95/EC) Equipment: 720p Wireless H.264 Day & Night Network Camera Model No.: IC-3116W The following - Edimax IC-3116W | Installation Guide - Page 32
it to your programs, too. When we speak of free software, we are referring to freedom, not price. Our General Public Licenses are designed to make sure that you have the freedom to distribute copies of free software (and charge for this service if you wish), that you receive source code or can get - Edimax IC-3116W | Installation Guide - Page 33
the complete corresponding machine-readable source code, which must be distributed under the terms of Sections 1 and 2 above on a medium customarily used for software interchange; or, b) Accompany it with a written offer, valid for at least three years, to give any third party, for a charge no more - Edimax IC-3116W | Installation Guide - Page 34
differ in detail to address new problems or concerns. Each version is software which is copyrighted by the Free Software Foundation, write to the Free Software Foundation; we sometimes make exceptions for this. Our decision will be guided THE COST OF ALL NECESSARY SERVICING, REPAIR OR CORRECTION. 12. - Edimax IC-3116W | Installation Guide - Page 35
35
-
 1
1 -
 2
2 -
 3
3 -
 4
4 -
 5
5 -
 6
6 -
 7
7 -
8
-
9
-
10
-
11
-
12
-
13
-
14
-
15
-
16
-
17
-
18
-
19
-
20
-
21
-
22
-
23
-
24
-
25
-
26
-
27
-
28
-
29
-
30
-
31
-
32
-
33
-
34
-
35
 |
 |

IC-3116W
Quick Installation Guide (English)
11-2013 / v1.0