Electrolux E15IM60GPS Complete Owner's Guide (English)
Electrolux E15IM60GPS Manual
 |
View all Electrolux E15IM60GPS manuals
Add to My Manuals
Save this manual to your list of manuals |
Electrolux E15IM60GPS manual content summary:
- Electrolux E15IM60GPS | Complete Owner's Guide (English) - Page 1
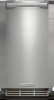
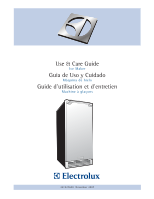
Use & Care Guide Ice Maker Guia de Uso y Cuidado Máquina de hielo Guide d'utilisation et d'entretien Machine à glaçons 241927600 November 2007 - Electrolux E15IM60GPS | Complete Owner's Guide (English) - Page 2
choosing Electrolux, the new premium brand in home appliances. This Use & Care Guide is part of our commitment to customer satisfaction and product quality throughout the service life of your new ice maker. We view your purchase as the beginning of a relationship. To ensure our ability to continue - Electrolux E15IM60GPS | Complete Owner's Guide (English) - Page 3
- Every Year 19 Storing, Vacation and Moving 19 Draining for Non-Use 19 Troubleshooting 20 Before you Call for Service 20 If Service is Required 21 Warranty Information 22 WARNING You must follow these guidelines to ensure that your refrigerator's safety mechanisms are operating correctly. - Electrolux E15IM60GPS | Complete Owner's Guide (English) - Page 4
the warranty. CAUTION • Using a heater to speed up defrosting can cause personal injury and damage to the inner lining. DO NOT use any type of heater to defrost. • Use only genuine Electrolux replacement parts. Imitation parts can reduce ice rate, cause water to overflow from ice maker mold - Electrolux E15IM60GPS | Complete Owner's Guide (English) - Page 5
follow recommendations and instructions may result in damage and/or harm. Model EI15IM55GS can be installed using a gravity drain or the Electrolux EIMP60, optional drain pump kit. Follow these guidelines when installing drain lines to prevent water from flowing back into the ice maker storage bin - Electrolux E15IM60GPS | Complete Owner's Guide (English) - Page 6
EIMP60 drain pump is available through your Dealer, or direct from Electrolux with complete installation instructions. If a pump other than the Electrolux EIMP60 drain pump is to be used, it must meet the following specifications: • It must be UL listed and have a UL listed, 120 VAC, 3-wire - Electrolux E15IM60GPS | Complete Owner's Guide (English) - Page 7
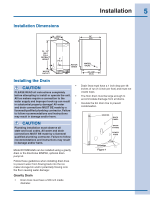
Electrical Grounding Required. This appliance is equipped with a the ice maker. 5 Connect the unit to a grounded and polarized 115 VAC, 60 Hz, 15 A installed flush with a cabinet or wall (see Figure 2). Electrolux stainless steel models require a minimum 2-3/4 inch handle clearance when installed - Electrolux E15IM60GPS | Complete Owner's Guide (English) - Page 8
every 15 minutes. • Make certain a SHUT-OFF VALVE is installed in the 1/4 inch water supply line. • Connect sufficient tubing to the unit to allow the unit to be moved for cleaning and servicing. However, make certain that the tubing is not pinched or damaged during installation. • Electrolux - Electrolux E15IM60GPS | Complete Owner's Guide (English) - Page 9
front to back and from side to side (see Figure 10). CHECK LEVEL Figure 10 2 If the ice maker is not level, adjust the feet on the corners of the unit as necessary (see Figure 11). TURN FOOT TO ADJUST Figure 11 3 Check the - Electrolux E15IM60GPS | Complete Owner's Guide (English) - Page 10
10 Door Reversal Reversing the Door (some models) All Electrolux units may be left or right hand new hinge location (see Figure 14), and remove hinge pin hole plug in top of door (see Figure 15). Do not discard. SCREW PLUGS Figure 12 To reverse the door: 1 Remove top hinge screw pin from - Electrolux E15IM60GPS | Complete Owner's Guide (English) - Page 11
Door Reversal 11 4 Remove the two door closer inserts from the 7 Holding door upright with top of door tilted existing bottom hinge and install as shown on forward, place hole of door pivot plate on the new bottom hinge (see Figure 17). bottom hinge screw pin (see Figure 19). - Electrolux E15IM60GPS | Complete Owner's Guide (English) - Page 12
Adjusting the Door Your door is aligned at the factory before shipment. Occasional re-adjustment may be necessary, especially if an overlay panel is installed. The following procedure will correct for up to 1/4" alignment. The door should never be flush with the top of the cabinet. Even when level - Electrolux E15IM60GPS | Complete Owner's Guide (English) - Page 13
, the front grille must NOT be obstructed. NOTE To ease unit installation and removal, the unit must be located to allow clearance for water, drain and electrical connections in the rear of the ice maker. Model EI15IM55GS Built-In Cabinet Dimensions Unit Dimensions Width Height 14-15/16" 34 - Electrolux E15IM60GPS | Complete Owner's Guide (English) - Page 14
ice production rate may vary depending on many considerations. Ambient air temperatures, water temperatures, condenser cleanliness and ice-maker ice bucket. 1/4" TO 1/2" DIMPLE 1/16" TO 1/8" ICE BRIDGE BRIDGE TOO THIN DIMPLE TOO DEEP Your Electrolux ice maker uses advanced technology to make ice - Electrolux E15IM60GPS | Complete Owner's Guide (English) - Page 15
adjustment should only be made one increment at a time. Allow ice maker production to stabilize for 24 hours before rechecking ice thickness. IMPORTANT It is extremely important that Clear Ice models are level. If not level, the ice mold will not fill evenly. 3. Touch and release the LIGHT - Electrolux E15IM60GPS | Complete Owner's Guide (English) - Page 16
steel models exposed to chlorine gas and moisture, such as areas with spas or swimming pools, may have some discoloration of the stainless steel. Discoloration from chlorine gas is normal. Follow exterior cleaning instructions. Interior Cleaning - As Required 1 Disconnect power to the ice maker - Electrolux E15IM60GPS | Complete Owner's Guide (English) - Page 17
when handling Ice Machine Cleaner. CAUTION Use only Electrolux Ice Machine Cleaner (part number EIM30046). It is a violation of Federal law to use this solution in a manner inconsistent with its labeling. Use of any other cleaner can ruin the finish of the evaporator and will void the warranty. Read - Electrolux E15IM60GPS | Complete Owner's Guide (English) - Page 18
45 minutes) the unit will remain off for an additional 15 minutes. When the clean cycle is completed, the display equipped with a drain pump, it should drain the ice bin. When ice production resumes, the water fill valve will energize, fill of Electrolux Ice Machine Cleaner to the water reservoir. - Electrolux E15IM60GPS | Complete Owner's Guide (English) - Page 19
Make sure the drain system is working properly and the drain hose is not pinched or kinked. Pour one gallon of cool, fresh water into the ice bin. The water should drain freely. If your ice maker warranty. WATER CONNECTION Figure 33 UL103_CO IMPORTANT The use of antifreeze or other products of - Electrolux E15IM60GPS | Complete Owner's Guide (English) - Page 20
without a service call. DANGER ELECTROCUTION HAZARD NEVER attempt to repair or perform maintenance on the unit until the main electrical power has been disconnected. Troubleshooting Guide Troubleshooting - What to check when problems occur Problem Unit does not operate. Unit runs but no ice is - Electrolux E15IM60GPS | Complete Owner's Guide (English) - Page 21
Troubleshooting 21 Troubleshooting - What to check when problems occur Problem Poor ice quality (soft or unclear). Unit produces shallow or incomplete cubes, or the ice fill pattern on the evaporator is incomplete. Possible Cause x Poor incoming water quality. x Ice-making system is dirty. x Low - Electrolux E15IM60GPS | Complete Owner's Guide (English) - Page 22
add to any of our obligations under this warranty. Our obligations for service and parts under this warranty must be performed by us or an authorized Electrolux Home Products, Inc. servicer. In Canada, your appliance is warranted by Electrolux Canada Corp. *NORMAL RESPONSIBILITIES OF THE CUSTOMER
-
 1
1 -
 2
2 -
 3
3 -
 4
4 -
 5
5 -
 6
6 -
 7
7 -
8
-
9
-
10
-
11
-
12
-
13
-
14
-
15
-
16
-
17
-
18
-
19
-
20
-
21
-
22
 |
 |
241927600
November 2007
Use & Care Guide
Ice Maker
Guia de Uso y Cuidado
Máquina de hielo
Guide d’utilisation et d’entretien
Machine à glaçons