Electrolux E23BC79SPS Complete Owners Guide English
Electrolux E23BC79SPS Manual
 |
View all Electrolux E23BC79SPS manuals
Add to My Manuals
Save this manual to your list of manuals |
Electrolux E23BC79SPS manual content summary:
- Electrolux E23BC79SPS | Complete Owners Guide English - Page 1
EN FRENCH DOOR BOTTOM FREEZER/REFRIGERATOR FR RÉFRIGÉRATEUR À PORTES FRANÇAISES/CONGÉLATEUR EN BAS ES REFRIGERADOR CON CONGELADOR INFERIOR DE PUERTA DOBLE USE AND CARE GUIDE GUIDE D'UTILISATION ET D'ENTRETIEN GUIA DE USO Y CUIDADO A05963204 June 2018 - Electrolux E23BC79SPS | Complete Owners Guide English - Page 2
2 Finding Information Please read and save this guide Thank you for choosing Electrolux, our new premium brand in home appliances. This Use & Care Guide is part of our commitment to customer satisfaction and product quality throughout the service life of your new appliance. Keep a record for quick - Electrolux E23BC79SPS | Complete Owners Guide English - Page 3
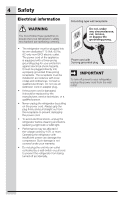
These problems are not limited to the past. Whether junked, abandoned, or temporarily stored (even for a few hours), unattended refrigerators and Have refrigerant and compressor oil removed by a qualified service technician. Please read all safety instructions before using your new refrigerator. • - Electrolux E23BC79SPS | Complete Owners Guide English - Page 4
use an extension cord or adapter plug. • If the power cord is damaged, it should be replaced by the manufacturer, service technician, or a qualified person. • Never unplug the refrigerator by pulling on the power cord. Always grip the plug firmly and pull straight out from the receptacle to prevent - Electrolux E23BC79SPS | Complete Owners Guide English - Page 5
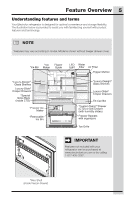
Overview 5 Understanding features and terms Your Electrolux refrigerator is designed for optimal convenience and storage . Model is shown without freezer drawer cover. *Ice Flipper *Ice Bin Maker Guide LED Light Water Filter Air Filter Flipper Mullion *Luxury-Design® Glass Shelves Luxury-Glide - Electrolux E23BC79SPS | Complete Owners Guide English - Page 6
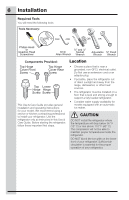
provides general installation and operating instructions for your model. We recommend using a service or kitchen contracting professional to install your refrigerator. Use the refrigerator only as instructed in this Use & Care Guide. Before starting the refrigerator, follow these important first - Electrolux E23BC79SPS | Complete Owners Guide English - Page 7
for ease of installation, proper air circulation, and plumbing and electrical connections: Sides & Top 3/8 inch (9.5 mm) Back 1 inch (25.4 mm) NOTE If your refrigerator is placed with the door hinge against a wall, you may have to allow additional space so the door can be opened wider. Door - Electrolux E23BC79SPS | Complete Owners Guide English - Page 8
appliance. Raise Flipper Mullion Mullion Guide Thickness of a Coin Adjusting Flipper Mullion Height 3 Re-tighten screw. Installing Shelves (select models) Your refrigerator was shipped with the shelf hanger and glass shelves in a shipping pack. Below are the instructions to install and remove the - Electrolux E23BC79SPS | Complete Owners Guide English - Page 9
hanger. 6 Lift the hanger directly upwards and pull toward you to remove it from the ladder. CAUTION Shelves must be removed prior to moving the refrigerator. 4 Gently set the shelf onto the hanger once the back is secured by the hanger. Reposition the Air Seal (select models) 1 Remove air seal - Electrolux E23BC79SPS | Complete Owners Guide English - Page 10
carefully. NOTE Features may vary according to model. Your refrigerator includes glass shelves that are designed to catch and hold compartments to suit your needs. The shelves have mounting brackets that attach to slotted supports at the rear of each compartment. To change the position of a shelf: - Electrolux E23BC79SPS | Complete Owners Guide English - Page 11
the top door hinges. 2 Lift inside edge of hinge cover and tilt back. NOTE DO NOT remove the ground screw from hinge. To remove the refrigerator doors WARNING Make sure the electrical power cord is unplugged from the wall outlet. 1 Remove top hinge covers. Trace lightly around the door's top hinges - Electrolux E23BC79SPS | Complete Owners Guide English - Page 12
be pulling approximately five feet of water tube from the back of the refrigerator. NOTE Use care while pulling the water tube from the unit to be kink the tube. Press Press Water Line Left Door Right Door 4 Open the refrigerator doors to a 90 degree angle and remove the two screws from the top - Electrolux E23BC79SPS | Complete Owners Guide English - Page 13
Removing the Doors 13 To reinstall the refrigerator doors: IMPORTANT When replacing the doors on the lower hinge, Water Line Once the door pins are reset, follow the steps "To reinstall the refrigerator doors". NOTE When reinserting the water tube and replacing the top hinge cover, use care to - Electrolux E23BC79SPS | Complete Owners Guide English - Page 14
when lifting. 1 Remove 4 hex head drawer screws. 2 Lift up drawer to remove. Replacing Freezer Drawer 1 Extend the Freezer slides from the unit. 2 Carefully align support pin with hooks on end of freezer slides and then lower freezer door onto slides. 3 Replace the 4 hex head screws that secure the - Electrolux E23BC79SPS | Complete Owners Guide English - Page 15
Installing Door Handles 15 Door Handle Mounting Instructions CAUTION Wear gloves and safety goggles. Use extreme for the set screws are facing towards the first door. End Cap End Cap Mounting Refrigerator Handles End End Cap Cap 5. Position freezer handle end caps over left and right pre - Electrolux E23BC79SPS | Complete Owners Guide English - Page 16
your local building authority for recommendations on water lines and associated materials prior to installing your new refrigerator. Depending on your local/state building codes, Electrolux recommends for homes with existing valves its Smart Choice® water line kit 5305513409 with a 6 ft. (1.8 meters - Electrolux E23BC79SPS | Complete Owners Guide English - Page 17
they do not vibrate or wear against any other surface. 7. Turn ON water supply at shutoff valve and tighten any connections that leak. 8. Reconnect refrigerator to electrical power source. 9. To turn ice maker on, lower wire signal arm (freezer ice maker) or use the digital control setting to turn - Electrolux E23BC79SPS | Complete Owners Guide English - Page 18
18 Controls Wave-TouchTM Your refrigerator is equipped with a WaveTouchTM control panel display. It is only necessary to gently touch Sleep Mode displays only the water, cubes and crushed options. Touch an icon to activate the desired dispenser mode. The active dispenser mode is more brightly - Electrolux E23BC79SPS | Complete Owners Guide English - Page 19
maker, all dispenser functions,andtheCustomTempTM drawer (select models). The temperaturedisplaywillreadOFF. IMPORTANT Pressing the system on/off icon does not turn off power to your refrigerator. You must unplug the power cord from the wall outlet. Setting cooling temperatures 1 Touch the glass - Electrolux E23BC79SPS | Complete Owners Guide English - Page 20
) will continue to work and must be manually turned off to be compliant with the Sabbath left ajar the High Temp alarm is activated. The refrigerator will function normally once the door is closed, without itself after 10 minutes while the High Temp icon stays lit until the Sabbath mode is exited. - Electrolux E23BC79SPS | Complete Owners Guide English - Page 21
for three seconds to turn off the cooling systemtocleantherefrigerator.Thetemperaturedisplayswill read OFF. IMPORTANT Pressing the system on/off icon does not turn off power to your refrigerator. You must unplug the power cord from the wall outlet. Setting cooling temperatures Press the + or - Electrolux E23BC79SPS | Complete Owners Guide English - Page 22
refrigerator and the refrigerator temp "+" activated. The refrigerator will function normally High Temp icon stays lit Before putting the refrigerator into the Sabbath function on the main refrigerator display. See the IQ mode. When the refrigerator is taken out is deactivated. Refrigerator stays in - Electrolux E23BC79SPS | Complete Owners Guide English - Page 23
work as soon as you install your refrigerator. If you cannot connect a water supply, set the ice maker's On/Off icon to Off and turn off the water supply the ice bin is full. This signal arm should not be used to manually stop the ice maker. Using the ice maker after installation Before making ice - Electrolux E23BC79SPS | Complete Owners Guide English - Page 24
24 Automatic Ice Maker & Water Dispenser Ice maker/dispenser tips • If your refrigerator is not connected to a water supply or the water supply is turned off, turn off the ice maker by holding the On/Off soft-touch icon for three seconds. • The following sounds are normal when the ice maker is - Electrolux E23BC79SPS | Complete Owners Guide English - Page 25
turned on at the factory so it can work as soon as you install your refrigerator. If you cannot connect a water supply, lift the ice maker's wire signal Mode, the automatic ice maker will continue to work and must be manually turned off to be compliant with the Sabbath observance. Turning the ice - Electrolux E23BC79SPS | Complete Owners Guide English - Page 26
26 Automatic Ice Maker - Freezer Cleaning the ice maker Clean the ice maker and ice bin at regular intervals, especially prior to vacation or moving. 1 Turn off the ice maker. 2 Remove the ice bin. 3 Empty and carefully clean the ice bin with mild detergent. Do not use harsh or abrasive cleaners. - Electrolux E23BC79SPS | Complete Owners Guide English - Page 27
Storage Features 27 Drawers Your refrigerator includes a variety of storage drawers. Crispers Crisper drawers are designed for storing fruits, vegetables, and other fresh produce. They feature a smooth-glide, ball-bearing system - Electrolux E23BC79SPS | Complete Owners Guide English - Page 28
Custom TempTM Drawer is designed to keep food items at a precise temperature whether cooler, warmer, or the same as the fresh food section of the refrigerator. The thaw setting holds a temperature for thawing frozen foods for 12 hours. At the end of that time, it then switches to the snacks setting - Electrolux E23BC79SPS | Complete Owners Guide English - Page 29
4 Place the bin just above desired position. 5 Lower the bin onto supports until locked in place. Accessories (varies by model) Tall bottle retainer The containers in the bin from falling forward when opening or closing the refrigerator door. To install, insert the ends of the retainer into the - Electrolux E23BC79SPS | Complete Owners Guide English - Page 30
of the basket and pull them out to remove. 2 Open fresh food doors completely. 3 Lift the basket up and remove. Replacing Freezer Basket Instructions 1 Place freezer basket back inside the freezer drawer. 2 Replace clips by sliding them back into the slots. Stabilizer Bar Freezer Baskets To Remove - Electrolux E23BC79SPS | Complete Owners Guide English - Page 31
Dividers Removal Lift up on the front of the upper divider and pull out. Storage Features 31 Upper Basket Divider Retainers Stabilizer Bar Upper Basket Divider Squeeze handle and lift up in the center of the divider to move it side-to-side. (The divider cannot be removed.) Lower Basket Divider - Electrolux E23BC79SPS | Complete Owners Guide English - Page 32
. • Leave a space between packages, so cold air can circulate freely, allowing food to freeze as quickly as possible. Ideas for saving energy Installation • Locate the refrigerator in the coolest part of the room, out of direct sunlight, and away from heating ducts or registers. • Do not place the - Electrolux E23BC79SPS | Complete Owners Guide English - Page 33
ice maker When ice has been produced, you will hear ice cubes falling into the ice bin. Ice maker fan, water valve activation, and refrigerant gas fluid may create sounds from its operation. E Electronic control & automatic defrost control These parts can produce a snapping or clicking sound when - Electrolux E23BC79SPS | Complete Owners Guide English - Page 34
please reorder the same filter type that is currently in your refrigerator. More about your Advanced Water Filter The PureAdvantage UltraTM ice and - 125 gallons/473 liters for PureAdvantage UltraTM ice and water filter • Rated service flow - .65 gallons per minute • Operating Temp: Min. 33°F, Max. - Electrolux E23BC79SPS | Complete Owners Guide English - Page 35
.com, by calling toll-free at 800-599-7569, or by visiting the dealer where you purchased your refrigerator. Electrolux recommends that you order extra filters when you first install your refrigerator, and that you replace your filters at least once every six months. Here is the product number to - Electrolux E23BC79SPS | Complete Owners Guide English - Page 36
glass breakage. IMPORTANT If you store or move your refrigerator in freezing temperatures, be sure to completely drain the water supply system. Failure to do so could result in water leaks when the refrigerator is put back into service. Contact a service representative to perform this operation. - Electrolux E23BC79SPS | Complete Owners Guide English - Page 37
guide on the next page for details on caring and cleaning specific areas of your refrigerator. Occasion Short Vacations Long Vacations Moving Tips • Leave refrigerator • Soap and water • Remove toe grille (see Installation Instructions). • Mild liquid sprays • Vacuum both sides and wipe with - Electrolux E23BC79SPS | Complete Owners Guide English - Page 38
you call... If you experience a problem with your refrigerator or notice a product behavior or condition that you do not understand, you can usually avoid a call to your service representative by referring to this section to the rear of the shelf. See Automatic Ice Maker-Freezer section in manual. - Electrolux E23BC79SPS | Complete Owners Guide English - Page 39
Problems 39 is kinked. • Ensure that the supply line does not kink when the refrigerator is pushed into place against the wall. • Saddle valve on cold water the off or upward position. See Automatic Ice Maker-Freezer section in manual. Ice cubes • Ice cubes are not being • Remove ice container - Electrolux E23BC79SPS | Complete Owners Guide English - Page 40
to Common Problems Concern Potential Cause Dispenser (Ice & Water) Common Solution Dispenser will not dispense ice. • There is no ice in the bin to • See the "Ice maker is not making any be dispensed. ice" section above. • The refrigerator doors are • Be sure the refrigerator doors are - Electrolux E23BC79SPS | Complete Owners Guide English - Page 41
is level and solid, and can adequately support the refrigerator. Contact a carpenter to correct a sagging or sloping floor. • Refrigerator is touching a wall or cabinet. • control system has detected a performance problem. • Call your Electrolux service representative, who can interpret any - Electrolux E23BC79SPS | Complete Owners Guide English - Page 42
42 Solutions to Common Problems Concern Potential Cause Common Solution Water/Moisture/Frost Inside Refrigerator Moisture • Weather is hot and humid. • The rate of frost buildup and internal collects on sweating increases. inside of • Flipper mullion refrigerator walls. • Adjust flipper - Electrolux E23BC79SPS | Complete Owners Guide English - Page 43
date of purchase, Electrolux will repair or replace any parts in the cabinet liner and sealed refrigeration system which prove to be defective in materials or workmanship when such appliance is installed, used, and maintained in accordance with the provided instructions. Exclusions This warranty
-
 1
1 -
 2
2 -
 3
3 -
 4
4 -
 5
5 -
 6
6 -
 7
7 -
8
-
9
-
10
-
11
-
12
-
13
-
14
-
15
-
16
-
17
-
18
-
19
-
20
-
21
-
22
-
23
-
24
-
25
-
26
-
27
-
28
-
29
-
30
-
31
-
32
-
33
-
34
-
35
-
36
-
37
-
38
-
39
-
40
-
41
-
42
-
43
 |
 |

EN
FRENCH DOOR BOTTOM
FREEZER/REFRIGERATOR
FR
RÉFRIGÉRATEUR À PORTES
FRANÇAISES/CONGÉLATEUR EN BAS
ES
REFRIGERADOR CON CONGELA-
DOR INFERIOR DE PUERTA DOBLE
A05963204 June 2018
USE AND CARE GUIDE
GUIDE D’UTILISATION ET D’ENTRETIEN
GUIA DE USO Y CUIDADO