Electrolux E30WD75GTT Installation Instructions
Electrolux E30WD75GTT Manual
 |
View all Electrolux E30WD75GTT manuals
Add to My Manuals
Save this manual to your list of manuals |
Electrolux E30WD75GTT manual content summary:
- Electrolux E30WD75GTT | Installation Instructions - Page 1
SERVICE MUST BE PERFORMED BY A QUALIFIED INSTALLER. IMPORTANT: SAVE FOR LOCAL ELECTRICAL INSPECTOR'S USE. READ AND SAVE THESE INSTRUCTIONS FOR FUTURE REFERENCE. WARNING FOR YOUR SAFETY: Do not store or use gasoline or other flammable vapors and liquids in the vicinity of this or any other appliance - Electrolux E30WD75GTT | Installation Instructions - Page 2
careful not to pinch electrical cord. 3.Remove the drawer as instructed in the Use & Care Guide and secure drawer housing to cabinet using the 3 nickel-plated screws supplied (see Figure 2). Do not overtighten screws. 4.The 60" (152,4 cm) appliance power cord can now be connected into the 120 Volt - Electrolux E30WD75GTT | Installation Instructions - Page 3
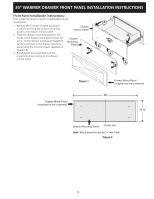
30" WAWRAMREMR&DRSAERWVEERDFRrAoWntERPaINnSeTlAILNLSATTAIOLLNAITNIOSTNRIUNCSTTIROUNCSTIONS Front Panel Installation instructions: First, install the drawer handle (if applicable) on the wood panel. A 1. Remove the 5 screws located at position A which are fixing the drawer mounting panel to - Electrolux E30WD75GTT | Installation Instructions - Page 4
the appliance. Model and Serial Number Location The serial plate is located as shown below. When ordering parts electrical supply cord from wall receptacle before servicing cooktop. Preferred Method Grounding type wall receptacle installation instructions of the cooktop to avoid interference with the - Electrolux E30WD75GTT | Installation Instructions - Page 5
WARM & SERVE DRAWER INSTALLATION INSTRUCTIONS Canadá LA INSTALACIÓN Y EL SERVICIO DEBEN SER ón calentador debe de estar instalado con una superficie llana, de la izquierda a la derecha, de la parte de atrás al frente. La superficie debe poder sostener 100 libras (45,4 Kg). Dimensiones del cajón - Electrolux E30WD75GTT | Installation Instructions - Page 6
INSTALLATION INSTRUCTIONS Notas la última edición de los Estados Unidos, o la CSA C22.1, Parte 1 en Canadá, y con los requisitos de códigos locales. Herramientas el cable eléctrico. 3. Remover el cajón como indica el manual de uso y cuidado asegure el marco contra el gabinete utilizando los - Electrolux E30WD75GTT | Installation Instructions - Page 7
WARM & SERVE DRAWER INSTALLATION INSTRUCTIONS Instrucciones de instalación del panel frontal En primer lugar, madera (provisto por el cliente) Panel de madera (provisto por el cliente) 30'' 11¼'' Panel de montaje Linea central Nota: El panel de madera debe tener ½'' de espesor. Figura 2 - Electrolux E30WD75GTT | Installation Instructions - Page 8
WARM & SERVE DRAWER INSTALLATION INSTRUCTIONS Conexión eléctrica Un circuito derivado conectado correctamente a tierra de 120 voltios, 60 Herz protegido por un interruptor automático de 15 amp o un fusible - Electrolux E30WD75GTT | Installation Instructions - Page 9
INSTALLATION ET LE SERVICE. IMPORTANT: CONSERVEZ CES INSTRUCTIONS POUR LES INSPECTEURS LOCAUX. LISEZ CES INSTRUCTIONS ET CONSERVEZ‑ l'arrière à l'avant. combiné à un four encastré superposé. La surface doit pouvoir supporter 100 lbs (45,4 Kg). Dimensions du tiroir-réchaud NOTE: Un câble de 60" ( - Electrolux E30WD75GTT | Installation Instructions - Page 10
au tiroir-réchaud (s'il y a lieu). Suivez les instructions d'installation fournies avec le four encastré. Assurez-vous d'utiliser main ou scie sauteuse Niveau à bulle Installation d'un tiroir-réchaud 1. Localisez les supports anti-bascule tel qu'indiqué à la fig. 1. Utilisez les vis fournies pour - Electrolux E30WD75GTT | Installation Instructions - Page 11
D'INSTALLATION POUR LE TIROIR-RÉCHAUD Instructions d'installation du panneau avant du tiroir: Premièrement, Panneau de bois (fourni par le client) Panneau de bois (fourni par le client) 30'' 11¼'' Panneau de montage Ligne centrale Note: Le panneau de bois doit avoir au minimum ½'' (1.27 - Electrolux E30WD75GTT | Installation Instructions - Page 12
INSTRUCTIONS D'INSTALLATION POUR LE TIROIR-RÉCHAUD Connexion électrique Circuit de dérivation de 120 volt, 60 Hertz, avec mise à la terre appropriée, protégé par un disjoncteur de
-
 1
1 -
 2
2 -
 3
3 -
 4
4 -
 5
5 -
 6
6 -
 7
7 -
8
-
9
-
10
-
11
-
12
 |
 |
WARM & SERVE DRAWER INSTALLATION INSTRUCTIONS
D
A
F
E
C
B
P/N 318201808 (0901) Rev. C
English – pages 1-4
Español – páginas 5-8
Français – pages 9-12
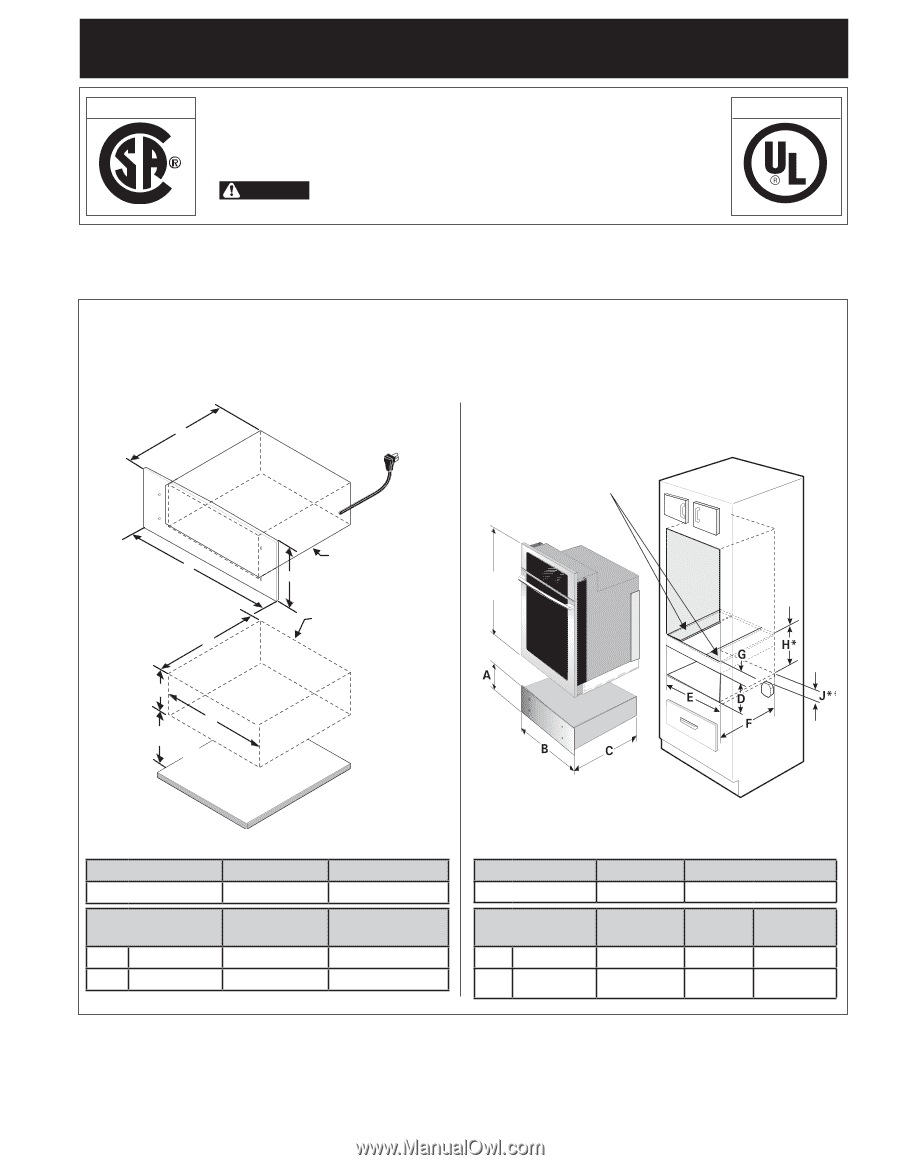
Warm & Serve Drawer Dimensions
Stand Alone Installation
NOTE:
A 60" (152,4 cm) long cable is supplied with
the Warm & Serve Drawer.
FLOOR
Warm and Serve
Cutout
Warm and Serve
Drawer
60" (152,4
cm) Cord
Minimum distance to floor
4½" (11,4 cm)
IMPORTANT:
The Warm & Serve Drawer runs off a
single phase three-wire 120 volt, 60 hertz, AC only
electrical supply with ground.
H*
= 11 5/8" (29,5cm) Min.
is a Critical
dimension and has to be respected
.
Caution
: Two 3" (7,6 cm) wide X
3/4" (1,9 cm) thick planks have to
be install and they should be able to
support 200 pounds. (90,7 Kg)
29½"
(74,9cm)
Printed in the USA
J**
= 3" (7,6cm) Max.
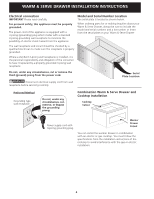
Electrical Junction Box for wall oven
must be lower than warmer drawer cutout.
Bottom of oven cutout
A. HEIGHT
B. WIDTH
C. DEPTH
10 ¾" (27,3 cm)
29" (73,7 cm)
23
3
/
8
" (59,4 cm)
D. CUTOUT
HEIGHT
E. CUTOUT
WIDTH
F.
CUTOUT
DEPTH
Min.
9
7
/
8
" (25,1 cm)
28 ½" (72,4 cm)
23
5
/
8
" (60 cm)
Max.
10 ¼" (26 cm)
28 ¾" (73 cm)
24" (61 cm)
A. HEIGHT
B. WIDTH
C. DEPTH
10 ¾" (27,3 cm)
29" (73,7 cm)
23
3
/
8
" (59,4 cm)
D. CUTOUT
HEIGHT
E. CUTOUT
WIDTH
F.
CUTOUT
DEPTH
G. HEIGHT
Min.
9
7
/
8
" (25,1 cm)
28 ½" (72,4 cm)
24" (61 cm)
1 ¾" (4,4 cm)
Max.
10 ¼" (26 cm)
28 ¾" (73 cm)
Depends on critical
dimension
H
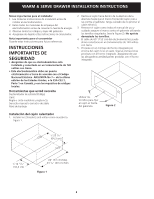
IMPORTANT:
The warmer drawer must be installed on
a leveled surface from left to right, rear to front and the
surface must be capable of supporting 100 lbs (45,4 Kg).
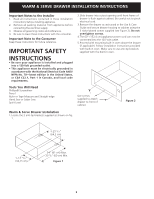
INSTALLATION AND SERVICE MUST BE PERFORMED
BY A QUALIFIED INSTALLER.
IMPORTANT: SAVE FOR LOCAL ELECTRICAL INSPECTOR'S USE.
READ AND SAVE THESE INSTRUCTIONS FOR FUTURE REFERENCE.
WARNING
FOR YOUR SAFETY:
Do not store or use gasoline or other
flammable vapors and liquids in the vicinity of this or any other appliance.
Canada
United States
GENERAL INFORMATION
: The Warm & Serve Drawer
can be used as a stand alone appliance or combine with a
built-in oven mounted above.
Combination Warm & Serve Drawer/
Built-in Oven Installation