Electrolux E36GC75E Installation Instructions
Electrolux E36GC75E - Icon Cooktops Manual
 |
View all Electrolux E36GC75E manuals
Add to My Manuals
Save this manual to your list of manuals |
Electrolux E36GC75E manual content summary:
- Electrolux E36GC75E | Installation Instructions - Page 1
SERVICE MUST BE PERFORMED BY IMPORTANT: A QUALIFIED INSTALLER. SAVE FOR LOCAL ELECTRICAL INSPECTOR'S USE. READ AND SAVE THESE INSTRUCTIONS FOR FUTURE REFERENCE. If the information in this manual or any other appliance. -- WHAT TO DO IF YOU SMELL GAS: • Do not try to light any appliance. • Do not - Electrolux E36GC75E | Installation Instructions - Page 2
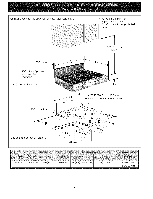
ForInstallatiowniththeoptionaSl tainlesSsteeBl acksplash. * 30" (76.2cm)rain.for unprotectecdabinet 24" (61cm)minf,orprotected surface 30"(76.2 cm) Min.* Stainless Steel Backsplash Gas Cooktop Dimensions 2"(5.1 cm) Dia. F Gas Cooktop Cutout Dimensions jE 3"(7 6 cm) C 4"X 4" (10.2 cm x 10.2 cm) - Electrolux E36GC75E | Installation Instructions - Page 3
Safety, title 24, HUD (part 280)] or, when such standard is not applicable, the Standard for Manufactured Home Installation, ANSI/NCSBCS A225.1 or with local codes where applicable. This cooktop has been design certified by International Approval Services (I.A.S). As with any appliance using gas and - Electrolux E36GC75E | Installation Instructions - Page 4
13" (33 cm) max. depth -_ for cabinet installed above cooktop 30" (76.2 cm) Min. Clearance Between the Top of the Cooking Platform and the Bottom of an Unprotected Wood or Metal Cabinet 24" (61 cm) Min. when Bottom of Wood _JV or Metal Cabinet is Protected by Not Less Than 1/8" Flame Retardant - Electrolux E36GC75E | Installation Instructions - Page 5
or 3/4" (1.9 cm) pipe. LP/Propane Gas Conversion Tills appliance can be used with Natural gas or LP/ Propane gas. service technician in accordance with the kit instructions and all local codes and requirements. Failure to follow instructions fire or explosion. Manual Shutoff Fla_ GASFLOW _ll_ - Electrolux E36GC75E | Installation Instructions - Page 6
Leak testing of the appliance shall be conducted according to the manufacturer's instructions. After connecting tile gas supply piping system by closing its individual manual shutoff valve during any pressure testing of the gas from wall receptacle before servicing cooktop. Cooktop Installation 1. - Electrolux E36GC75E | Installation Instructions - Page 7
Refer to the Use and Care Guide packaged with the cooktop for operating instructions and for care and cleaning of your size. The controls do not have to be set at a particular mark. Use the marks as a guide and adjust the flame as needed. 4, Adjust the "LO" or "SIMMER" Setting of Surface Burner - Electrolux E36GC75E | Installation Instructions - Page 8
. Before You Call for Service Read the Before You Call Checklist and operating instructions in your Use and Care Guide. It may save you time appliance. Refer to your Use and Care Guide for Sears service phone numbers. Please call if you have inquiries about your product and/or need to order parts - Electrolux E36GC75E | Installation Instructions - Page 9
ESTAS INSTRUCCIONES PARA USO DEL INSPECTOR ELI_CTRICO LOCAL. LEA Y GUARDE ESTAS INSTRUCCIONES PARA FUTURAS REFERENCIAS Si todas las instrucciones de _ste manual no son observadas a la letra, se puede ocurrir incendios o explosiones que pueden causar dahos materiales, lesiones o la muerte. PARASU - Electrolux E36GC75E | Installation Instructions - Page 10
ParaverlaInstalaciOconnel PanePl rotectoOr pcionadleAceroInoxidable. * 30" (76.2cm)minparaun armarioprotegido. 24" (61cm)minparauna supefficineoprotegida. 2" (5.1 cm) Panel Protector Opcional de Acero Inoxidable de 9" (22,9 cm) Dimensiones de la parrilla de cocinar a gas 30"(76.2 cm) Min.* C 4"X4 - Electrolux E36GC75E | Installation Instructions - Page 11
Home Consturction and Safet Standard, titulo 24CFR, parte 3280 [Anteriormente el Federal Standard for Mobil Home Construction and Safety, titulo 24, HUD (parte hasta UTE (encendido). Tenga cuidado al encender los quemadores en forma manual. • No deje articulos que interesan los ni_os en los armarios - Electrolux E36GC75E | Installation Instructions - Page 12
cuenta con este espacio, se puede disminuir el peligro instalando una cubierta de cocina que se extienda horizontalmente en 7" (17.8 cm) minimo por sobre la parte inferior delantera en los armarios. 36" (91.4 cm) 36" (91.4 cm) Figura 3 - DESEI_IO DEL ARMARIO 7" (17.8 cm) 7" (17.8 cm) 12 - Electrolux E36GC75E | Installation Instructions - Page 13
la presiOn del mOltiple, la presiOn Monte el conector flexible del tubo del suministro de gas al regulador de presiOn en funcionamiento: 1. wilvula de cierre manual de entrada debe de ser de al menos 5" (12.7 cm). La Ifnea de suministro de gas pot el horno debeffa tenet un tubo de 1/2" (1.3 cm - Electrolux E36GC75E | Installation Instructions - Page 14
el Panel Protector Opcional de Acero Inoxidable, primero col0quelo en la parte posterior de la tapa de la cocina usando los tornillos provistos con tuberia del suministro de gas cierrando su v_ilvula de cierre individual manual, durante cualquier ensayo de presi0n del systema de suministro de - Electrolux E36GC75E | Installation Instructions - Page 15
Verifique la operacibn Refiera al Manual del Usuario que viene con la plancha de cocinar para las cabezal al tama_o de la cabeza. Cada cabezal tiene un anillo interiormente elevado en las partes inferiores del lado para ayudarle a ubicar correctamente el cabezal sobre la cabeza. D. Aseg0rese - Electrolux E36GC75E | Installation Instructions - Page 16
letra del lote que se encuentran en la placa, en todo pedido de partes o solicitud de informaci6n acerca de su plancha de cocinar. La placa de n0mero "Evitando LIamadas de Servicio" y las instrucciones de funcionamiento en su Manual del Usuario Verifique que los fusibles de la casa no se hayan - Electrolux E36GC75E | Installation Instructions - Page 17
UN INSTALLATEUR QUALIFII_ DOlT EFFECTUER L'INSTALLATION ET LE SERVICE IMPORTANT: CONSERVEZ CES INSTRUCTIONS POUR LES INSPECTEURS LOCAUX. LISEZ CES INSTRUCTIONS ET CONSERVEZ-LES POUR RI_FERENCES ULTI_RIEURES. Si les instructions de ce manuel ne sent pas suivies _ la lettre, ilpourrait en resulter un - Electrolux E36GC75E | Installation Instructions - Page 18
reli_s _ ces accessoiressont _ la charge du consommateur. INSTRUCTIONS DE SECURITE IMPORTANTES Cette appareil dolt _tre installee conformement aux Home Installation, ANSI/NCSBCS A225.1, ou aux codes Iocaux. La conception de cette plaque de cuisson a _t_ approuvee par International Approval Services - Electrolux E36GC75E | Installation Instructions - Page 19
I • Assurez-vous que votre appareil est correctement install_e et mise _ la terre par un installateur ou un technicien d'entretien qualifi_. • Le circuit _lectrique de cette plaque de cuisson dolt _tre mis _ la terre conform_ment aux reglements Iocaux, ou en leur absence, au code national de I' - Electrolux E36GC75E | Installation Instructions - Page 20
marque "POUR CONVERSION AU GAZ PROPANE". Un installateur qualifie dolt effectuer I'installation et le service, conformement aux instructions du fabricant et tous les codes et r_glements applicables. Sices instructions ne sont pas suivies _ la lettre, il pourrait en resulter de serieuses blessures - Electrolux E36GC75E | Installation Instructions - Page 21
installez le dosseret optionnel en acier inoxidable, fixez-le _ I'arriCre de la table de cuisson I'aide des vis fournies et suivez les instructions fournies pression sup_rieure a Y2 Ib/po2 (3.5 kPa ou 14" C.E.), avec le dosseret. d_branchez la plaque de cuisson et son robinet d'arr_t individuel - Electrolux E36GC75E | Installation Instructions - Page 22
br01eur, reglez la flamme a l'intensite voulue. Los commandos n'ont pas besoin d'etre reglees vis-a-vis d'un repere particulier. Utilisez los reperes comme guide et reglez la flamme au besoin. 4. R_glez la position LOW ou SIMMER (Figure 9) Enfoncez et tournez chaque bouton de commande a la position - Electrolux E36GC75E | Installation Instructions - Page 23
de gaz et la pression pour lesquels la surface de cuisson a _t_ ajust_ en usine. Avant d'appeler le service d'entretien Consultez la liste de v_rification preventive et les instructions d'operation dans votre Manuel d'utilisation. Vous sauverez probablement du temps et de I'argent. La liste contient - Electrolux E36GC75E | Installation Instructions - Page 24
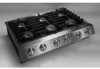
TDP BURNER [BNITEq OPT]ONAL QUE]NADOR BE ENCEt4][DO SUPERIOR OPC]ONAL BDLG[E D'ALLUMAGE BRULEUR TOp BUNNEJq OPT[ON_ OUEMADOqOE IGN]TER ENCENDIDO _ BUPER]OR OPC[ON_ BBUGIE O'ALLUNAGE FACULTAT[V BRULEUR TOP BURNER IGN]_R QUEMgl]OR DE ENC[_ID]DO BUPERICR BOUG[E D" ALLUHA_ BRULEUR TOp BdR/
-
 1
1 -
 2
2 -
 3
3 -
 4
4 -
 5
5 -
 6
6 -
 7
7 -
8
-
9
-
10
-
11
-
12
-
13
-
14
-
15
-
16
-
17
-
18
-
19
-
20
-
21
-
22
-
23
-
24
 |
 |

INSTALLATION
AND
SERVICE
MUST
BE PERFORMED
BY
A
QUALIFIED
INSTALLER.
IMPORTANT:
SAVE
FOR
LOCAL
ELECTRICAL
INSPECTOR'S
USE.
READ
AND
SAVE
THESE
INSTRUCTIONS
FOR
FUTURE
REFERENCE.
If the information
in this manual is not followed
exactly, a fire or explosion
may result causing
property
damage, personal injury or death.
FOR YOUR SAFETY:
--
Do not store or use gasoline or other flammable
vapors and liquids in the vicinity
of this or any other
appliance.
--
WHAT TO DO IF YOU SMELL GAS:
•
Do not try
to
light any appliance.
•
Do not touch any electrical switch; do not use any phone in
your
building.
•
Immediately
call
your
gas supplier from a neighbor's
phone.
Follow the gas supplier's
instructions.
•
If
you
cannot
reach
your
gas supplier, call
the
fire department.
--
Installation
and service must be performed
by a qualified
installer, service agency or the gas supplier.
For Standard
Installation:
* 30" (76.2 cm) min. for
unprotected cabinet
24" (61 cm) min. for
protected surface
30"(76.2
cm)
Min.*
Gas Cooktop
Dimensions
2"(51
cm) Dia
Gas Cooktop Cutout
Dimensions
¢
4"X4"
(10.2 cm x 10.2 cm)
to route armoured
cable.
For Installation
with
the
optional
Stainless
Steel
Backsplash
see page
2.
Figure
1
36(91.4)
35/_(91.1)
253A(65.4)
7Y_(19.7)
36(91.4)
35V6(89.4)
22(55.9)
l g_ (2.9) Max.
71h(t9.I)Min.
*
81/2(21.6) Max.
All dimensions
are in inches
(cm).
318201455
(0402) Rev. C
English - pages 1-8
NOTE:
Wiring
diagrams
for
this
cooktop
are
enclosed
in this
booklet
Espa_ot - p_ginas 9-16
Fran_ais - pages 17-23
Wiring
Diagram page - Diagrama de la instalaci6n at_imbrica p_igina * 24