Electrolux E36GC75PSS Installation Instructions (English Español Fran
Electrolux E36GC75PSS Manual
 |
View all Electrolux E36GC75PSS manuals
Add to My Manuals
Save this manual to your list of manuals |
Electrolux E36GC75PSS manual content summary:
- Electrolux E36GC75PSS | Installation Instructions (English Español Fran - Page 1
INSTRUCTIONS INSTALLATION AND SERVICE MUST BE PERFORMED BY A QUALIFIED INSTALLER. IMPORTANT: SAVE FOR LOCAL ELECTRICAL INSPECTOR'S USE. READ AND SAVE THESE INSTRUCTIONS FOR FUTURE REFERENCE. If the information in this manual F DEPTH G H J. HEIGHT BELOW COOKTOP 36 (91,4) 357/8 (91,1) 25 (63,5) - Electrolux E36GC75PSS | Installation Instructions (English Español Fran - Page 2
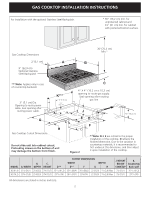
GAS COOKTOP INSTALLATION INSTRUCTIONS For Installation with the optional Stainless Steel Backsplash. , it is recommended to first undercut this dimension, and then adjust it upon installation of the cooktop. MODEL 36 (91,4) 30 (76,2) A. WIDTH 357/8 (91,1) 297/8 (75,9) B. C. DEPTH HEIGHT D** 25 - Electrolux E36GC75PSS | Installation Instructions (English Español Fran - Page 3
Keep these instructions with your Use and Care Guide for future reference. Depth Adjustment Filler Kit This cooktop is designed to replace the United States, or in Canada, with the Canadian Electrical Code, CSA C22.1 Part 1. • The burners can be lit manually during an electrical power outage - Electrolux E36GC75PSS | Installation Instructions (English Español Fran - Page 4
GAS COOKTOP INSTALLATION INSTRUCTIONS 13" (33 cm) max. depth for cabinet installed ,8 cm) beyond the bottom of the cabinets. It is not recommended to use drawer underneath cooktop. MODEL 36" (91,4 cm) 30" (76,2 cm) A 36" (91,4 cm) 30" (76,2 cm) B. Minimum Clearance from Left Side 9" (22,9 cm - Electrolux E36GC75PSS | Installation Instructions (English Español Fran - Page 5
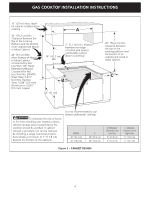
service technician in accordance with the kit instructions and all local codes and requirements. Failure to follow instructions UNIT Provide an Adequate Gas Supply This cooktop is designed to operate on natural gas at 4" (10,2 series with the supply line. Manual Shutoff Valve Flare Union GAS FLOW - Electrolux E36GC75PSS | Installation Instructions (English Español Fran - Page 6
extension cord with this cooktop. Grounding Instructions IMPORTANT Please read carefully. For personal the gas supply piping system by closing its individual manual shutoff valve during any pressure testing of the gas cord from wall receptacle before servicing cooktop. Cooktop Installation 1. - Electrolux E36GC75PSS | Installation Instructions (English Español Fran - Page 7
Check Operation Refer to the Use and Care Guide packaged with the appliance for operating instructions and for care and cleaning of your cooktop. Do not touch the burners. They may be hot enough to cause burns. 1. Check Burner Cap Placement - Electrolux E36GC75PSS | Installation Instructions (English Español Fran - Page 8
Checklist and operating instructions in your Use and Care Guide. It may save you time and expense. The list includes common occurrences that are not the result of defective workmanship or materials in this appliance. Refer to your Use and Care Guide for Electrolux Service phone numbers, or call - Electrolux E36GC75PSS | Installation Instructions (English Español Fran - Page 9
Si todas las instrucciones de éste manual no son observadas a la letra a la variación de los materiales de la cocina. MODELO 36 (91,4) 30 (76,2) A. ANCHURA 357/8 (91,1) NOTA: Se adjunta los diagramas de cables de esta Impreso en Canada la plancha de cocinar para la conexión 318205459 (1307) Rev. - Electrolux E36GC75PSS | Installation Instructions (English Español Fran - Page 10
No deslizar dentro del hueco de la alacena. Los tornillos que sobresalen de la parte inferior de la unidad pueden dañar el acabado inferior del frente. C del aparato debido a la variación de los materiales de la cocina. MODELO 36 (91,4) 30 (76,2) A. B. ANCHURA PROFUNDIDAD 357/8 (91,1) 25 - Electrolux E36GC75PSS | Installation Instructions (English Español Fran - Page 11
1-877-4ELECTROLUX (1-877-435-3287). Para modelo 36": #903051-9010 Para modelo 30": #903051- Estados Unidos, or in Canada, con el Canadian Electrical Code, CSA C22.1 Parte 1. • Los quemadores pueden ). Tenga cuidado al encender los quemadores en forma manual. • No deje artículos que interesan los - Electrolux E36GC75PSS | Installation Instructions (English Español Fran - Page 12
por encima del mostrador. 30" (76,2 cm) Mínimo de espacio entre la parte superior de la plataforma de la plancha 18" (45,7 cm) Mín. de cocinar utilizar cajones debajo de la estufa. MODELO DE PLANCHA DE COCINAR DE 36" (91,4 cm) 30" (76,2 cm) A 36" (91,4 cm) 30" (76,2 cm) B. Espacio mínimo - Electrolux E36GC75PSS | Installation Instructions (English Español Fran - Page 13
cm) 5" (12,7 cm) Si desea hacer la conversión para utilizar el gas propano, use las piezas con orificios fijados provistos en el paquete del manual de instrucciones para la instalación en el paquete escrito "PARA LA CONVERSIÓN EN GAS PROPANO". Para hacer la conversión del gas natural al gas propano - Electrolux E36GC75PSS | Installation Instructions (English Español Fran - Page 14
tubería del suministro de gas cerrando su válvula de cierre individual manual, durante cualquier ensayo de presión del sistema de suministro de gas el Panel Protector Opcional de Acero Inoxidable, primero colóquelo en la parte posterior de la tapa de la cocina usando los tornillos provistos con el - Electrolux E36GC75PSS | Installation Instructions (English Español Fran - Page 15
INSTRUCCIONES DE INSTALACIÓN PARA PLANCHA DE COCINAR A GAS Comprobación del funcionamiento Consulte el Manual del Usuario incluido con la unidad para instrucciones de operación y instrucciones para el cuidado y limpieza de su plancha de cocinar 1. Verifique la colocación de la - Electrolux E36GC75PSS | Installation Instructions (English Español Fran - Page 16
todos los controles estén en la posición OFF (apagada). Antes de Llamar al Servicio Lea la sección Lista de control de averías en su Manual del Usuario. Esto le podrá ahorrar tiempo y gastos. Esta lista incluye ocurrencias comunes que no son el resultado de defectos de materiales o fabricación de - Electrolux E36GC75PSS | Installation Instructions (English Español Fran - Page 17
SERVICE IMPORTANT: CONSERVEZ CES INSTRUCTIONS POUR LES INSPECTEURS LOCAUX. LISEZ CES INSTRUCTIONS ET CONSERVEZ-LES POUR RÉFÉRENCES ULTÉRIEURES. Si les instructions H J. HAUTEUR SOUS LA TABLE DE CUISSON 36 (91,4) 357/8 (91,1) 25 (63 . Imprimé au Canada 17 P/N 318205459 (1307) Rev. A English - - Electrolux E36GC75PSS | Installation Instructions (English Español Fran - Page 18
INSTRUCTIONS D'INSTALLATION POUR PLAQUE DE CUISSON À GAZ Pour l'installation avec le dosseret é de tailler un peu plus petit que cette dimension et l'ajuster lors de l'installation de l'appareil. MODÈLE 36 (91,4) 30 (76,2) A. LARGEUR 357/8 (91,1) 297/8 (75,9) B. PROFONDEUR 25 (63,5) 25 (63 - Electrolux E36GC75PSS | Installation Instructions (English Español Fran - Page 19
service au 1-877-4ELECTROLUX (1-877-435-3287). Pour le modèle 36 service ou en téléphonant au 1-8774ELECTROLUX (1-877-435-3287). Par contre tous les frais reliés à ces accessoires sont à la charge du consommateur. INSTRUCTIONS lectricité, ACNOR C22.1, partie 1, au Canada. • Lors d'une panne de courant - Electrolux E36GC75PSS | Installation Instructions (English Español Fran - Page 20
INSTRUCTIONS D'INSTALLATION POUR PLAQUE DE CUISSON À GAZ L'armoire supérieure ne cm) la base de l'armoire. Il est déconseillé d'installer des tiroirs sous la table de cuisson. MODÈLE 36" (91,4 cm) 30" (76,2 cm) A 36" (91,4 cm) 30" (76,2 cm) B. Dégagement minimal du côté gauche 9" (22,9 cm) 5" - Electrolux E36GC75PSS | Installation Instructions (English Español Fran - Page 21
marqué "POUR CONVERSION AU GAZ PROPANE". Un installateur qualifié doit effectuer l'installation et le service, conformément aux instructions du fabricant et à tous les codes et règlements applicables. Si ces instructions ne sont pas suivies à la lettre, il pourrait en résulter de sérieuses blessures - Electrolux E36GC75PSS | Installation Instructions (English Español Fran - Page 22
INSTRUCTIONS D'INSTALLATION POUR PLAQUE DE CUISSON À GAZ Lors de toute vérification de pression du réparer ou de nettoyer la plaque de cuisson. Vérification du Fonctionnement Référez‑vous au Guide de l'utilisateur inclus avec l'appareil pour les directives de fonctionnement et pour l'entretien et - Electrolux E36GC75PSS | Installation Instructions (English Español Fran - Page 23
és - Vérifiez si toutes les commandes sont en position d'arrêt (OFF). Avant d'appeler le service d'entretien Révisez la liste de vérifications préventives et les instructions d'opération dans votre Guide de l'utilisateur. Vous sauverez probablement du temps et de l'argent. La liste contient les - Electrolux E36GC75PSS | Installation Instructions (English Español Fran - Page 24
INSTRUCTIONS D'INSTALLATION POUR PLAQUE DE CUISSON À GAZ 24
-
 1
1 -
 2
2 -
 3
3 -
 4
4 -
 5
5 -
 6
6 -
 7
7 -
8
-
9
-
10
-
11
-
12
-
13
-
14
-
15
-
16
-
17
-
18
-
19
-
20
-
21
-
22
-
23
-
24
 |
 |
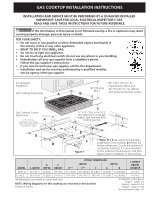
GAS COOKTOP INSTALLATION INSTRUCTIONS
1
A
B
C
E
J
G
H
D
F
318205459 (1307) Rev. A
English - pages 1-8
Español - páginas 9-16
Français - pages 17-23
Wiring Diagram page - 24
NOTE: Wiring diagrams for this cooktop are enclosed in this booklet
Printed in China
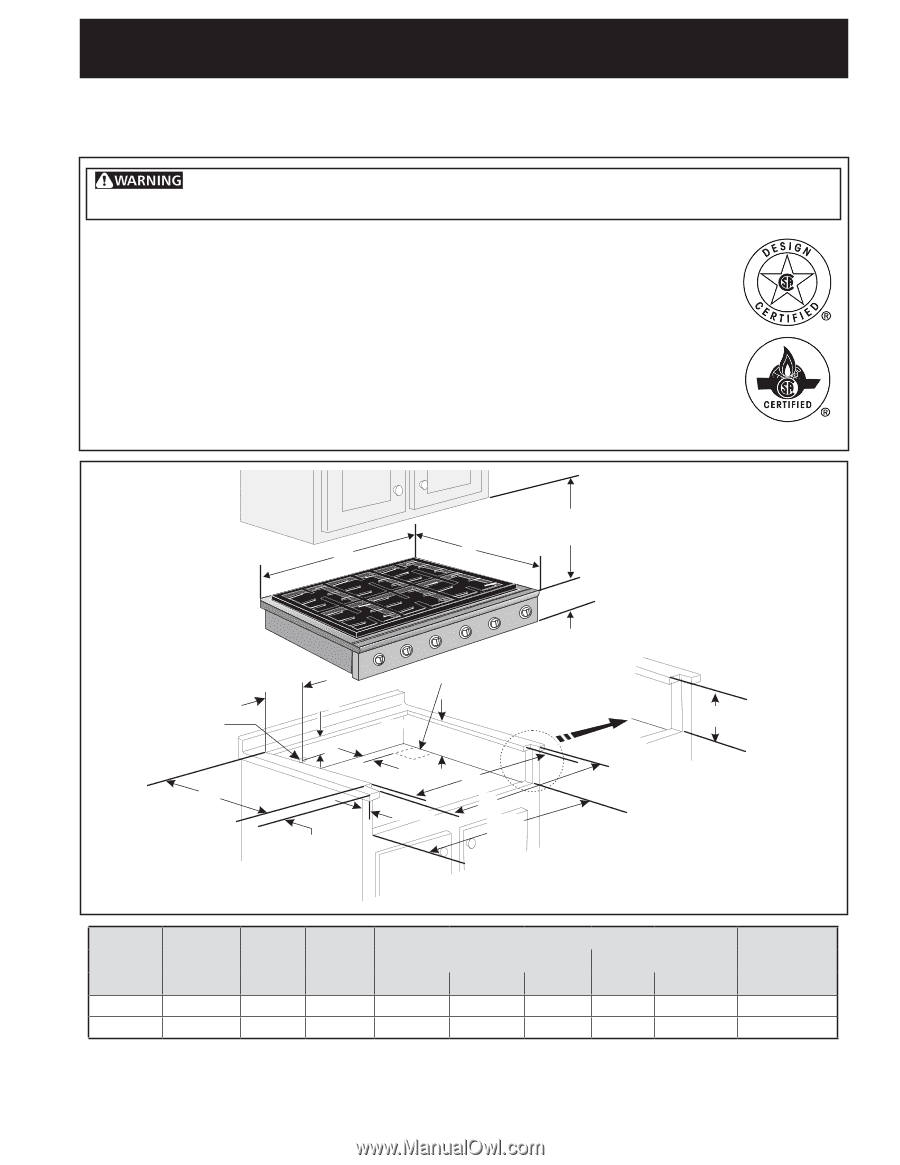
Figure 1
Gas Cooktop Dimensions
Gas Cooktop Cutout
Dimensions
30"(76.2cm)
Min.*
4" X 4" (10,2 cm x 10,2
cm) opening to route gas
supply. Seal opening after
routing gas line
2"(5,1 cm) Dia.
Opening to route power
cable. Seal opening after
routing power cable.
For Standard
Installation:
1" (2,5 cm)
2"(5,1 cm)
7
1
/
4
"
(18,4cm)
3"(7,6 cm)
2
1
/
2
"
(6,4 cm)
All dimensions are stated in inches and (cm).
* 30" (76,2 cm) min. for
unprotected cabinet and
24" (61cm) min. for cabinet
with protected bottom surface.
**Note: D
&
E
are critical to the proper
installation of the cooktop.
D
reflects the
finished dimension. Due to the variation in
countertop materials, it is recommended
to first undercut this dimension, and then
adjust it upon installation of the cooktop.
MODEL
A. WIDTH
B.
DEPTH
C.
HEIGHT
CUTOUT DIMENSIONS
J. HEIGHT
BELOW
COOKTOP
WIDTH
DEPTH
D**
E**
F
G
H
36 (91,4)
35
7
/
8
(91,1)
25 (63,5)
7¾ (19,7)
35
15
/
16
(91,3)
35
3
/
16
(89,4)
35
1
/
8
(89,2)
22 (55,9)
1
1
/
8
(2,9) Max.
7½ (19,1)
30 (76,2)
29
7
/
8
(75,9)
25 (63,5)
7¾ (19,7)
29
15
/
16
(76)
29
3
/
16
(74,1)
29
1
/
8
(74)
22 (55,9)
1
1
/
8
(2,9) Max.
7½ (19,1)
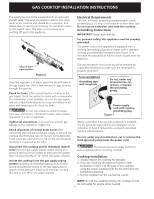
INSTALLATION AND SERVICE MUST BE PERFORMED BY A QUALIFIED INSTALLER.
IMPORTANT: SAVE FOR LOCAL ELECTRICAL INSPECTOR'S USE.
READ AND SAVE THESE INSTRUCTIONS FOR FUTURE REFERENCE.
If the information in this manual is not followed exactly, a fire or explosion may result
causing property damage, personal injury or death.
FOR YOUR SAFETY:
— Do not store or use gasoline or other flammable vapors and liquids in
the vicinity of this or any other appliance.
— WHAT TO DO IF YOU SMELL GAS:
•
Do not try to light any appliance.
•
Do not touch any electrical switch; do not use any phone in your building.
•
Immediately call your gas supplier from a neighbor's phone.
Follow the gas supplier's instructions.
•
If you cannot reach your gas supplier, call the fire department.
— Installation and service must be performed by a qualified installer,
service agency or the gas supplier.