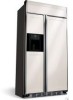
Electrolux E42BS75ETT Owners Manual
Electrolux E42BS75ETT - 42" - Refrigerator Manual
 |
View all Electrolux E42BS75ETT manuals
Add to My Manuals
Save this manual to your list of manuals |
Electrolux E42BS75ETT manual content summary:
- Electrolux E42BS75ETT | Owners Manual - Page 1
, 13 9 Ice and Water Dispenser ..... 10, 11 Refrigerator Doors 8 Replacing the Light Bulbs ....... 14 Shelves and Bins 7 Temperature Controls ........... 5 Water Filter 6 Model 42 Electrolux Icon C6te a C6te ROfrigOrateurs Installation Instructions La section franGaise commence - Electrolux E42BS75ETT | Owners Manual - Page 2
purpose as described in this Owner's Manual. SAFETYPRECAUTIONS When using electrical appliances, basic safety precautions should be followed, including the following." This refiigerator must be properly hlstalled a]ld located in accordance with tile Installation Instructions before it is used. Do - Electrolux E42BS75ETT | Owners Manual - Page 3
, please follow the instructions below to help prevent accidents. Before You Throw Away Your Old Refrigerator or Freezer: Take off the doors. Leave the shelves in place so that children iilay not easily cliinb inside. Refrigerants All refrigeration products contain refrigerants, which under federal - Electrolux E42BS75ETT | Owners Manual - Page 4
or daanage the power cord. DONOTUSEAN ADAPTERPLUGOREXTENSIONCORD (Adapterplugs not permittedin Canada) Do not use an adapter plug to connect the refrigerator to a 2-prong outlet. Do not use an extension cord with this appliance. READAND FOLLOWTHISSAFETYINFORMATIOCNAREFULLY. SAVE THESEINSTRUCTIONS - Electrolux E42BS75ETT | Owners Manual - Page 5
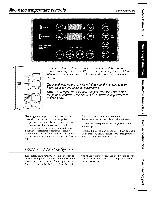
the preset recommended settings. The actual temperature may vary slightly from the set temperature based on usage and operating environment. NOTE: The refrigerator is shipped with protective film covering the temperature controls, if this film was not removed during installation, remove it now. 11 - Electrolux E42BS75ETT | Owners Manual - Page 6
About the water filter. (o.somemodels) Water Filter Cartridge The water filter is located in tile fresh food compea'tment ha the upper right side. When to Replace the Filter There is a replacement indicator light for the water filter cea'tridge on the dispenser. Tilts light will turn ainber to tell - Electrolux E42BS75ETT | Owners Manual - Page 7
. Not all features are on all models. Refrigera[or olns Refrigerator Door Bins and Freezer Door Bins All door bins, except for it towai'd you. Toreplace or relocate: Engage the back side of the bin in tile Inolded supports on the dooI: Then push down on the fl'ont of the bhl. Bin will lock in - Electrolux E42BS75ETT | Owners Manual - Page 8
at 90° open, it will automatically close, Beyond this step the door wilt stay open, Door Alignment 1 If doors ewe uneven, adjust the refrigerator dooI'. 0 Usln ' g a 7/32 ** socket wrench, turnthe door adjusting screw clockwise to raise the dooi; counterclockwise to lower the door. (A @on plug - Electrolux E42BS75ETT | Owners Manual - Page 9
About the drawers and baskets. Not all features are on all models. Fruit and Vegetable Drawers Excess water that inay accumulate in the bottoin of the clrawei3 should be wiped dry. Elec oluxUSAcom crisper 0_ humidity con_ro Adjustable Humidity Drawers S1Me the control - Electrolux E42BS75ETT | Owners Manual - Page 10
. Important facts about your ice and water dispenser Do not add ice fl'oln trays or bags to tile storage bin. It inay water inay drip fl'oin the chute. {{{T{h{e{ first glass of water dispensed may be wariner than the following ones. This is norinal. Automatic Icemaker A newly-installed refrigerator - Electrolux E42BS75ETT | Owners Manual - Page 11
water spottn_g, the shelf and its grille should be cleaned regularly. If no water N dispensed when the refrigerator is first installed, there may be air in the water a hurry, press this button to speed up ice production. This will h_crease ice production for the following 48 houiB oi" until you press - Electrolux E42BS75ETT | Owners Manual - Page 12
" cleaners containing bleach because these products coal scratch and dainage tile fintsh stainless steel clegulei'. Do not use appliance wax oi" polish on the stainless steel of water. This both cleans and neutralizes odors. Thoroughly rinse eald wipe dry. Otherparts of the refrigerator,including - Electrolux E42BS75ETT | Owners Manual - Page 13
tile refrigerator. Cleeal tile hlterior with a bakhlg soda solution of one tablespoon (15 ml) of baking soda to one quea't (1 liter) of water. Leave off the water supply to tile refl'igerator. If tile teinperature can drop below fl'eezing, have a qualified servicer drain tile water supply system - Electrolux E42BS75ETT | Owners Manual - Page 14
Left side of the shieM and pull down. O Replace the bulbs with appliance bulbs of the saine or lower wattage. Replace the shield by engaging the switch to the ] (on) position and close the grille pealel. Refrigerator Compartment--Lower This light is located above the top draweL Light Raise the - Electrolux E42BS75ETT | Owners Manual - Page 15
Owner's Manual for future reference. • Skill Level - Installation of this refrigerator requires basic mechanical, carpentry and plumbing skills. Proper installation is the responsibility of the installer, Product failure due to improper installation is not covered under the Electrolux Home Products - Electrolux E42BS75ETT | Owners Manual - Page 16
Instructions HARDWARE SUPPLIED • Anti-Tip brackets Anti-Tip Brackets MATERIALS REQUIRED • 36" long, 2" x 4" wood block for Anti-Tip bracket installation • #12 or #14 wood screws for Anti-Tip bracket • Screws to secure refrigerator to cabinets • 1/4" O.D. copper water line tubing. • Water Appliance - Electrolux E42BS75ETT | Owners Manual - Page 17
Installation Instructions THE INSTALLATION SPACE 3" _ Finished Width 74" FromFloor to Bottom to extend to the front of the refrigerator. Installation of an easily accessible shutoff valve in the water line is required. Product Clearances These refrigerators are equipped with a 2 position door - Electrolux E42BS75ETT | Owners Manual - Page 18
Installation Instructions Refrigerator z_:E_ r23_7/8 ,, From i i Rearof Refrigerat°r Case |lr!m 1/2" 1/4" © Top View 130 ° Door Swing (factory setting) Scale 1:1 FreshFood Door BackerPane 18 3/4" CustomPanel (NominalSize) \ % \ - Electrolux E42BS75ETT | Owners Manual - Page 19
Installation Instructions Refrigerator CaseTrim 23-7/8" FromRearof Refrkerator © Top View 90 ° Door Swing (optional setting) Scale 1:1 FreshFood Door I I I 19 - Electrolux E42BS75ETT | Owners Manual - Page 20
Installation Instructions CUSTOMIZATION BASICS: Stainless Steel Wrapped Models Stainless Steel Wrapped Refrigerators Stainless Steel wrapped refrigerators have wrapped doors and grille panels, and beveled edges. These models are shipped ready for installation. Trimmed Models Trimmed Refrigerator - Electrolux E42BS75ETT | Owners Manual - Page 21
Installation Instructions 1/4" FRAMED PANEL DIMENSIONS If you choose to install -3/4 67-7/8 I=] 16-7/16 22-11/32 17-13/16 [el 35-5/32 IMPORTANT NOTE: Dispenser Trim The refrigerator is supplied with factory installed dispenser trim, • If panel is less than 1/4" thick, a noticeable gap will - Electrolux E42BS75ETT | Owners Manual - Page 22
Installation Instructions 3/4" FRAMED CUSTOM PANEL OPTION For a more custom appearance, 3/4" framed custom panels may be installed on trimmed models. The overlay panel is secured to a 1/4" finished backer - Electrolux E42BS75ETT | Owners Manual - Page 23
Installation Instructions 3/4" FRAMED CUSTOM WOOD PANELS Secured to a 1/4" finished backer panel. This design provides a framed appearance. Fresh Food Panel ,1 RHeqaunidreled QfoeraOrapntcime al --3q/8" Min._ 1/4"Max.-T 3-1/8" 1" ThickMax. or 3/4" - Electrolux E42BS75ETT | Owners Manual - Page 24
Installation Instructions 3/4" FRAMED CUSTOM WOOD PANELS Secured to a 1/4" finished backer panel, This design provides a framed appearance, Grille Panel 1" Thick Max. _Fd 2_L'_ r;1 1/4" Backer Panel 39-15/16" 3/4" - Electrolux E42BS75ETT | Owners Manual - Page 25
Installation Instructions 3/4" FULL-WIDTH OVERLAY CUSTOM PANELS This panel design provides a nearly trimless appearance. Fresh Food Panel Assemble the spacer panel onto the finished backer panel. Allow 1/2" - Electrolux E42BS75ETT | Owners Manual - Page 26
Installation Instructions 3/4" FULL-WIDTH OVERLAY CUSTOM PANELS This panel design provides a nearly trimless appearance. Assemble the spacer panel onto the backer panel. Allow 1/2" clearance on all four - Electrolux E42BS75ETT | Owners Manual - Page 27
Instructions SIDE PANELS Side panels (not supplied) must be used whenever the sides of the refrigerator . This surface should be strong enough to support a fully loaded refrigerator, or approximately 1500 lb. NOTE: Protect of electric shock hazard from this appliance. Have the wall outlet and - Electrolux E42BS75ETT | Owners Manual - Page 28
Instructions [] REMOVE PACKAGING CAUTION: Refrigerator is Top-Heavy--be careful when moving. When using an appliance bolts that secure metal brackets to the refrigerator, • Remove the three 1/2" nuts appliance dolly underneath the Freezer side. off the skid with the appliance dolly. • Remove toekick - Electrolux E42BS75ETT | Owners Manual - Page 29
enough to extend to the front of the refrigerator. Allow enough tubing to accommodate bend leading into the water line connection. NOTE: Certain types of plastic may crack or rupture with age and cause water damage to your home. Shut off the main water supply. Turn on the nearest faucet long enough - Electrolux E42BS75ETT | Owners Manual - Page 30
Installation Instructions [] INSTALL SIDE PANELS SKIP THIS STEP WHEN NOT USING SIDE PANELS If you are using 1/4" side panels, they should be inserted into the case trim. Fasten the panels to the refrigerator with the 3M Dual Lock adhesive strips before setting refrigerator in place. [] INSTALL - Electrolux E42BS75ETT | Owners Manual - Page 31
tr0m Floor to Bottom or Wood Block 82" [] LEVEL REFRIGERATOR All models have 4-point leveling. The front and back are supported by leveling legs. Both are accessible from the front of the refrigerator. • To level the back of the refrigerator, turn the 1/2" hex nut located above the front wheels - Electrolux E42BS75ETT | Owners Manual - Page 32
Installation Instructions [] SECURE REFRIGERATOR TO CABINETS Whenever possible, perform this step for anti-tip security. The refrigerator must be secured to prevent tipping. • Raise the grille panel to access case trim. • Drive a screw through the trim and into the adjacent cabinet using - Electrolux E42BS75ETT | Owners Manual - Page 33
Installation Instructions INSTALL DOOR PANELS ON TRIMMED MODELS Handle FreshFood Refrigerator Door _- t01 Install 1/4" Decorative Panels: • Remove Handles Open door to 90 °. Remove 5 Phillips head screws from the Fresh Food and Freezer door handles; retain all - Electrolux E42BS75ETT | Owners Manual - Page 34
Installation Instructions INSTALL DOOR HANDLES ON STAINLESS STEEL MODELS 1, Remove handles from cartonin 9 and any other protective packagin 9. 2, Place handle over pre-installed shoulder bolts (A) that are fastened into door in four locations, 3, While supporting handle and Iookin 9 at upper end - Electrolux E42BS75ETT | Owners Manual - Page 35
Installation Instructions 1_ CONNECT WATER SUPPLY Check to make sure that Master Power switch is in the O (OFF) position. TURN ON THE POWER • Set the Master Power switch to the I (ON) position, • Check to make sure power to refrigerator is on by opening refrigerator door to see if interior lights - Electrolux E42BS75ETT | Owners Manual - Page 36
Installation Instructions START ICEMAKER F P0wer Switch DOOR ALIGNMENT • Stand back from the refrigerator to inspect the door TOEKICK • Locate the supplied toekick (shipped taped to the top of the refrigerator). Install with 2 screws provided. Supplied kickplate % "% • The vented toekick - Electrolux E42BS75ETT | Owners Manual - Page 37
Normal operatingsounds. Newer refrigerators sound different from older refrigerators. Modern refrigerators have more features and use newer cooling coils may make a gurgling noise like boiling water. • Water dropping on the defl'ost heater can cause a sizzling, popping or buzzing sound during - Electrolux E42BS75ETT | Owners Manual - Page 38
Troubleshooting lips Save time and money! Review the charts on the following pages first and you may not need to call for service is in tire off position. Water supply turned off or not connected on icemaker blinking). • Wait 24 houI_ for the refrigerator cool down, • This is normal. to completely - Electrolux E42BS75ETT | Owners Manual - Page 39
and a half gallons). Water is not dispensed buticemakeris working Water in reservoir is frozen. Refrigerator control setting is too cold. Call for service. Set to a warmer setting. No water or ice cube produaion Supply line or shutoff valve is dogged. Water filter clogged. Dispenser is LOCKED - Electrolux E42BS75ETT | Owners Manual - Page 40
in the freezer Refrigeratorhes odor Doornut closing properly Moisture forms on outside of refrigerator Moisture collects inside (in humid weath_, air carries moisture into refrigerator when doors are opened) Interiorlight does net work Water on kitchen floor or on bottom of freezer Hot air from top - Electrolux E42BS75ETT | Owners Manual - Page 41
appliance. • Service trips to your home to teach you how to use the product. • Damage to finish after delivery. • Improper installation--proper installation includes adequate air circulation to the refrigeration use and care of product as listed in the owner's manual, proper setting of controls - Electrolux E42BS75ETT | Owners Manual - Page 42
Appliances North America, a division of Electrolux Canada Corp. Electrolux Home Products, Inc. and Electrolux Canada Corp. are referred to in this warranty as "Electrolux". We authorize no person to change or add to any of our obligations under this warranty. Our obligations for service and parts - Electrolux E42BS75ETT | Owners Manual - Page 43
seconds to reset after replacing the filter cartridge. Please refer to the Use & Care Guide for complete instructions. • pure advantage TM NGFC-2000 Ice & Water Filter System should not be used on water that is microbiologically unsafe or with water of unknown quality without adequate disinfection - Electrolux E42BS75ETT | Owners Manual - Page 44
of Health Services Water Treatment Device Certificate Number 01 - 1474 Date Issued: April 25, 2001 Trademark/Model Designation Frigidaire PureSource 2 NGFC-2000 Gibson Cool and Clean NGFC-2000 Electrolux pure ad_7,antageNGFC-2000 ManuIhcturer: Electrolux Home Products Replacement Elements
-
 1
1 -
 2
2 -
 3
3 -
 4
4 -
 5
5 -
 6
6 -
 7
7 -
8
-
9
-
10
-
11
-
12
-
13
-
14
-
15
-
16
-
17
-
18
-
19
-
20
-
21
-
22
-
23
-
24
-
25
-
26
-
27
-
28
-
29
-
30
-
31
-
32
-
33
-
34
-
35
-
36
-
37
-
38
-
39
-
40
-
41
-
42
-
43
-
44
 |
 |

www.ElectroluxUSA.com
I
Safety
Instructions
...........
2-4
Operating
Instructions
Automatic
Ieemaker
...........
10
Care
and
Cleaning
..........
12,
13
Drawers
and
Baskets
............
9
Ice
and
Water
Dispenser
.....
10,
11
Refrigerator
Doors
.............
8
Replacing
the
Light
Bulbs
.......
14
Shelves
and
Bins
...............
7
Temperature
Controls
...........
5
Water
Filter
...................
6
Installation
Instructions
Anti-Tip
Brackets
..............
30
Dimensions,
Clearances
........
17
Door,
Grille
Panels
.........
32,
33
Installation
Space
.............
17
Leveling
.....................
31
Panel
Dimensions
..........
21-26
Stainless
Steel
Handles
.........
34
Water
Line
...................
29
Water
Supply
.................
35
Troubleshooting
Tips
.......
38
40
Normal
Operating
Sotnlds
......
37
Consumer
Support
Consumer
Support
.....
Back
Cover
Performance
Data
Sheet
........
43
State
of
California
Water
Treatment
Device
Certificate
.....
44
Warranty
(Canadian)
...........
41
Warranty
(U.S.)
...............
42
Write
the model
and serial
numbers
here:
Model
#
Serial
#
Find
these
numbers
on
a label
inside
tile
refl'igerator
coinpartinent
at tile
top
on
the
right
side.
Model 42
Electrolux
Icon
C6te
a C6te
ROfrigOrateurs
La section franGaise commence
a
la page 45
Electrolux
Icon
Lado
a Lado
Refrigeradores
ta seccion en espat)ol empieza en la pagina
88
DA99-00689C
REV(0,0)