Electrolux ECVI4262AS Complete Owners Guide English
Electrolux ECVI4262AS Manual
 |
View all Electrolux ECVI4262AS manuals
Add to My Manuals
Save this manual to your list of manuals |
Electrolux ECVI4262AS manual content summary:
- Electrolux ECVI4262AS | Complete Owners Guide English - Page 1
ECVI4262AS User Manual Range Hood EN 2 - Electrolux ECVI4262AS | Complete Owners Guide English - Page 2
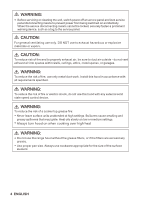
9. TECHNICAL DATA 16 10.TROUBLE SHOOTING 16 11.ENVIRONMENTAL PROTECTION 16 12.WARRANTY INFORMATION 17 SAFETY INSTRUCTIONS Do not attempt to install or operate this appliance until you have read the safety instructions in this manual. Safety items throughout this manual are labelled with a Danger - Electrolux ECVI4262AS | Complete Owners Guide English - Page 3
MUST COMPLY WITH ALL LOCAL CODES. IMPORTANT: Save these instructions for the Local Electrical Inspector's use. INSTALLER: Please leave these instructions with this appliance for the owner. OWNER: Please retain these instructions for future reference. DANGER: Always switch off the electricity - Electrolux ECVI4262AS | Complete Owners Guide English - Page 4
disconnecting means cannot be locked, securely fasten a prominent warning device, such as a tag,to the service panel. CAUTION: For general ventilating use only. DO NOT use to exhaust hazardous or explosive materials or vapors. CAUTION: To reduce risk of fire and - Electrolux ECVI4262AS | Complete Owners Guide English - Page 5
if you are not sure range hood is properly grounded. Do not have a fuse in the neutral or ground circuit. IMPORTANT Save installation instructions for electrical inspector's use. The range hood must be connected with copper wire only. The range hood should be connected directly to the fused - Electrolux ECVI4262AS | Complete Owners Guide English - Page 6
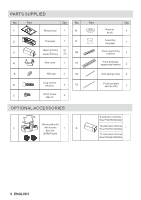
ACCESSORIES Recirculation kit 1. with screws 1 2. Elux PN: EHRKT62AS Part Qty. Washer 4 8x16 Assembly 1 template Side supporting bracket 2 Front and back supporting bracket 2 Side sponge strip 2 Front and back sponge strip 2 8' extension chimney Elux PN:EHI08X62AS 12' extension - Electrolux ECVI4262AS | Complete Owners Guide English - Page 7
The vent hood should be on site before final framing and wall finishing. This will help to accurately locate the duct work and electrical service. Installation will be easier if the vent hood is installed before the cooktop and countertop are installed. Ductwork and wiring locations: Determine the - Electrolux ECVI4262AS | Complete Owners Guide English - Page 8
Structures 7 1/16" This vent hood is heavy. Adequate structure and support must be provided in all types of installations. Framing must support minimum 150 Ibs load. At the hood location, adequate bracing is required to support the weight of the hood (fig. 2 ) Arrange cross framing in the ceiling - Electrolux ECVI4262AS | Complete Owners Guide English - Page 9
that you can easily reach up to the ceiling. Step 2 Unscrew 16 screws between the two sections of the structure. Adjust extension of the hood support structure (dimenssion A), as the final height of the hood depends on this ,and remember that with installation completed to the hood must be at least - Electrolux ECVI4262AS | Complete Owners Guide English - Page 10
cable for the range hood is routed inside the bracket. Fig. 8 IMPORTANT Before mounting the truss part onto the ceiling, please remove the supporting plate firstly (fig. 9 ). Remember to keep these screws which will be reused in step 8 Step 5 Depending on the ceiling height ensure required power - Electrolux ECVI4262AS | Complete Owners Guide English - Page 11
Loosen the 4 short screws from the junction box (fig.11 ) Fig. 11 Step 6 Place the exhaust duct onto the outlet and secure it with duct tape (not provided) (fig. 14 ) Fig. 14 Connect the incoming positive, neutral and ground cables to the respective terminals. (fig.12 ). Fig. 12 Step 7 Insert the - Electrolux ECVI4262AS | Complete Owners Guide English - Page 12
Step 8 Hook the hood body onto the truss, ensuring it fits properly, secure the body to the truss with 12 screws (7) then tighten it(fig. 17 ). Fig. 19 IMPORTANT Make sure the wire terminal passes though the hole on the air house (fig. 16 ) Fig. 17 Step 10 Install the aspiration plate to the hood - Electrolux ECVI4262AS | Complete Owners Guide English - Page 13
Exhaust operation Makeup Air Local building codes may require the use of makeup air systems when using ventilation systems greater than specified CFM of air movement. The specified CFM varies from locale to locale. Consult your HVAC professional for specific requirements in your area. Air - Electrolux ECVI4262AS | Complete Owners Guide English - Page 14
and high temperatures are detected, the vent fan will automatically change to medium speed During this event, the vent fan speed can be changed manually to high speed, but not low speed or off. When the heat sensor detects a significant drop in temperature, then the appliance will operate normally - Electrolux ECVI4262AS | Complete Owners Guide English - Page 15
-Do not repair or replace any part of the appliance unless specifically recommended in the manual. All other servicing should be referred to a qualified technician. IMPORTANT Parts and accessories not provided with your hood, or for replacement, can be purchased at www.electrolux.com - Electrolux ECVI4262AS | Complete Owners Guide English - Page 16
Motor Power: 330W Lamp power: 24W for ECVI4262AS TROUBLESHOOTING Problem Cause Solution Excessive vibration Light on, but fan is damaged. Switch off the appliance. Repair to be carried out by qualified service personnel only. Light bulb broken. Replace with a bulb with correct rating. Both - Electrolux ECVI4262AS | Complete Owners Guide English - Page 17
materials or workmanship, or for appliances not in ordinary household use or used other than in accordance with the provided instructions. 7. Service calls to correct the installation of your appliance or to instruct you how to use your appliance. 8. Expenses for making the appliance accessible for - Electrolux ECVI4262AS | Complete Owners Guide English - Page 18
, delivery slip, or some other appropriate payment record to establish the warranty period should service be required. If service is performed, it is in your best interest to obtain and keep all receipts. Service under this warranty must be obtained by contacting Electrolux at the addresses or phone - Electrolux ECVI4262AS | Complete Owners Guide English - Page 19
09050102432 A (EN) September 2020
-
 1
1 -
 2
2 -
 3
3 -
 4
4 -
 5
5 -
 6
6 -
 7
7 -
8
-
9
-
10
-
11
-
12
-
13
-
14
-
15
-
16
-
17
-
18
-
19
 |
 |

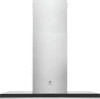
ECVI4262AS
User Manual
Range Hood
EN
2