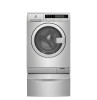
Electrolux EFLS210TIS Installation Instructions English Spanish French
Electrolux EFLS210TIS Manual
 |
View all Electrolux EFLS210TIS manuals
Add to My Manuals
Save this manual to your list of manuals |
Electrolux EFLS210TIS manual content summary:
- Electrolux EFLS210TIS | Installation Instructions English Spanish French - Page 1
EN FRONT LOAD WASHER FR LAVEUSE Á CHARGEMENT FRONTAL ES LAVADORA DE CARGA FRONTAL INSTALLATION INSTRUCTIONS INSTRUCTIONS D'INSTALLATION INSTRUCCIONES DE INSTALACIÓN 157012090 April 2017 - Electrolux EFLS210TIS | Installation Instructions English Spanish French - Page 2
q Foam shipping support (in door gasket Washer is level, side-to-side and front-to-back Cabinet is setting solid on all corners Water Supply Use only new hoses and verify rubber sealing washers on Washer plugged in Final Checks Installation Instructions and Use and Care Guide read thoroughly - Electrolux EFLS210TIS | Installation Instructions English Spanish French - Page 3
Important Safety Instructions 3 NOTE The electrical service to the washer must conform with local codes and ordinances and the latest edition of the National Electrical Code, ANSI/NFPA 70, or in Canada, the Canadian Electrical Code C22.1 part 1. WARNING SUFFOCATION HAZARD Destroy the carton and - Electrolux EFLS210TIS | Installation Instructions English Spanish French - Page 4
to be located so the power supply cord is accessible when the washer is in an installed position. Grounding type wall receptacle Do not, requirements Hot and cold water faucets MUST be installed within hose length of your washer's water inlet. The faucets MUST be 3/4 inch (1.9 cm) with threading - Electrolux EFLS210TIS | Installation Instructions English Spanish French - Page 5
Installation Requirements 5 Washer Dimensions 42" (107 cm) to clear open door 25" (64 cm) to front of closed door 24" (60.5 cm) freestand washer on floor floor line washer mounted on optional pedestal floor line water supply connection on rear of unit drain hose on rear of unit1 33.5" (85 cm) - Electrolux EFLS210TIS | Installation Instructions English Spanish French - Page 6
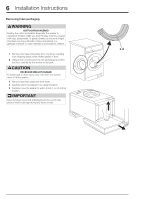
Installation Instructions Removing foam packaging WARNING SUFFOCATION HAZARD Destroy the carton and plastic bags after the washer is unpacked or lift the washer. 3 Remove styrofoam base and set it aside. 4 Carefully return the washer to an upright position. 5 Carefully move the washer to within 4 - Electrolux EFLS210TIS | Installation Instructions English Spanish French - Page 7
bolts and spacers for future use. If the washer is to be transported at a later date, the shipping hardware must be reinstalled to help prevent shipping damage. Installing hole plugs Locate hole plugs in the small bag supplied with washer instruction guides. Cut them apart from each other and - Electrolux EFLS210TIS | Installation Instructions English Spanish French - Page 8
performance of the washer. c NOTE For pedestal installations, see additional installation instructions included with the pedestal. b raise d WASHERS MUST BE PRESENT USE ONLY NEW HOSES c NOTE Hoses are not included with washer purchase. See "Accessories" section for various inlet hose kits - Electrolux EFLS210TIS | Installation Instructions English Spanish French - Page 9
and money. 7 If you have any questions during initial operation, please review the "Service Prevention Checklist" in your Use & Care Guide before calling for service. 8 Place these instructions in a location near the washer for future reference. NOTE A wiring diagram and technical data sheet are - Electrolux EFLS210TIS | Installation Instructions English Spanish French - Page 10
another stacking kit, you may order one. INLET HOSE KITS Please call 866-233-8353 (in Canada, 800-265-8352) to explore hose kit options that will meet your specific installation needs. UNIVERSAL APPLIANCE WRENCH P/N 137019200 A UNIVERSAL APPLIANCE WRENCH is available to aid in dryer/washer/pedestal - Electrolux EFLS210TIS | Installation Instructions English Spanish French - Page 11
EN FRONT LOAD WASHER FR LAVEUSE Á CHARGEMENT FRONTAL ES LAVADORA DE CARGA FRONTAL INSTALLATION INSTRUCTIONS INSTRUCTIONS D'INSTALLATION INSTRUCCIONES DE INSTALACIÓN - Electrolux EFLS210TIS | Installation Instructions English Spanish French - Page 12
14-15 Instructions d'installation 16-19 Accessoires 20 Remarques 21 Liste de vérification d'installation Matériel d'expédition Le support en mousse Vérifications finales Vous avez lu entièrement les instructions d'installation et le Guide d'utilisation et d'entretien La porte se verrouille - Electrolux EFLS210TIS | Installation Instructions English Spanish French - Page 13
dernière édition du National Electrical Code (ANSI/NFPA 70), ou au Canada, au Code canadien de l'électricité (C22.1, article 1). AVERTISSEMENT RISQUE de tout autre appareil électroménager. IMPORTANT Les instructions comprises dans ce guide et toute autre documentation fournie avec cet appareil ne - Electrolux EFLS210TIS | Installation Instructions English Spanish French - Page 14
ou par toute autre source d'alimentation différente de celle fournie par les services publics n'est pas recommandée. PRISE - Prise à trois alvéoles et l'eau froide ne doit pas dépasser 68,9 kPa (10 lb/po²). Le service des eaux de votre localité peut vous informer sur la pression de votre alimentation - Electrolux EFLS210TIS | Installation Instructions English Spanish French - Page 15
Dimensions de Laveuse 42" (107 cm) avec la porte grande ouverte 25" (64 du cordon d'alimentation de la laveuse, environ 150 cm (59 po). 3Longueur du cordon d'alimentation de la sécheuse au Canada, environ 150 cm (59 po). alimentation électrique à l'arrière de la sécheuse3 tuyau de vidange à l'arriè - Electrolux EFLS210TIS | Installation Instructions English Spanish French - Page 16
16 Instructions d'Installation Retrait de l'emballage en mousse AVERTISSEMENT RISQUE D'ÉTOUFFEMENT y avoir accès. x 2 1 Retirez le ruban de la porte et videz le contenu du tambour, y compris le support en mousse qui a servi à l'expédition à l'intérieur du joint de porte en caoutchouc. 2 À l'aide - Electrolux EFLS210TIS | Installation Instructions English Spanish French - Page 17
Dégagement du Tuyau de Vidange Instructions d'Installation 17 Le tuyau de vidange est maintenu en place ées pour éviter de l'endommager. Pose des bouchons Trouvez les bouchons du petit sac fourni avec les guides de votre laveuse. Séparez-les les uns des autres à l'aide de ciseaux et insérez-les - Electrolux EFLS210TIS | Installation Instructions English Spanish French - Page 18
possible de la laveuse afin d'optimiser le rendement de la laveuse. REMARQUE Pour une installation sur socle, reportez-vous aux instructions d'installation complémentaires incluses avec le socle. b soulever d abaisser Branchement de l'entrée d'eau 1 Faites couler de l'eau chaude et froide - Electrolux EFLS210TIS | Installation Instructions English Spanish French - Page 19
Retirez et jetez le ruban de la porte. 6 Reportez-vous au Guide d'utilisation et d'entretien fourni avec la laveuse. Il contient des renseignements rification avant service » de votre Guide d'utilisation et d'entretien avant d'effectuer une demande de service. 8 Laissez ces instructions à proximit - Electrolux EFLS210TIS | Installation Instructions English Spanish French - Page 20
vous est possible d'en commander un. KITS TUYAUX D'ALIMENTATION S'il vous plaît appelez 866-233-8353 (au Canada, 800-2658352) pour explorer les options de marchand qui vous a vendu votre appareil, ou reportez-vous au guide d'utilisation et d'entretien pour obtenir plus de détails. AVERTISSEMENT - Electrolux EFLS210TIS | Installation Instructions English Spanish French - Page 21
EN FRONT LOAD WASHER FR LAVEUSE Á CHARGEMENT FRONTAL ES LAVADORA DE CARGA FRONTAL INSTALLATION INSTRUCTIONS INSTRUCTIONS D'INSTALLATION INSTRUCCIONES DE INSTALACIÓN - Electrolux EFLS210TIS | Installation Instructions English Spanish French - Page 22
instrucciones antes de usar este lavadora. Identificación de los símbolos, palabras y avisos de seguridad Las indicaciones de seguridad incluidas en este manual aparecen precedidas de un aviso titulado "ADVERTENCIA" o "PRECAUCIÓN", de acuerdo con el nivel de riesgo. Definiciones Este es el símbolo - Electrolux EFLS210TIS | Installation Instructions English Spanish French - Page 23
carpintero Mangueras de llenado (x2) NOTA Las mangueras no están incluidos con la compra de la lavadora. Vea la sección de "Accesorios" para verificar diferentes kits de mangueras especificas para su instalación - Electrolux EFLS210TIS | Installation Instructions English Spanish French - Page 24
24 Requisitos de Instalación Requisitos del sistema eléctrico CIRCUITO - Circuito individual de bifurcación de 15 amp., correctamente polarizado y con conexión a tierra con fusible de retardo de 15 amp. o con interruptor automático. SUMINISTRO ELÉCTRICO: corriente alterna de 2 cables, con conexión - Electrolux EFLS210TIS | Installation Instructions English Spanish French - Page 25
) para destapar abra la puerta 25" (64 cm) al frente de la puerta cerrada lavadora independiente sobre el piso línea del piso lavadora colocada sobre pedestal opcional línea del piso 43" (109 cm) para destapar abra la puerta 26" (66 cm) al frente de la puerta cerrada Requisitos de Instalación 25 - Electrolux EFLS210TIS | Installation Instructions English Spanish French - Page 26
26 Instrucciones de Instalación Retiro de la espuma de embalaje ADVERTENCIA PELIGRO DE ASFIXIA Después de desembalar la lavadora, destruya los cartones y las bolsas de plástico. Los niños podrían utilizarlos para jugar. Los cartones cubiertos con alfombras, cubrecamas, o láminas de plástico - Electrolux EFLS210TIS | Installation Instructions English Spanish French - Page 27
Instrucciones de Instalación 27 Liberación de la Manguera de Desagüe La manguera de desagüe se mantiene fijada con dos piezas de plástico. Presione la pestaña de bloqueo y libere la manguera de desagüe. Retiro del embalaje de protección x 3 Retire todos los elementos siguientes de la parte - Electrolux EFLS210TIS | Installation Instructions English Spanish French - Page 28
un mejor rendimiento de la lavadora. NOTA Para instalar un pedestal, consulte las instrucciones de instalación adicionales que vienen con la lavadora. Vea la sección de "Accesorios" para verificar diferentes kits de mangueras especificas para su instalación. 2 Conecte la manguera de suministro - Electrolux EFLS210TIS | Installation Instructions English Spanish French - Page 29
Instrucciones de Instalación 29 Conexión del desagüe y del suministro eléctrico 1 Enganche un extremo del gancho de la manguera de drenaje (empacada en el tambor de la lavadora) en la manguera de drenaje. Continúe deslizando la manguera alrededor del soporte y encájela en su lugar. 2 Coloque el - Electrolux EFLS210TIS | Installation Instructions English Spanish French - Page 30
EPWD200QSW Un accesorio de pedestal de almacenamiento, especialmente diseñado para esta lavadora, se puede utilizar para elevar la secadora y facilitar su uso. *Es posible que hayan otros colores disponibles. Póngase en contacto con el distribuidor donde adquirió la lavadora. KIT DE SECADORA PARA - Electrolux EFLS210TIS | Installation Instructions English Spanish French - Page 31
Notas 31 - Electrolux EFLS210TIS | Installation Instructions English Spanish French - Page 32
electrolux.com/shop
-
 1
1 -
 2
2 -
 3
3 -
 4
4 -
 5
5 -
 6
6 -
 7
7 -
8
-
9
-
10
-
11
-
12
-
13
-
14
-
15
-
16
-
17
-
18
-
19
-
20
-
21
-
22
-
23
-
24
-
25
-
26
-
27
-
28
-
29
-
30
-
31
-
32
 |
 |

EN
FRONT LOAD WASHER
FR LAVEUSE Á CHARGEMENT FRONTAL
ES LAVADORA DE CARGA FRONTAL
INSTALLATION INSTRUCTIONS
INSTRUCTIONS D’INSTALLATION
INSTRUCCIONES DE INSTALACIÓN
157012090 April 2017