Electrolux EFLW427UIW Installation Instructions English
Electrolux EFLW427UIW Manual
 |
View all Electrolux EFLW427UIW manuals
Add to My Manuals
Save this manual to your list of manuals |
Electrolux EFLW427UIW manual content summary:
- Electrolux EFLW427UIW | Installation Instructions English - Page 1
EN FRONT LOAD WASHER FR LAVEUSE Á CHARGEMENT FRONTAL ES LAVADORA DE CARGA FRONTAL INSTALLATION INSTRUCTIONS INSTRUCTIONS D'INSTALLATION INSTRUCCIONES DE INSTALACIÓN A11200201 January 2018 - Electrolux EFLW427UIW | Installation Instructions English - Page 2
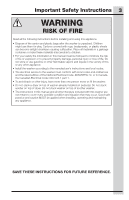
until you have read the safety precautions in this manual. Safety items throughout this manual are labeled with a Danger, Warning, or Important Safety Instructions 2 Installation Requirements 4 Unpacking Washer 8 Installation Instructions 10 Electrolux Major Appliances All rights reserved. - Electrolux EFLW427UIW | Installation Instructions English - Page 3
CSA C22.1 part 1. • To avoid back or other injury, have more than one person move or lift the washer. • Do not stack a dryer on top of washer already installed on pedestal. Do not stack washer on top of dryer. Do not stack washer on top of another washer. • The instructions in this manual and all - Electrolux EFLW427UIW | Installation Instructions English - Page 4
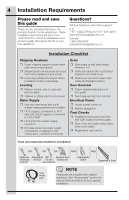
save this guide Thank you for choosing Electrolux, the premium brand in home appliances. These Installation Instructions are part of our commitment to customer satisfaction and product quality throughout the life of your new appliance. Questions? Toll-free telephone and online support: U.S. 1-877 - Electrolux EFLW427UIW | Installation Instructions English - Page 5
Electrical Codes, ANSI/NFPA 70 (latest edition), or in Canada, the Canadian electrical code C22.1 part 1. If in doubt, call a licensed electrician. DO NOT . Power cord with 3-prong grounded plug Grounding requirements 1. The washer MUST be grounded. In the event of malfunction or breakdown, - Electrolux EFLW427UIW | Installation Instructions English - Page 6
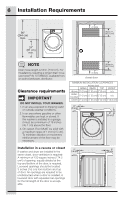
in. (150 cm). For installations requiring a longer drain hose, use hose P/N 137098000, available from an authorized parts distributor. Clearance requirements IMPORTANT DO NOT INSTALL YOUR WASHER: 1. In an area exposed to dripping water or outside weather conditions. 2. In an area where gasoline or - Electrolux EFLW427UIW | Installation Instructions English - Page 7
rear of unit3 freestand washer on floor floor line washer mounted on optional pedestal floor line 27.0" (68.5 cm) power cord on rear of unit1 38.0" (96.5 cm) 53.25" (135.5 cm) 53.5" (136 cm)* to clear open door 32" (81.25 cm)* to front of closed door approved stacking kit (STACKIT7X) required for - Electrolux EFLW427UIW | Installation Instructions English - Page 8
onto its back without the shipping bolts. 6. Carefully return the washer to an upright position. 7. Carefully move the washer to within 4 feet (1 m) of its final location. WARNING ELECTRIC SHOCK HAZARD Certain internal parts are intentionally not grounded and may present a risk of electrical shock - Electrolux EFLW427UIW | Installation Instructions English - Page 9
damage to your home, or unexpected washing results. Save all shipping bolts and spacers for future use. If the washer is to be transported at a later the small bag sup- plied with washer instruction guides. Insert them in the holes in the washer back panel where the shipping hardware has been - Electrolux EFLW427UIW | Installation Instructions English - Page 10
the washer. NOTE For pedestal installations, see additional installation instructions included with the pedestal. washer firmly in place. Rubber Washers Must Be Present USE ONLY NEW HOSES NOTE Hoses are not included with washer purchase. See "Accessories" section for various inlet hose kits - Electrolux EFLW427UIW | Installation Instructions English - Page 11
operation. 8. If you have any questions during initial operation, please review the "Service Prevention Checklist" in your Use & Care Guide before calling for service. 9. Place these instructions in a location near the washer for future reference. NOTE A wiring diagram and technical data sheet are - Electrolux EFLW427UIW | Installation Instructions English - Page 12
plate. IMPORTANT Take care not to pull the door away from the washer until you remove the wiring harness terminal cap. Fine Thread 3. Hold the door with one hand supporting the handle area and one hand supporting the hinge. While supporting the door at the hinge, press firmly with the other hand - Electrolux EFLW427UIW | Installation Instructions English - Page 13
hole cover upward to release it from the front panel. You may have to use a nonscratching plastic knife if you are unable to release it manually. Then, slide the cover down slightly and remove it from the front panel. 2 Reversing Door Assembly 1. Locate nine screws on inner door ring. Remove each - Electrolux EFLW427UIW | Installation Instructions English - Page 14
in the correct orientation with the "scoop" at the bottom. 2. Slide terminal cap onto back of hinge plate until tabs snap into place. 3. Plug in washer and close the door. Test correct door lock operation by starting a test cycle: lock should engage, and door should not be able to be opened - Electrolux EFLW427UIW | Installation Instructions English - Page 15
dryer on top of this washer may have been included in the initial purchase of your dryer. If your model did not include a stacking kit or you desire another stacking kit, you may order one. INLET HOSE KITS Please call 866-233-8353 (in Canada, 800-265-8352) to explore hose kit options that will meet - Electrolux EFLW427UIW | Installation Instructions English - Page 16
electrolux.com/shop - Electrolux EFLW427UIW | Installation Instructions English - Page 17
EN FRONT LOAD WASHER FR LAVEUSE À CHARGEMENT FRONTAL ES LAVADORA DE CARGA FRONTAL INSTALLATION INSTRUCTIONS INSTRUCTIONS D'INSTALLATION INSTRUCCIONES DE INSTALACIÓN A11200201 Janvier 2018 - Electrolux EFLW427UIW | Installation Instructions English - Page 18
sent manuel. Les mesures de sécurité présentées dans ce guide sont identifiées par les mots DANGER, AVERTISSEMENT ou MISE EN GARDE Conditions d'installation 4 Déballage de l'appareil 8 Instructions d'installation 10 Porte réversible 12 Options 15 Electrolux Électroménagers Tous droits réservés. - Electrolux EFLW427UIW | Installation Instructions English - Page 19
. • Pour votre sécurité, les informations contenues dans le présent Guide doivent être suivies afin de minimiser les risques d'incendie ou d'explosion sécheuse. Ne pas superposer la laveuse sur une autre laveuse. • Les instructions dans le présent manuel et tous les autres documents inclus avec cet - Electrolux EFLW427UIW | Installation Instructions English - Page 20
4 Conditions d'installation Veuillez lire et conserver ce guide Merci d'avoir choisi Electrolux, la marque de qualité en matière d'électroménagers. Ces instructions d'installation font partie de notre engagement à vous satisfaire et à vous fournir un produit de qualité pendant toute la durée de vie - Electrolux EFLW427UIW | Installation Instructions English - Page 21
toute autre source d'alimentation différente de celle fournie par les services publics n'est pas recommandée. PRISE ÉLECTRIQUE - Prise à 3 pression entre l'eau chaude et froide ne peut pas dépasser 10 psi. Votre service d'aqueduc pourra vous informer de votre pression d'eau. Exigences du système de - Electrolux EFLW427UIW | Installation Instructions English - Page 22
6 Conditions d'installation 244 cm (96") max. 61 cm (24") min. 7.6 cm (3") 387.1 cm² (60 sq. in.) REMARQUE La longueur du tuyau est de 150 cm (59 po). Pour des installations nécessitant un tuyau plus long, utiliser le tuyau portant le numéro de pièce 137098000 disponible auprès d'un distributeur - Electrolux EFLW427UIW | Installation Instructions English - Page 23
Conditions d'installation 7 Dimensions de la laveuse 53.5" (136 cm)* avec la 53.5" (136 cm)* avec la porte grande ouverte poàrtep3al2or"trisr(q8due1'e.l2'lale5vaecnsmtt df)e*ermlaée kit d'empilage approuvé (STACKIT7X) requis pour l'installation empilée raccord de l'alimentation en eau à l'arri - Electrolux EFLW427UIW | Installation Instructions English - Page 24
8 Déballage de l'appareil Retirer l'emballage en mousse AVERTISSEMENT RISQUE D'ÉTOUFFEMENT Détruire le carton d'emballage et les sacs en plastique après avoir déballé l'appareil. Les enfants pourraient les utiliser pour jouer. Les cartons recouverts de tapis, couvertes ou draps de plastique peuvent - Electrolux EFLW427UIW | Installation Instructions English - Page 25
des HOT Water Hose CALIENTE CHAUDE COLD Water Hose FRIA FROIDE bouchons de trou Situer les bouchons dans le petit sac fourni avec les guides d'instructions de la laveuse. Les insérer dans les trous dans le panneau arrière de la laveuse où la quincaillerie de transport avait été retirée. x7 - Electrolux EFLW427UIW | Installation Instructions English - Page 26
le plus près possible de la laveuse afin d'optimiser le rendement de la laveuse. REMARQUE Pour une installation sur socle, voir les instructions d'installation complémentaires incluses avec le socle. Raccordement à la canalisation d'eau 1. Faire couler de l'eau chaude et froide des robinets pour - Electrolux EFLW427UIW | Installation Instructions English - Page 27
et le bon fonctionnement de la machine. 8. Si vous avez des questions concernant le fonctionnement initial, veuillez consulter la « Liste de prévention de service » dans votre Guide d'emploi et d'entretien avant de faire appel à un technicien. 9. Ranger ces instructions dans un endroit proche de la - Electrolux EFLW427UIW | Installation Instructions English - Page 28
vis de charnière. 2. Retirer les quatre vis de charnière à l'aide d'un tournevis avec embout carré #2. Les conserver pour la repose. x4 4. Tout en supportant la porte d'une main, pincer les onglets pour libérer le capuchon terminal de plastique de la plaque de charnière. IMPORTANT Prendre soin de - Electrolux EFLW427UIW | Installation Instructions English - Page 29
Porte réversible 13 Dépose de la porte, suite 6. Libérer le faisceau de câblage de la retenue sur le capuchon terminal de plastique. Puis libérer le terminal du capuchon terminal. Conserver le capuchon pour la repose plus tard. Repose du verrou de porte et du bouchon en plastique 1. Déplacer le - Electrolux EFLW427UIW | Installation Instructions English - Page 30
14 Porte réversible Porte réversible, suite 3. S'assurer que les onglets d'alignement se réenclenchent. 3. Introduire les goupilles de référence de la charnière dans le trou qui avait précédemment été caché par le bouchon de plastique. Appuyez sur la face de la charnière pour enclencher les autres - Electrolux EFLW427UIW | Installation Instructions English - Page 31
qui vous a vendu votre laveuse. Pièces de rechange aux États-Unis et au Canada Si vous avez besoin de pièces de rechange pour votre sécheuse, contactez le dé 3287) aux États-Unis ou le 1 800 265-8352 au Canada, ou visitez notre site Internet http://www.electroluxappliances.ca/fr-CA pour trouver le distributeur - Electrolux EFLW427UIW | Installation Instructions English - Page 32
electrolux.com/shop - Electrolux EFLW427UIW | Installation Instructions English - Page 33
EN FRONT LOAD WASHER FR LAVEUSE Á CHARGEMENT FRONTAL ES LAVADORA DE CARGA FRONTAL INSTALLATION INSTRUCTIONS INSTRUCTIONS D'INSTALLATION INSTRUCCIONES DE INSTALACIÓN A11200201 Enero 2018 - Electrolux EFLW427UIW | Installation Instructions English - Page 34
hasta que haya leído las precauciones de seguridad en este manual. Los elementos de seguridad en este manual están etiquetados con Peligro, Advertencia o Atención, según el tipo es importante pero no se relaciona con ningún peligro. ©2017 Electrolux Major Appliances Todos los derechos reservados. - Electrolux EFLW427UIW | Installation Instructions English - Page 35
Nacional, ANSI/NFPA 70, o en Canadá, el código eléctrico canadiense CSA C22.1 parte 1. • Para evitar lesiones en la espalda o de otro tipo, la lavadora debe ser pedestal. No apile la lavadora encima de una secadora. No apile la lavadora encima de otra lavadora. • Las instrucciones de este manual - Electrolux EFLW427UIW | Installation Instructions English - Page 36
esta guía ¿Preguntas? Gracias por elegir Electrolux, la marca premium de electrodomésticos. Estas Instrucciones de Instalación forman parte de nuestro compromiso con la satisfacción del sección "Accesorios" para ver los distintos kits de mangueras de entrada adecuados a su instalación concreta. - Electrolux EFLW427UIW | Installation Instructions English - Page 37
estos, de acuerdo con los Códigos Eléctricos N acionales ANSI/ NFPA 70 (última edición), o en Canadá, según el código eléctrico canadiense C22.1 parte 1. En caso de duda, llame a un electricista cualificado. NO corte ni modifique la clavija de conexión a tierra del cable de alimentación eléctrica - Electrolux EFLW427UIW | Installation Instructions English - Page 38
una a bertura mínima de 774,2 cm² (120 pulgadas cuadradas), dividida por igual en la parte superior e inferior de la puerta. Las aberturas de listones estarán situadas a 7,6 cm (3 pulgadas) de las partes inferior y superior de la puerta. Si se instala una puerta, deberá tener aberturas de aire - Electrolux EFLW427UIW | Installation Instructions English - Page 39
abierta 81,25 cm (32")* para puerta cerrada Suministro de agua conexión en la parte trasera de la unidad freestand washer on floor línea de suelo lavadora montada sobre el pedestal opcional línea de suelo tubo de desagüe en la parte trasera de la unidad3 68.5 cm (27,0") cable de alimentación en - Electrolux EFLW427UIW | Installation Instructions English - Page 40
. 4. Utilizando una alfombra, manta o trozo de cartón para proteger el suelo, apoye con cuidado la lavadora sobre su parte trasera. IMPORTANTE NO coloque la lavadora sobre su parte trasera sin los pernos de transporte. PRECAUCIÓN PELIGRO DE PESO EXCESIVO Para evitar lesiones en la espalda o de otro - Electrolux EFLW427UIW | Installation Instructions English - Page 41
Desembalaje de la lavadora 9 Retirada de los materiales de embalaje y envío IMPORTANTE No retirar todos los materiales de embalaje y envío podría provocar daños en el electrodoméstico y en su hogar u obtener resultados de lavado no esperados. Guarde todos los separadores y pernos de transporte para - Electrolux EFLW427UIW | Installation Instructions English - Page 42
el pedestal. Conexión de la entrada de agua 1. Haga circular agua de las llaves de agua caliente y fría para vaciar las tuberías y eliminar partí incluye mangueras. Consulte la sección "Accesorios" para ver los distintos kits de mangueras de entrada adecuados a su instalación concreta. 3. Conecte - Electrolux EFLW427UIW | Installation Instructions English - Page 43
Instrucciones de instalación 11 4. Conecte la manguera de entrada CALIENTE al suministro de agua CALIENTE y la manguera de entrada FRÍA al suministro de agua FRÍA. 5. Apriete a mano hasta que queden bien ajustadas. A continuación apriete cada conexión de suministro otros 2/3 de vuelta con los - Electrolux EFLW427UIW | Installation Instructions English - Page 44
12 Instrucciones de instalación 4. Encienda el interruptor del disyuntor/ caja de fusibles. 5. Deslice cuidadosamente la lavadora hacia su posición definitiva. Vuelva a comprobar el nivel y empuje en las esquinas para comprobar la estabilidad. Consulte el apartado "Nivelación de su lavadora". Retire - Electrolux EFLW427UIW | Installation Instructions English - Page 45
con broca cuadrada del 2 3. Proteja la superficie del suelo de trabajo, como la parte superior de la lavadora o el suelo cercano a ésta, con un paño suave con la otra mano hasta que los pasadores de posicionamiento de la parte posterior de la placa de bisagras se desencajen del panel frontal. 4. - Electrolux EFLW427UIW | Installation Instructions English - Page 46
y de la cubierta 1. Desplace la cubierta hacia el otro lado del panel frontal. Coloque la cubierta de forma que el "gancho" esté en la parte inferior. Introduzca el gancho en la ranura inferior, deslice la tapa hacia abajo e introduzca a presión las pestañas de retención superiores hasta que queden - Electrolux EFLW427UIW | Installation Instructions English - Page 47
puerta externa. Puerta reversible 15 180 3. Asegúrese de que se acoplen las pestañas de alineamiento. 2. Deslice la tapa del terminal sobre la parte posterior de la placa de bisagra hasta que las pestañas se enganchen en su sitio. 3. Introduzca los pasadores de posicionamiento de la bisagra en - Electrolux EFLW427UIW | Installation Instructions English - Page 48
pestillo sujeta bien cuando se cierra. 2. Verifique si el cristal de la puerta interna tiene la orientación correcta con la "cuchara" de la parte inferior. 3. Enchufe la lavadora y cierre la puerta. Pruebe el funcionamiento correcto de la cerradura iniciando un ciclo de prueba: la cerradura se deber - Electrolux EFLW427UIW | Installation Instructions English - Page 49
o daños en la lavadora. 68,5 cm (27") 38 cm (15") (6276,c5m") Pedestal de almacenamiento KITS DE MANGUERA DE ENTRADA Llame al 866-233-8353 (en Canadá, 800-265-8352) para conocer los UU. o www.electroluxappliances.ca en Canadá para encontrar el distribuidor de piezas de Electrolux más cercano. - Electrolux EFLW427UIW | Installation Instructions English - Page 50
electrolux.com/shop
-
 1
1 -
 2
2 -
 3
3 -
 4
4 -
 5
5 -
 6
6 -
 7
7 -
8
-
9
-
10
-
11
-
12
-
13
-
14
-
15
-
16
-
17
-
18
-
19
-
20
-
21
-
22
-
23
-
24
-
25
-
26
-
27
-
28
-
29
-
30
-
31
-
32
-
33
-
34
-
35
-
36
-
37
-
38
-
39
-
40
-
41
-
42
-
43
-
44
-
45
-
46
-
47
-
48
-
49
-
50
 |
 |
EN
FRONT LOAD WASHER
FR LAVEUSE Á CHARGEMENT FRONTAL
ES LAVADORA DE CARGA FRONTAL
INSTALLATION INSTRUCTIONS
INSTRUCTIONS D’INSTALLATION
INSTRUCCIONES DE INSTALACIÓN
A11200201 January 2018