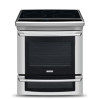
Electrolux EI30GF45QS Installation Instructions (English, Spanish, French)
Electrolux EI30GF45QS Manual
 |
View all Electrolux EI30GF45QS manuals
Add to My Manuals
Save this manual to your list of manuals |
Electrolux EI30GF45QS manual content summary:
- Electrolux EI30GF45QS | Installation Instructions (English, Spanish, French) - Page 1
and the drawer compartments before connecting the electrical supply to the range. 3. Observe all governing codes and ordinances. 4. Be sure to leave these instructions with the consumer. Important Note to the Consumer Keep these instructions with your owner's guide for future reference. Printed in - Electrolux EI30GF45QS | Installation Instructions (English, Spanish, French) - Page 2
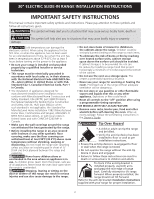
30" ELECTRIC SLIDE-IN RANGE INSTALLATION INSTRUCTIONS IMPORTANT SAFETY INSTRUCTIONS This manual contains important safety symbols and instructions. Please pay attention to these symbols and follow all instructions given. This symbol will help alert you to situations that may cause serious bodily - Electrolux EI30GF45QS | Installation Instructions (English, Spanish, French) - Page 3
30" ELECTRIC SLIDE-IN RANGE INSTALLATION INSTRUCTIONS Product Dimensions C Do not install the unit in the cabinet before reading next two pages. O(pseeen nDootoer5) A D B Side Panel A. HEIGHT (Under Cooktop) 35 3/4" (90,8 cm) - Electrolux EI30GF45QS | Installation Instructions (English, Spanish, French) - Page 4
30" ELECTRIC SLIDE-IN RANGE INSTALLATION INSTRUCTIONS Cabinet Dimensions 30" Min. (76,2 cm) Min. 13" (33 cm) Shave (see page 5), insert the appliance in the counter and then level. Make sure the unit is supported by the leveling legs at the front and the wheels at the back and NOT by the cooktop - Electrolux EI30GF45QS | Installation Instructions (English, Spanish, French) - Page 5
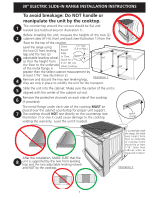
30" ELECTRIC SLIDE-IN RANGE INSTALLATION INSTRUCTIONS To avoid breakage: Do NOT handle or manipulate the flange under each side of the cooktop MUST be placed over the cabinet countertop for proper unit support. 7 The cooktop should NOT rest directly on the countertop (see illustration 2) or else it - Electrolux EI30GF45QS | Installation Instructions (English, Spanish, French) - Page 6
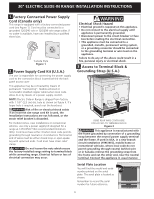
shown on figure 4. If a larger hole is required, punch out the knockout. Risk of fire or electrical shock exists if an incorrect size range cord kit is used, the Installation Instructions are not followed, or the strain relief bracket is discarded. For mobile homes, new installations or recreational - Electrolux EI30GF45QS | Installation Instructions (English, Spanish, French) - Page 7
30" ELECTRIC SLIDE-IN RANGE INSTALLATION INSTRUCTIONS 4. Electrical Connection to the Range (U.S.A.) Three Conductor Wire Connection to Range If local codes permit connection of the frame grounding conductor to the neutral wire of the copper power supply cord (see Figure 3): 1. Remove the 3 screws - Electrolux EI30GF45QS | Installation Instructions (English, Spanish, French) - Page 8
30" ELECTRIC SLIDE-IN RANGE INSTALLATION INSTRUCTIONS Direct Electrical Connection to the Circuit Breaker, Fuse Box the appliance-grounding conductor to the neutral (white) wire, or if connecting to 4-wire electrical system (see Figure 6): 1. Be sure that no power is supplied on the cable from - Electrolux EI30GF45QS | Installation Instructions (English, Spanish, French) - Page 9
30" ELECTRIC SLIDE-IN RANGE INSTALLATION INSTRUCTIONS 4. Cabinet Construction 4.1 To eliminate the risk of burns or fire by reaching over heated surface units, do not have cabinet storage space above the range. If there is cabinet storage space above range, reduce risk by installing a range hood - Electrolux EI30GF45QS | Installation Instructions (English, Spanish, French) - Page 10
30" ELECTRIC SLIDE-IN RANGE INSTALLATION INSTRUCTIONS 5. Range Installation Important Note: Door removal is not a requirement for installation of the range, but is an added convenience. Refer to the Use and Care Guide for oven door removal instructions. 10 Position range in front of the cabinet - Electrolux EI30GF45QS | Installation Instructions (English, Spanish, French) - Page 11
ELECTRIC SLIDE-IN RANGE INSTALLATION INSTRUCTIONS 6. Leveling the Range Level the range after installation in the cutout opening. 1. Open the range OFF position. Before You Call for Service Read the Before you call list and operating instructions in your Use and Care Manual . It may save you time - Electrolux EI30GF45QS | Installation Instructions (English, Spanish, French) - Page 12
30" ELECTRIC SLIDE-IN RANGE INSTALLATION INSTRUCTIONS 8 Anti-Tip Brackets Installation To reduce the risk of tipping of the range, the range must be secured to the floor by properly installed anti-tip bracket and screws packed with the range. These parts are located in the oven. Failure to install - Electrolux EI30GF45QS | Installation Instructions (English, Spanish, French) - Page 13
digo o reglamento. 4. Asegúrese de dejar estas instrucciones con el con- sumidor Nota importante para el consumidor Mantenga estas instrucciones con el manual del usuario para futuras referencias. Impreso en Canada P/N 318201626 (1212) Rev. C English - pages 1-12 Español - páginas 13-24 Français - Electrolux EI30GF45QS | Installation Instructions (English, Spanish, French) - Page 14
y otros utensilios antes de auto-limpiar el horno. Limpie todo exceso de derrames. Siga las instrucciones para la pre-limpieza en el Manual del usuario. communities and setups); ANSIZ225.1/NFPA 501A- última edición o con códigos locales en los Estados Riesgo de volcamiento Unidos, o el CAN - Electrolux EI30GF45QS | Installation Instructions (English, Spanish, French) - Page 15
INSTRUCCIONES DE INSTALACIÓN PARA LA ESTUFA ELÉCTRICA DESLIZABLE DE 30" Dimensiones del producto C No instale la unidad en el gabinete si no ha leido esta página. P(uveeratalaanboietrata5) A D B Panel lateral A. ALTURA (Debajo de la cubierta) 35 3/4" (90,8 cm) 36 5/8" (93 cm) B. ANCHURA - Electrolux EI30GF45QS | Installation Instructions (English, Spanish, French) - Page 16
INSTRUCCIONES DE INSTALACIÓN PARA LA ESTUFA ELÉCTRICA DESLIZABLE DE 30" Dimensiones del contador 30" Mín. (76,2 cm) Mín. Lije la parte elevade del borde para obtener las 31 1/2" (80 cm) de ancho del reborde de la plancha de cocinar. 1 ½" Máx. (3,8 cm Máx.) 13" (33 cm) Estas superficies deben - Electrolux EI30GF45QS | Installation Instructions (English, Spanish, French) - Page 17
INSTRUCCIONES DE INSTALACIÓN PARA LA ESTUFA ELÉCTRICA DESLIZABLE DE 30" Para evitar fractura de la unidad: NO manipule la unidad sosteniendo la cubierta. La cubierta alrededor del espacio donde usted instalara su unidad 1 debe de estar plana y nivelada. (Vea el área sombreada en la ilustración nú - Electrolux EI30GF45QS | Installation Instructions (English, Spanish, French) - Page 18
INSTRUCCIONES DE INSTALACIÓN PARA LA ESTUFA ELÉCTRICA DESLIZABLE DE 30" 1. Cordón de fuente de energía conectado de fabrica (Canadá solamente) Esta estufa viene de fabrica equipada con un cordón de fuente de energía (vea a la figura 1). El cordón debe de ser conectado a una toma de corriente a - Electrolux EI30GF45QS | Installation Instructions (English, Spanish, French) - Page 19
INSTRUCCIONES DE INSTALACIÓN PARA LA ESTUFA ELÉCTRICA DESLIZABLE DE 30" 4. Conexión eléctrica a la cocina (Estados Unidos) Conexión del cable a tres alambres la cocina Si los códigos locales permiten la conexión del conductor a tierra del armazón al alambre neutral del cable de bronce del - Electrolux EI30GF45QS | Installation Instructions (English, Spanish, French) - Page 20
INSTRUCCIONES DE INSTALACIÓN PARA LA ESTUFA ELÉCTRICA DESLIZABLE DE 30" Conexión eléctrica directa al cortacircuito, a la caja de fusibles o la caja de empalmes Si el aparato está conectado directamente al cortacircuito, a la caja de fusibles o a la caja de empalmes, use un cable blindado flexible - Electrolux EI30GF45QS | Installation Instructions (English, Spanish, French) - Page 21
INSTRUCCIONES DE INSTALACIÓN PARA LA ESTUFA ELÉCTRICA DESLIZABLE DE 30" 5. Construcción del armario Para eliminar el riesgo de quemaduras o de fuego tratando de alcanzar algo por encima de las zonas calientes, evite de colocar artículos sobre la cocina. Si cree necesitar este espacio, el riesgo - Electrolux EI30GF45QS | Installation Instructions (English, Spanish, French) - Page 22
INSTRUCCIONES DE INSTALACIÓN PARA LA ESTUFA ELÉCTRICA DESLIZABLE DE 30" 6. Instalación de la estufa Nota importante: No es necesario, pero sí es conveniente, quitar la puerta para instalar el horno. Consulte las instrucciones para retirar la puerta en la Guía de Uso y Cuidado. 10 Coloque la - Electrolux EI30GF45QS | Installation Instructions (English, Spanish, French) - Page 23
de los Elementos del Horno El horno está equipado con un control electrónico. Cada función ha sido probada en la fábrica antes del Antes de Llamar al Servicio Lea la sección Evite Llamadas de Servicio en su Manual del Usuario. Esto le podrá ahorrar tiempo y gasto. Esta lista incluye ocurrencias - Electrolux EI30GF45QS | Installation Instructions (English, Spanish, French) - Page 24
INSTRUCCIONES DE INSTALACIÓN PARA LA ESTUFA ELÉCTRICA DESLIZABLE DE 30" 9. Instrucciones de instalación de la fijación anti-inclinación Para reducir el riesgo de inclinación de la cocina, ésta debe ser asegurada hacia el piso con las fijaciones de anti-inclinación y los tornillos que vienen con la - Electrolux EI30GF45QS | Installation Instructions (English, Spanish, French) - Page 25
fonctionnement 35 Installation du support anti-bascule 36 Notes importantes à l'installateur 1. Lisez toutes les instructions contenues dans ce feuillet pas de laisser ces instructions au consommateur. Note importante au consommateur Conservez ces instructions avec le guide de l'utilisateur pour - Electrolux EI30GF45QS | Installation Instructions (English, Spanish, French) - Page 26
. Essuyez tous les renversements excessifs. Suivez les instructions pour le prénettoyage dans le Guide de l'utilisateur. Risque de basculement • Un de ces instructions peut causer des blessures fatales ou de graves brûlures aux enfants et aux adultes. Pour vérifier si le support antirenversement est - Electrolux EI30GF45QS | Installation Instructions (English, Spanish, French) - Page 27
INSTRUCTIONS D'INSTALLATION POUR LA CUISINIÈRE 30" ENCASTRABLE Dimensions du produit N'insérez pas l'appareil dans le comptoir sans avoir lu les deux prochaines pages. Po( - Electrolux EI30GF45QS | Installation Instructions (English, Spanish, French) - Page 28
INSTRUCTIONS D'INSTALLATION POUR LA CUISINIÈRE 30" ENCASTRABLE Dimensions du comptoir 30" Min 29), insérez l'appareil dans le comptoir et ensuite nivelez-le. Assurez-vous que l'appareil est bien supporté par les pattes et les roulettes de nivellement et non par la table de cuisson. 22 7/8" (58 - Electrolux EI30GF45QS | Installation Instructions (English, Spanish, French) - Page 29
INSTRUCTIONS D'INSTALLATION POUR LA CUISINIÈRE 30" ENCASTRABLE Pour éviter les cassures: NE de chaque côté de la table de cuisson DOIT reposer sur le comptoir pour que l'appareil soit bien supporté. 7 La table de cuisson ne doit PAS toucher directement le comptoir (voir illustration 2), sinon cela - Electrolux EI30GF45QS | Installation Instructions (English, Spanish, French) - Page 30
, ou un connecteur mis à la terre doit être branché à la borne de mise à la terre ou directement sur l'appareil. Si vous ne suivez pas les instructions précitées à la lettre, il peut en résulter un incendie, des blessures ou un choc électrique. 3. Accès au bloc de connexions et à la plaque - Electrolux EI30GF45QS | Installation Instructions (English, Spanish, French) - Page 31
INSTRUCTIONS D'INSTALLATION POUR LA CUISINIÈRE 30" ENCASTRABLE 4. Connexions électriques à la cuisinière (U.S.A.) Pour une connexion à un câble d'alimentation à trois conducteurs (EtatsUnis seulement) Si les codes - Electrolux EI30GF45QS | Installation Instructions (English, Spanish, French) - Page 32
INSTRUCTIONS D'INSTALLATION POUR LA CUISINIÈRE 30" ENCASTRABLE Connexions électriques au système électrique de la résidence L'appareil doit être raccordé directement au disjoncteur ou au - Electrolux EI30GF45QS | Installation Instructions (English, Spanish, French) - Page 33
INSTRUCTIONS D'INSTALLATION POUR LA CUISINIÈRE 30" ENCASTRABLE 5. Construction de l'armoire 5.1 Pour éliminer les risques de brûlures ou de feu, en étendant le bras au‑ - Electrolux EI30GF45QS | Installation Instructions (English, Spanish, French) - Page 34
cessaire pour moulure arrière dans un centre de service. Installation de panneaux latéraux Vous pouvez commander un nécessaire pour panneaux latéraux support antibascule maintenant avant de placer l'appareil à 7 sa position finale. Suivez les instructions à la page 35 ou sur le gabarit fourni avec le support - Electrolux EI30GF45QS | Installation Instructions (English, Spanish, French) - Page 35
sont terminés Vérifiez si toutes les commandes sont en position d'arrêt. Avant d'appeler le service d'entretien Révisez la liste des vérifications préventives et les instructions d'opération dans votre Guide de l'utilisateur. Vous sauverez probablement du temps et de l'argent. La liste contient les - Electrolux EI30GF45QS | Installation Instructions (English, Spanish, French) - Page 36
ou si un enfant y grimpe. Les renversements de liquides chauds ou la cuisinière peuvent provoquer de sérieuses blessures. Suivez les instructions ci‑dessous pour installer le support anti‑bascule. Si vous déplacez la cuisinière pour l'installer à un autre endroit, vous devez également déplacer le
-
 1
1 -
 2
2 -
 3
3 -
 4
4 -
 5
5 -
 6
6 -
 7
7 -
8
-
9
-
10
-
11
-
12
-
13
-
14
-
15
-
16
-
17
-
18
-
19
-
20
-
21
-
22
-
23
-
24
-
25
-
26
-
27
-
28
-
29
-
30
-
31
-
32
-
33
-
34
-
35
-
36
 |
 |

INSTALLATION INSTRUCTIONS
30" ELECTRIC SLIDE-IN RANGE
Table of Contents
Important Safety Instructions
...................................
2
Cutout Dimensions
...............................................
3-4
To Avoid Breakage
...................................................
5
Factory Connected Power Supply Cord
....................
6
Power Supply Kit
......................................................
6
Access to Terminal Block & Grounding Strap
............
6
Serial Plate Location
.................................................
6
Electrical Connection to the Range
........................
7-8
Cabinet Construction
...............................................
9
Range Installation
..................................................
10
Leveling the range
.................................................
11
Check Operation
....................................................
11
Anti-Tip Brackets Installation
..................................
12
Important Notes to the Installer
1.
Read all instructions contained in these installation
instructions before installing range.
2. Remove all packing material from the oven and
the drawer compartments before connecting the
electrical supply to the range.
3.
Observe all governing codes and ordinances.
4. Be sure to leave these instructions with the
consumer.
Important Note to the Consumer
Keep these instructions with your owner's guide for
future reference.
INSTALLATION AND SERVICE MUST BE PERFORMED BY A
QUALIFIED INSTALLER.
IMPORTANT: SAVE FOR LOCAL ELECTRICAL INSPECTOR'S USE.
READ AND SAVE THESE INSTRUCTIONS FOR FUTURE REFERENCE.
FOR YOUR SAFETY: Do not store or use gasoline or other
flammable vapors and liquids in the vicinity of this or any other appliance.
Canada
United States
P/N 318201626 (1212) Rev. C
English – pages 1-12
Español – páginas 13-24
Français – pages 25-36
Printed in Canada