Electrolux ERFC2393AS Complete Owners Guide
Electrolux ERFC2393AS Manual
 |
View all Electrolux ERFC2393AS manuals
Add to My Manuals
Save this manual to your list of manuals |
Electrolux ERFC2393AS manual content summary:
- Electrolux ERFC2393AS | Complete Owners Guide - Page 1
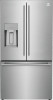
Use & Care Guide EN Refrigerator Guide d'utilisation et d'entretien FR Réfrigérateur Guía de uso y cuidado SP Refrigerador electroluxappliances.com\register - Electrolux ERFC2393AS | Complete Owners Guide - Page 2
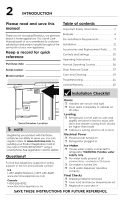
Settings 20 Operating Instructions 30 Normal Operating Sounds 36 Serial number Stain Removal Guide 37 Model number Care and Cleaning 39 Troubleshooting 44 Limited Warranty 50 Installation Checklist Serial Number Location NOTE Registering your product with Electrolux enhances our - Electrolux ERFC2393AS | Complete Owners Guide - Page 3
refrigerant used. To be repaired only by trained service person-nel. Use only manufacturer-authorized service parts. Any repair equipment used must be designed for flammable refrigerants. Follow all manufacturer repair instructions. Do not puncture refrigerant tubing. WARNING CALIFORNIA RESIDENTS - Electrolux ERFC2393AS | Complete Owners Guide - Page 4
Have refrigerant removed by a qualified service technician. Do not use electrical entrapment Child entrapment and suffocation are not problems of the past. Junked or abandoned refrigerators old refrigerator or freezer, please follow the instructions below to help prevent accidents. IMPORTANT CFC/ - Electrolux ERFC2393AS | Complete Owners Guide - Page 5
(GFI) circuit. Do not use an extension cord or adapter plug. • If the power cord is damaged, it should be replaced by an authorized service technician to prevent any risk. • Never unplug the refrigerator by pulling on the power cord. Always grip the plug firmly, and pull straight out from - Electrolux ERFC2393AS | Complete Owners Guide - Page 6
™ Water Filter B Condiment Bin C L-Shaped Bin D Dairy Bin E Flipper Mullion F Gallon Bin G Slim Bin H Fresh Food Ice Maker & Bin I Flipper Guide J PureAdvantage™ AF-2 Air Filter K Slide Under ¼ & ½ width shelves L Edge-to-edge Glass Shelving M Standard bins N TasteLock™ Plus Crisper Drawers - Electrolux ERFC2393AS | Complete Owners Guide - Page 7
& Care Manual provides general installation and operating instructions for your model. We recommend using a service or kitchen contracting must be installed on a floor that is level and strong enough to support a fully loaded refrigerator. • Consider water supply availability for models equipped - Electrolux ERFC2393AS | Complete Owners Guide - Page 8
8 INSTALLATION NOTE If your refrigerator is placed with the door hinge side against a wall, you may have to allow additional space so the door can be opened wider. Door opening Your refrigerator should be positioned to allow easy access to a counter when removing food. For best use of the - Electrolux ERFC2393AS | Complete Owners Guide - Page 9
should be a separation about the thickness of a coin (0.060 inches, or 1.5 mm) between the guide and flipper mullion. Mullion Guide Flipper Mullion WRONG Thickness of a Coin To adjust the flipper mullion: 1. Loosen the two screws located on the flipper mullion hinge. Flipper Mullion Adjusting - Electrolux ERFC2393AS | Complete Owners Guide - Page 10
10 DOOR REMOVAL Getting through narrow spaces If your refrigerator will not fit through an entrance area, you can remove the doors. Check first by measuring the entrance. To prepare for removing the doors: 1. Make sure the electrical power cord is unplugged from the wall outlet. 2. Remove any food - Electrolux ERFC2393AS | Complete Owners Guide - Page 11
3. Trace lightly around the door's top hinges with a pencil. This makes reinstallation easier. 11 DOOR REMOVAL 5. Pull the water tube out of the conduit from the top of the cabinet. 4. Remove bulkhead cover at rear of unit to access water tubing. Disconnect the water tube at the push-lock - Electrolux ERFC2393AS | Complete Owners Guide - Page 12
12 DOOR REMOVAL 7. Remove hex screws from top hinge plate, then remove the top hinge. To reinstall the refrigerator doors: 1. Replace three bottom hinge screws and hinges on both sides of the cabinet. Ensure screws are tightly snug to hinges on both sides of the cabinet before re-installing doors - Electrolux ERFC2393AS | Complete Owners Guide - Page 13
13 DOOR REMOVAL NOTE Upon replacement, the tube needs to be fully inserted up to the marking line. To reset door pin: If doors are removed at less than a 40 degree angle, the pin returns to the home position. It can be reset by turning the door upside down and using a 5/32" Allen wrench to - Electrolux ERFC2393AS | Complete Owners Guide - Page 14
the drawer to the slide assemblies. 2. Lift up drawer to remove. Replacing Freezer Drawer 1. Extend the Freezer slides from the unit. 2. Carefully align support pin with hooks on end of freezer slides and then lower freezer door onto slides. 3. Replace the 4 hex head screws that secure the slides - Electrolux ERFC2393AS | Complete Owners Guide - Page 15
15 DOOR HANDLE INSTALLATION CAUTION Wear gloves and safety goggles. Use extreme CAUTION when installing these handles. Door Handle Mounting Instructions 1. Remove handles from carton and any other protective packaging. 2. Position refrigerator handle end over upper and lower pre-installed - Electrolux ERFC2393AS | Complete Owners Guide - Page 16
Choice® water line kit 5308815072 with a 6 ft. (1.8 meters) Stainless Steel Water Line for homes with existing valves. Please refer to www.electrolux.com for more information. To Connect the Water Supply Line To Main Water Inlet Valve 1. Disconnect refrigerator from electric power source. 2. Place - Electrolux ERFC2393AS | Complete Owners Guide - Page 17
be lit) or set the ice maker's On/ off power switch to the "ON" position (freezer ice maker). NOTE These instructions do not cover after market ice maker installation. Instructions in after market ice maker kit should be used. Steel Clamp Brass Compression Nut Ferrule (Sleeve) Copper Water line - Electrolux ERFC2393AS | Complete Owners Guide - Page 18
18 CONTROLS AND SETTINGS In-Door Control Display Mode Views Your display is equipped with a sleep and lock mode to prevent accidental changes to the unit settings during opening and closing of the doors. When both doors are closed, the display will be in sleep mode. When either door is first opened - Electrolux ERFC2393AS | Complete Owners Guide - Page 19
to lower the temperature and freeze food faster. FREEZE BOOST will remain active for up to 24 hours before automatically deactivating or manually exiting by pressing FREEZE BOOST to turn 1 the function off. This will reset the freezer to the previous temperature setting. 2 4 F/C Touch to - Electrolux ERFC2393AS | Complete Owners Guide - Page 20
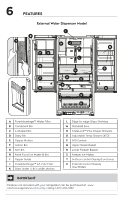
20 CONTROLS AND SETTINGS External Water Dispenser Control Display 2 1 3 4 5 6 7 8 9 10 1 Replace Water Filter Display illuminates every 6 months or when filter needs replacing. Replace the filter then press and hold the WATER FILTER button on the side door control display for 3 seconds to - Electrolux ERFC2393AS | Complete Owners Guide - Page 21
21 CONTROLS AND SETTINGS NOTE Food placed within 1 in. in front of air ports may cause food to freeze. NOTE While in Sabbath Mode, neither the lights, dispenser, nor the control panel will work until Sabbath Mode is deactivated. Refrigerator stays in Sabbath Mode after power failure recovery. - Electrolux ERFC2393AS | Complete Owners Guide - Page 22
22 AUTOMATIC ICE & WATER DISPENSER Refrigerator Ice Maker Priming the water supply system Using the dispenser after installation Before making ice for the first time, be sure to prime the water supply system. Air in new plumbing lines can result in two or three empty ice maker cycles. Furthermore, - Electrolux ERFC2393AS | Complete Owners Guide - Page 23
has a built-in plastic signal arm that automatically stops ice production when the ice bin is full. This signal arm should not be used to manually stop the ice maker. IMPORTANT Your ice maker is turned on at the factory so it can work as soon as you install your refrigerator - Electrolux ERFC2393AS | Complete Owners Guide - Page 24
24 AUTOMATIC ICE & WATER DISPENSER Refrigerator Ice Maker Clean the ice maker and ice bin at regular intervals, especially prior to vacation or moving. 1. Turn off the ice maker. CAUTION NEVER use an ice pick or similar sharp instrument to break up the ice. This could damage the ice bin and - Electrolux ERFC2393AS | Complete Owners Guide - Page 25
25 ICE MAKER Freezer Ice Maker Freezer Ice Maker Ice Maker Operation & Care After the refrigerator is installed properly, the ice maker can produce ice within 24 hours. When using the ice maker for the first time, and in order for it to work properly, it is necessary to clear air from the water - Electrolux ERFC2393AS | Complete Owners Guide - Page 26
26 ICE MAKER Freezer Ice Maker Cleaning the ice maker bin Clean the ice maker and ice bin at regular intervals, especially prior to vacation or moving. 1. Turn off the ice maker. 2. Remove the ice bin. 3. Empty and carefully clean the ice bin with mild detergent. Do not use harsh or abrasive - Electrolux ERFC2393AS | Complete Owners Guide - Page 27
on the back wall of the cabinet. This also applies to the crisper shelves. 3. Replace by inserting the mounting bracket hooks into the desired support slots. 4. Lower the shelf and lock into position. To adjust slide-under shelf 1. Push front half shelf backward towards rear of cabinet until the - Electrolux ERFC2393AS | Complete Owners Guide - Page 28
. 2. Lift the front slightly and remove the drawer. 2. Push the crisper straight once the bottom rollers clear the front deli crisper support rollers. Removing TasteLock™ Plus Crisper Drawer CAUTION Remove the PureAdvantage™ Produce Keeper prior to washing the crisper drawer To replace the Crisper - Electrolux ERFC2393AS | Complete Owners Guide - Page 29
absorbers help to keep food fresher longer in the crisper drawers. See Filter Replacement section for details on how to order replacements. NOTE Electrolux does not recommend replacing the auto-humidity membrane unless it becomes damaged or ruined. If the membrane becomes soiled, it can be washed - Electrolux ERFC2393AS | Complete Owners Guide - Page 30
30 STORAGE FEATURES Adjustable Temp Drawer 1 2 3 4 Ideal for storage of deli meats, cheese, and beverages. Using your Adjustable Temp Drawer IMPORTANT Do not use the Adjustable Temp Drawer to store fresh produce as these items may freeze and cause damage to the fruits and leafy vegetables - Electrolux ERFC2393AS | Complete Owners Guide - Page 31
the bin firmly with both hands and lift it upward. 3. Remove the bin. 4. Place the bin just above desired position. 5. Lower the bin onto supports until locked in place. 6. Place bin liner into bin. 3. Push inward slightly on the basket tabs to release the upper basket from the slide assemblies - Electrolux ERFC2393AS | Complete Owners Guide - Page 32
32 STORAGE FEATURES Upper Freezer Basket Replacement To Remove Lower Freezer Basket: 1. Open Freezer drawer completely. 2. Pull both upper slides out of the freezer compartment, extending them fully. 1. Open freezer compartment completely. 2. Locate basket clips in the rear corners of the basket - Electrolux ERFC2393AS | Complete Owners Guide - Page 33
33 STORING FOOD AND SAVING ENERGY Ideas for storing foods Refrigerator storage • Keep the refrigerator compartment between 34°F and 40°F with an optimum temperature of 37°F. • Avoid overcrowding the refrigerator shelves, which reduces air circulation and causes uneven cooling. • Avoid placing food - Electrolux ERFC2393AS | Complete Owners Guide - Page 34
34 NORMAL OPERATING SOUNDS NOTE Energy efficient foam in your refrigerator is not a sound insulator. NOTE During automatic defrost cycle, a red glow in the back wall vents of your freezer compartment is normal. Understanding the sounds you may hear Your new, high-efficiency refrigerator may - Electrolux ERFC2393AS | Complete Owners Guide - Page 35
filter is located at the top of the air tower. Ordering replacement filters Order new filters by calling 1 (877) 435-3287, online at www.electrolux.com, or through the dealer where you bought your refrigerator. You may want to consider ordering extra filters when you first install your refrigerator - Electrolux ERFC2393AS | Complete Owners Guide - Page 36
specified on the performance data sheet. Visit electrolux.com for more information. Do not use : PureAdvantage™ Water Filter PWF-1 Part# EPPWFU01™ • Rated service flow - .50 gal/min. • Operating Temp.: Min. the package. Using the alignment guide, slide it gently into the filter housing until it - Electrolux ERFC2393AS | Complete Owners Guide - Page 37
.com, by calling toll-free at 1 (800) 435-3287, or by visiting the dealer where you purchased your refrigerator. Electrolux recommends that you replace your filters at least once every 6 months. Here are the product numbers to request when ordering: PureAdvantage Produce Keeper™ PK-1 Part # - Electrolux ERFC2393AS | Complete Owners Guide - Page 38
rollers will work correctly. This will prevent the floor from being damaged. Refer to the guide on the next page for details on caring and cleaning specific areas of your refrigerator. CAUTION when the refrigerator is put back into service. Contact a service representative to perform this operation. - Electrolux ERFC2393AS | Complete Owners Guide - Page 39
a non-abrasive stainless steel cleaner. These cleaners can be purchased at most home improvement or major department stores. Always follow manufacturer's instructions. Do not use household cleaners containing ammonia or bleach. NOTE: Always clean, wipe and dry with the grain to prevent scratching - Electrolux ERFC2393AS | Complete Owners Guide - Page 40
40 TROUBLESHOOTING Before You Call If you experience a problem with your refrigerator or notice a product behavior or condition that you do not understand, you can usually avoid a call to your service representative by referring to this section for an answer. Beginning with the following table, - Electrolux ERFC2393AS | Complete Owners Guide - Page 41
41 TROUBLESHOOTING Concern Potential Cause Automatic Ice Maker (Cont'd) Ice maker is not or upward position. See that has fallen against ice Automatic Ice Maker-Freezer section maker. in manual. • Ice cubes are not being • Remove ice container and discard used frequently enough or ice - Electrolux ERFC2393AS | Complete Owners Guide - Page 42
42 TROUBLESHOOTING Concern Potential Cause Dispenser (Ice & Water) Common Solution Dispenser • There is no ice in the bin • See the "Ice maker is not making any will - Electrolux ERFC2393AS | Complete Owners Guide - Page 43
43 TROUBLESHOOTING Concern Potential level and solid, and can It rocks on the floor when adequately support the refrigerator. moved slightly. Contact a carpenter to correct a sagging or a displays an performance problem. error. • Call your Electrolux service representative, who can - Electrolux ERFC2393AS | Complete Owners Guide - Page 44
44 TROUBLESHOOTING Concern Potential Cause Common Solution Water/Moisture/Frost Inside Refrigerator Moisture collects on inside of refrigerator walls. • Weather is hot and humid. • The rate of - Electrolux ERFC2393AS | Complete Owners Guide - Page 45
is installed, used and maintained in accordance with the provided instructions. Exclusions This warranty does not cover the following: 1. Products warranty. Obligations for service and parts under this warranty must be performed by Electrolux or an authorized service company. Product features - Electrolux ERFC2393AS | Complete Owners Guide - Page 46
A17856501 (November 2021) electroluxappliances.com
-
 1
1 -
 2
2 -
 3
3 -
 4
4 -
 5
5 -
 6
6 -
 7
7 -
8
-
9
-
10
-
11
-
12
-
13
-
14
-
15
-
16
-
17
-
18
-
19
-
20
-
21
-
22
-
23
-
24
-
25
-
26
-
27
-
28
-
29
-
30
-
31
-
32
-
33
-
34
-
35
-
36
-
37
-
38
-
39
-
40
-
41
-
42
-
43
-
44
-
45
-
46
 |
 |

electroluxappliances.com\register
Use & Care Guide
EN
Refrigerator
Guide d’utilisation et d’entretien
FR
Réfrigérateur
Guía de uso y cuidado
SP
Refrigerador