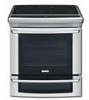
Electrolux EW30ES65GS Installation Instructions (All Languages)
Electrolux EW30ES65GS - 30" Slide-In Electric Range Manual
 |
UPC - 057112097008
View all Electrolux EW30ES65GS manuals
Add to My Manuals
Save this manual to your list of manuals |
Electrolux EW30ES65GS manual content summary:
- Electrolux EW30ES65GS | Installation Instructions (All Languages) - Page 1
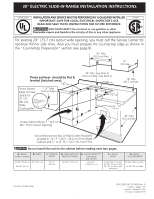
30" ELECTRIC SLIDE-IN RANGE INSTALLATION INSTRUCTIONS United States INSTALLATION AND SERVICE MUST BE PERFORMED BY A QUALIFIED INSTALLER. IMPORTANT: SAVE FOR LOCAL ELECTRICAL INSPECTOR'S USE. READ AND SAVE THESE INSTRUCTIONS FOR FUTURE REFERENCE. FOR YOUR SAFETY: Do not store or use Cabinet Doors 1" - Electrolux EW30ES65GS | Installation Instructions (All Languages) - Page 2
30" ELECTRIC SLIDE-IN RANGE INSTALLATION INSTRUCTIONS NOTE: 1. Do not pinch the power supply cord or the flexible gas conduit between the range and the wall. 2. Do not seal the range Make sure the unit is supported by the leveling legs at the front and the wheels at the back and NOT by the - Electrolux EW30ES65GS | Installation Instructions (All Languages) - Page 3
30" ELECTRIC SLIDE-IN RANGE INSTALLATION INSTRUCTIONS To avoid breakage: Do NOT handle or manipulate the unit by the cooktop. 1 The counter-top around the cut-out should be flat and leveled (see hatched area on illustration 1). Before installing the unit, measure the heights of the two (2) 2 - Electrolux EW30ES65GS | Installation Instructions (All Languages) - Page 4
the electrical supply to the range. 3. Observe all governing codes and ordinances. 4. Be sure to leave these instructions with the consumer. Important Note to the Consumer Keep these instructions with your Owner's Guide for the local electrical inspector's use and future reference. IMPORTANT SAFETY - Electrolux EW30ES65GS | Installation Instructions (All Languages) - Page 5
local code may differ). NOTE: Electric Slide-in Range is shipped from factory with 1 1/8" (2.9 cm) dia. hole as shown on figure 4. If a larger hole is required, punch out the knockout. Risk of fire or electrical shock exists if an incorrect size range cord kit is used, the Installation Instructions - Electrolux EW30ES65GS | Installation Instructions (All Languages) - Page 6
30" ELECTRIC SLIDE-IN RANGE INSTALLATION INSTRUCTIONS 4. Electrical Connection to the Range (U.S.A.) Three Conductor Wire Connection to Range If local codes permit connection of the frame grounding conductor to the neutral wire of the copper power supply cord (see Figure 3): 1. Remove the 3 screws - Electrolux EW30ES65GS | Installation Instructions (All Languages) - Page 7
30" ELECTRIC SLIDE-IN RANGE INSTALLATION INSTRUCTIONS Direct Electrical Connection to the Circuit Breaker, Fuse Box or Junction Box If the appliance is connected directly to the circuit breaker, fuse box or junction box, use to the rating of the appliance. Where local codes permit connecting the - Electrolux EW30ES65GS | Installation Instructions (All Languages) - Page 8
30" ELECTRIC SLIDE-IN RANGE INSTALLATION INSTRUCTIONS 4. Cabinet Construction 4.1 To eliminate the risk of burns or fire by reaching over heated surface units, do not have cabinet storage space above the range. If there is cabinet storage space above range, reduce risk by installing a range hood - Electrolux EW30ES65GS | Installation Instructions (All Languages) - Page 9
30" ELECTRIC SLIDE-IN RANGE INSTALLATION INSTRUCTIONS 5. Range Installation Important Note: Door removal is not a requirement for installation of the range, but is an added convenience. Refer to the Use and Care Guide for oven door removal instructions. 10 Position range in front of the cabinet - Electrolux EW30ES65GS | Installation Instructions (All Languages) - Page 10
RAISE LOWER Figure 9 7. Check Operation Refer to the Use and Care Manual packaged with the range for operating instructions and for care and cleaning of your range. Do not touch the elements. They may be hot enough to cause burns. Remove all packaging from the oven before testing. 1. Operation - Electrolux EW30ES65GS | Installation Instructions (All Languages) - Page 11
must be secured to the floor by properly installed anti-tip bracket and screws packed with the range. These parts are located in the oven. Failure to install the anti-tip bracket will allow the range to tip over if excessive weight is placed on an open door or if a child climbs upon it. Serious - Electrolux EW30ES65GS | Installation Instructions (All Languages) - Page 12
30" ELECTRIC SLIDE-IN RANGE INSTALLATION INSTRUCTIONS NOTES: 12 - Electrolux EW30ES65GS | Installation Instructions (All Languages) - Page 13
Preparación de la Mesada " (ver página 20). 30" Mín. (76,2 cm) Mín. 13" (33 cm) Lije la parte elevade del borde para obtener las 31 1/2" (80 cm 43,2 cm) del armario derecho y de 2" a 4" (5,1-10,2 cm) del suelo. No instale la unidad en el gabinete si no ha leido esta página. A. ALTURA (Debajo de la - Electrolux EW30ES65GS | Installation Instructions (All Languages) - Page 14
Figura 1 ***IMPORTANTE: Para el corte a lo ancho (dimensión E) de más de 30 1/16" (76,4 cm) para evitar que se rompa la cubierta, asegúrese que que le unidad este soportada por las patas adelante y por las ruedas en la parte de atrás y NO por la cubierta superior sobre la encimera. IMPORTANTE: El - Electrolux EW30ES65GS | Installation Instructions (All Languages) - Page 15
INSTALACIÓN PARA LA ESTUFA ELÉCTRICA DESLIZABLE DE 30" Para evitar fractura de la unidad: NO manipule cm Max.) (2) ruedas ajustables, de espacio 3 manera que la altura del suelo a la parte de abajo para una unidad con un dimension de 31 ½" (81 cm). del reborde de metal sea H2 H1 H4 H3 de al - Electrolux EW30ES65GS | Installation Instructions (All Languages) - Page 16
DE 30" parte 280)] o cuando este código no se aplica, la Standard for Manufactured Home Installation adecuada puede ser peligroso. • No guarde o use gasolina u otros vapores inflamables y líquidos . Siga las instrucciones para la prelimpieza en el Manual del usuario. Ubicación de la placa de serie - Electrolux EW30ES65GS | Installation Instructions (All Languages) - Page 17
ELÉCTRICA DESLIZABLE DE 30" 1. Cordón de digo local lo permite) o por medio de un kit de cable de alimentación (use únicamente un kit de cable de 50A con un conector de 13/8"). la conexión de la cocina al bloque terminal cuando esté instalándola. El corte o la perdida de corriente eléctrica puede - Electrolux EW30ES65GS | Installation Instructions (All Languages) - Page 18
INSTRUCCIONES DE INSTALACIÓN PARA LA ESTUFA ELÉCTRICA DESLIZABLE DE 30" 4. Conexión eléctrica a la cocina (Estados bronce del suministro eléctrico (vea figura 3). 1. Retire los 3 tornillos de la parte baja de la cubierta del cable trasero (cubierta de acceso), luego levante la cubierta hacia - Electrolux EW30ES65GS | Installation Instructions (All Languages) - Page 19
DE INSTALACIÓN PARA LA ESTUFA ELÉCTRICA DESLIZABLE DE 30" Conexión eléctrica directa al cortacircuito, a la caja de fusibles o la caja de empalmes Si el aparato está conectado directamente al cortacircuito, a la caja de fusibles o a la caja de empalmes, use un cable blindado flexible o no metálico - Electrolux EW30ES65GS | Installation Instructions (All Languages) - Page 20
3/16" (5.56 cm) 2 3/16" (5.56 cm) 29" (73.7 cm) 4 3/8" Min. (11.4 cm) 1¼" (3.2 cm) Quite el 2 3/16" de material de frente a la parte posteriora. 30" (76.2 cm) 31½" (80 cm) 1¼" (3.2 cm) Figura 8 Mostrador moldeado o enazulejo recortado 1¼" (3.2 cm) hacia atrás en las esquinas de frente de la - Electrolux EW30ES65GS | Installation Instructions (All Languages) - Page 21
la base de los armarios a 30" (76.2 cm) de espacio entre ellas. Asegúrese que estos esten 2 verticales y alineados antes de instalar la plancha de cocinar. Lije el borde del mostrador para obtener las 31 1/2 (80 cm)" en la parte superior del mostrador. Instale las puertas del armario a 32" (81 - Electrolux EW30ES65GS | Installation Instructions (All Languages) - Page 22
30" 6. Nivelación de la estufa Nivele la cocina después de haberla instalado en la abertura del mostrador. 1. Abra la gaveta. 2. Ajuste las patas del electrodoméstico y las ruedas como se muestra a seguir hasta que la parte Bake-Después de poner el horno a 350°F (177°C) para cocer, el element Manual - Electrolux EW30ES65GS | Installation Instructions (All Languages) - Page 23
DE INSTALACIÓN PARA LA ESTUFA ELÉCTRICA DESLIZABLE DE 30" 8. Instrucciones de instalación de la fijación anti- . Si no hay pared posterior, dibujar otra línea en el piso que corresponda a la parte posterior de la cocina. 2. Desplegar el molde de papel y colocarlo alisado sobre el piso - Electrolux EW30ES65GS | Installation Instructions (All Languages) - Page 24
INSTRUCCIONES DE INSTALACIÓN PARA LA ESTUFA ELÉCTRICA DESLIZABLE DE 30" NOTAS: 24 - Electrolux EW30ES65GS | Installation Instructions (All Languages) - Page 25
Canada Pour les ouvertures de 29" (73,7 cm) de largeur, vous devez appeler un centre de service pour commander des panneaux latéraux plus minces pour l'installation de la cuisinière. Vous devez aussi suivre les instructions la table de cuisson) 35 3/4" (90,8 cm) 30" (76,2 cm) 36 5/8" (93 cm) C. - Electrolux EW30ES65GS | Installation Instructions (All Languages) - Page 26
INSTRUCTIONS D'INSTALLATION POUR LA CUISINIÈRE 30 Panneau latéral ***IMPORTANT: Pour une largeur de découpage (dimension E) plus grande que 30 1/16" (76,4 cm) et pour éviter un ensuite nivelez-le. Assurez-vous que l'appareil est bien supporté par les pattes et les roulettes de nivellement et non - Electrolux EW30ES65GS | Installation Instructions (All Languages) - Page 27
INSTRUCTIONS D'INSTALLATION POUR LA CUISINIÈRE 30" ENCASTRABLE Pour éviter les cassures: NE PAS manipuler l'appareil par la table de cuisson. 1 Le comptoir alentour de l'ouverture de découpage doit être plat et à niveau (voir hachures sur illustration 1). Avant d'installer soit bien supporté. 7 - Electrolux EW30ES65GS | Installation Instructions (All Languages) - Page 28
30" ENCASTRABLE Notes importantes à l'installateur 1. Lisez toutes les instructions contenues dans ce feuillet avant d'installer la cuisinière. 2. Enlevez tout le matériel d'emballage des compartiments du four avant de connecter l'alimentation électrique à la cuisinière. 3. Respectez tous les codes - Electrolux EW30ES65GS | Installation Instructions (All Languages) - Page 29
INSTRUCTIONS D'INSTALLATION POUR LA CUISINIÈRE 30" ENCASTRABLE 1. Modèles avec cordon d'alimentation branché en usine (Canada seulement) Les connexions de 13/8"). Voir les tableaux plus bas pour la grosseur minimale de câble (code UL local peut être différent). NOTE: L'appareil sort de l'usine avec - Electrolux EW30ES65GS | Installation Instructions (All Languages) - Page 30
INSTRUCTIONS D'INSTALLATION POUR LA CUISINIÈRE 30" ENCASTRABLE 3. Connexions électriques à la cuisinière (U.S.A.) Pour une connexion à un câble d'alimentation à trois conducteurs (EtatsUnis seulement) Si les codes locaux permettent la connexion du conducteur de mise à la terre du châssis au fil - Electrolux EW30ES65GS | Installation Instructions (All Languages) - Page 31
INSTRUCTIONS D'INSTALLATION POUR LA CUISINIÈRE 30" ENCASTRABLE Connexions électriques au système é en cuivre seulement) et des raccordements doivent se conformer à la capacité de l'appareil. Si les codes locaux permettent le raccordement du conducteur de mise à la terre du châssis au fil neutre ( - Electrolux EW30ES65GS | Installation Instructions (All Languages) - Page 32
INSTRUCTIONS D'INSTALLATION POUR LA CUISINIÈRE 30" ENCASTRABLE 4. Construction de l'armoire 4.1 Pour éliminer les risques de brûlures ou de feu, en étendant le bras au‑dessus des surfaces de cuisson chaudes, évitez d'installer requise, ajustez en conséquence la dimension ¾" (1.9 cm). • Le - Electrolux EW30ES65GS | Installation Instructions (All Languages) - Page 33
les instructions à la page 35 ou sur le gabarit fourni avec le support anti-bascule de l'appareil. Afin d'obtenir une installation maximale, un centre de service. Installation de panneaux latéraux Vous pouvez commander un nécessaire pour panneaux latéraux dans un centre de service. Distancez les - Electrolux EW30ES65GS | Installation Instructions (All Languages) - Page 34
INSTRUCTIONS D'INSTALLATION POUR LA CUISINIÈRE 30" Clean). N'oubliez pas de régler l'horloge en premier. Cuisson au four (Bake)- Après avoir réglé le four à 350°F (177°C) pour la cuisson service d'entretien Révisez la liste des vérifications préventives et les instructions d'opération dans votre Guide - Electrolux EW30ES65GS | Installation Instructions (All Languages) - Page 35
POUR LA CUISINIÈRE 30" ENCASTRABLE 8. Instructions d'installation du support anti‑bascule Pour réduire le risque de basculement de la cuisinière, protégez-la en installant les vis et le support anti‑bascule fournis avec la cuisinière. Ils sont situés dans un sac de plastique dans le four - Electrolux EW30ES65GS | Installation Instructions (All Languages) - Page 36
INSTRUCTIONS D'INSTALLATION POUR LA CUISINIÈRE 30" ENCASTRABLE NOTES: 36
-
 1
1 -
 2
2 -
 3
3 -
 4
4 -
 5
5 -
 6
6 -
 7
7 -
8
-
9
-
10
-
11
-
12
-
13
-
14
-
15
-
16
-
17
-
18
-
19
-
20
-
21
-
22
-
23
-
24
-
25
-
26
-
27
-
28
-
29
-
30
-
31
-
32
-
33
-
34
-
35
-
36
 |
 |

30" ELECTRIC SLIDE-IN RANGE INSTALLATION INSTRUCTIONS
P/N 318201615 (1003) Rev. G
English – pages 1-12
Español – páginas 13-24
Français – pages 25-36
Printed in United States
F
G
E
½”
min.
3/8”
min.
½”
min.
Shave Raised
Edge To Clear
Space for
31 1/2"
(80 cm)
Wide
Cooktop Rim.
Grounded Junction Box or Wall Outlet Should Be
Located 8" to 17" (20,3 - 43,2 cm) From Right
Cabinet and 2" to 4" (5,1-10,2 cm) From Floor
24" Min.
(61 cm) Min.
30" Min.
(76,2 cm) Min.
13"
(33 cm)
Locate Cabinet Doors 1" (2,5 cm)
Min. From Cutout Opening
Approx. 1 7/8"
(4,8 cm)
18" Min.
(45,7 cm) Min.
30" Min. (see Note 3)
(76,2 cm) Min. (See Note 3)
1 ½" Max.
(3,8 cm Max.)
For existing 29" (73,7 cm) cutout wide opening, you must call the Service Center for
optional thinner side trims. Also you must prepare the countertop edge as shown in
the "Countertop Preparation" section (see page 8).
These surfaces
should be flat &
leveled (hatched area).
Do not install the unit in the cabinet before reading next two pages.
INSTALLATION AND SERVICE MUST BE PERFORMED BY A QUALIFIED INSTALLER.
IMPORTANT: SAVE FOR LOCAL ELECTRICAL INSPECTOR'S USE.
READ AND SAVE THESE INSTRUCTIONS FOR FUTURE REFERENCE.
FOR YOUR SAFETY: Do not store or use gasoline or other
flammable vapors and liquids in the vicinity of this or any other appliance.
Canada
United States
A
. HEIGHT
(Under Cooktop)
B
.
WIDTH
C.
COOKTOP
WIDTH
D
.
TOTAL DEPTH TO
FRONT OF RANGE
E
.
CUTOUT WIDTH***
(Countertop
and cabinet)
F
.
CUTOUT
DEPTH
G
.
HEIGHT
OF COUNTERTOP
35 3/4" (90,8 cm)
36 5/8" (93 cm)
30" (76,2 cm)
31 1/2"
(80 cm)
28 5/16" (71,9 cm)
30±1/16"
(76,2±0,15 cm)
21 3/4" (55,2 cm) Min.
22 1/8" (56,2 cm) Max
24" (61 cm) Min. with
backguard
35 3/4" (90,8 cm) Min.
36 5/8" (93 cm) Max.