Electrolux EW30GS65GS Complete Owner's Guide (English)
Electrolux EW30GS65GS - 30" Slide-In Gas Range Manual
 |
UPC - 057112096995
View all Electrolux EW30GS65GS manuals
Add to My Manuals
Save this manual to your list of manuals |
Electrolux EW30GS65GS manual content summary:
- Electrolux EW30GS65GS | Complete Owner's Guide (English) - Page 1
Use & Care Guide Gas Slide-In Range 318 205 860 (1001) Rev. A - Electrolux EW30GS65GS | Complete Owner's Guide (English) - Page 2
is opened. See picture below. Questions? For toll-free telephone support in the U.S. and Canada: 1-877-4ELECTROLUX (1-877-435-3287) For online support and internet product information: www.electroluxappliances.com ©2010 Electrolux Home Products, Inc. Post Office Box 212378, Augusta, Georgia 30917 - Electrolux EW30GS65GS | Complete Owner's Guide (English) - Page 3
2 Table of Contents 3 Safety 4 Important Safety Instructions 4-7 Feature Overview 8 Your Slide-In Range 8-9 Oven Rack Supports and Oven Vents 10 Removing and Replacing Oven Racks 11 Oven Control Pad Functions 12-13 Getting Started 14 Setting Clock at Power Up 14 Control Panel Display Modes - Electrolux EW30GS65GS | Complete Owner's Guide (English) - Page 4
Code, CSA C22.1 part 1, and local requirements. Install only per installation instructions provided in the literature package for this range. Ask your dealer to recommend a qualified technician and an authorized repair service. Know how to disconnect the electrical power to the range at the circuit - Electrolux EW30GS65GS | Complete Owner's Guide (English) - Page 5
and result in injury. • Remove the oven door from any unused appliance if it is to be stored or discarded. • IMPORTANT-Do not attempt to operate the oven during a power failure. If the power fails, always turn the oven off. If the oven is not turned off and the power resumes, the oven may begin - Electrolux EW30GS65GS | Complete Owner's Guide (English) - Page 6
with each other. • Do not use Searing Grill on the cooktop. The searing grill is not designed for use on the cooktop. Doing so may result in a fire. • Do Not Use Decorative Surface burner Covers. If a burner is accidentally turned on, the decorative cover will become hot and possibly melt. Burns - Electrolux EW30GS65GS | Complete Owner's Guide (English) - Page 7
should be used in or around any part of the oven. • Remove oven racks. Oven racks will be damaged if left in the oven during a self-cleaning cycle. The health of some birds is extremely sensitive to the fumes given off during the self-clean cycle of any range. Move birds to another well ventilated - Electrolux EW30GS65GS | Complete Owner's Guide (English) - Page 8
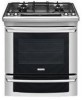
8 Feature Overview Your Slide-in Range Porcelain Grates Deep Drawn Cooktop touch activated glass control panel large metal handle curved glass oven door Warmer drawer door window glass POWER BURNER 14 000 BTU regular BURNER 9 500 BTU SIMMER burner 5 000 BTU DUAL FLAME BURNER 18 000 BTU - Electrolux EW30GS65GS | Complete Owner's Guide (English) - Page 9
Feature Overview 9 Your Slide-in Range Oven Door Latch Oven vent Broiling Element Oven Rack Support slideable Oven racks Convection Fan Oven Light Oven Rack support brackets BROILER PAN BROILER PAN Grid Convection Roasting rack - Electrolux EW30GS65GS | Complete Owner's Guide (English) - Page 10
Supports Always install oven rack support before turning on the oven (when the oven is cool). To install oven rack support, insert the supports by pushing them downward into the two brackets on each side of the oven interior, as shown below. To remove the oven rack support for a self-clean cycle - Electrolux EW30GS65GS | Complete Owner's Guide (English) - Page 11
on how to clean the racks. Replacing Sliding Oven Racks To replace the oven racks, follow the intructions above in reverse order. TOWARD FRONT OF OVEN TOWARD back OF OVEN 1st Bracket 2nd Bracket Oven Rack Oven Rack Slider Oven Rack Support Removing Non-Sliding Oven Rack Simply pull the - Electrolux EW30GS65GS | Complete Owner's Guide (English) - Page 12
turn the oven light on and off. 2 Bake Pad- Used to enter the normal baking mode temperature. 3 Broil Pad- Used to select the variable broil mode. 4 Convection Bake Pad- Used to select the convection baking mode. 5 Convection the time at which the cooking will end. 19 Probe Pad- Used to activate - Electrolux EW30GS65GS | Complete Owner's Guide (English) - Page 13
self-clean cycle. 26 Med Pad- Used to start a 3 hours self-clean cycle. 27 Heavy Pad- Used to start a 4 hours self-clean cycle. 28 Conv. Convert Pad- Used to convert a standard temperature to a convection temperature. 29 User Preference Pad- Used to bring the user preference menu in the display. 30 - Electrolux EW30GS65GS | Complete Owner's Guide (English) - Page 14
Getting Started Setting clock at power up When the unit is first plugged in, or when the power supply to the range has been interrupted, the timer in the display will flash with "12:00". The clock cannot be set when the oven is on. If an invalid time of day is entered, the control will - Electrolux EW30GS65GS | Complete Owner's Guide (English) - Page 15
Started 15 oven light Your appliance includes "theater" style oven lighting feature that gradually lights both the upper and lower oven interiors to full brightness. The upper oven is equipped with 2 halogen lights and the lower oven is equipped with 1 incandescent light. The oven lights will turn - Electrolux EW30GS65GS | Complete Owner's Guide (English) - Page 16
burner caps and burner heads are correctly placed BEFORE using your appliance. Electrode Burner Head Make sure each burner cap is properly aligned and level. Turn the burner on to determine if it will light. If the burner does not light, contact a Service Center. Do not service the sealed burner - Electrolux EW30GS65GS | Complete Owner's Guide (English) - Page 17
of food to be prepared and the size of burner. • Made of material that conducts heat well. • Easy to clean. • Heavy handle tilts pan. • Flame extends beyond unit. Note: Always use a utensil for its intended purpose. Follow manufacturer's instructions. Some utensils were not made to be used in - Electrolux EW30GS65GS | Complete Owner's Guide (English) - Page 18
Use the guides and adjust the flame as needed. DO NOT cook with the Surface Control knob in the position. (The electronic ignitor will continue to click if left in the position, causing premature wear.) In the event of an electrical power outage, the surface burners can be lit manually. To light - Electrolux EW30GS65GS | Complete Owner's Guide (English) - Page 19
1 for optimal positioning). Figure 1 ! CAUTION Always place the griddle on the grate before to turn on the burner. Always use potholders to remove the griddle from the grate. Allow the griddle to cool before removing. Do not set hot griddle on surfaces that cannot withstand high heat; such as - Electrolux EW30GS65GS | Complete Owner's Guide (English) - Page 20
. Always start with hot will not operate when the upper oven is set for self-cleaning or if the control lockout feature is active. Keep children away from the WARMER oven when hot. Failure to do so can result in burns. Always use oven mitts when removing food from the lower oven. The lower oven rack - Electrolux EW30GS65GS | Complete Owner's Guide (English) - Page 21
the convection fan are used in cycle to quickly heat the oven. • Use only one rack and center the pans as much as possible. • If using two racks, place the oven racks in . 3. Press START . Baking Problems Refer to the Baking Problems Table in the Solutions to Common Problems section of this manual. - Electrolux EW30GS65GS | Complete Owner's Guide (English) - Page 22
Bake, Convection Roast, Slow Cook, Keep Warm, Defrost, Dehydrate, Clean and Bread Proof cooking modes. This oven can be programmed with Cook Time and End Time to start and stop by itself at the right time. To set a delayed timed cooking (example is a 450°F Bake for 30 minutes which will end at - Electrolux EW30GS65GS | Complete Owner's Guide (English) - Page 23
of 550°F: 1. Arrange interior oven racks. Grid 2. Select oven by pressing UPPER OVEN . UPPER OVEN 3. Press BROIL . 4. Press START . 5. Place food in the oven after 2 minutes. 6. Turn food when the top side is browned and cook on the second side. 7. Remove food. Always use oven mitts when - Electrolux EW30GS65GS | Complete Owner's Guide (English) - Page 24
page for further instruction on temperature conversion. • Use tested recipes with times adjusted for convection baking when using this mode. With single rack convection baking some foods may have as much as a 25% reduction in cook time; check food at minimum time. Time reductions will vary depending - Electrolux EW30GS65GS | Complete Owner's Guide (English) - Page 25
The oven can be programmed to preheat with some of the cooking modes; Bake, Convection Bake and Convection Roast. IMPORTANT: The rapid preheat feature is for single rack ONLY. The heat distribution with multiple rack will be uneven. To set a rapid preheat (example is for a 350°F Bake): 1. Select - Electrolux EW30GS65GS | Complete Owner's Guide (English) - Page 26
position before removing food. • Position food (fat side up) on the roasting rack. To set a Convection Roast Temperature of 350°F: 1. Arrange interior oven racks. 2. Select oven by pressing UPPER OVEN . UPPER OVEN Roasting Rack Grid 3. Press CONVECTION ROAST . 4. Press START . 5. The - Electrolux EW30GS65GS | Complete Owner's Guide (English) - Page 27
oven, it will allow hot manual. To set a Keep Warm Temperature of 170°F: 1. Arrange interior oven racks START . 5. The Multi-Stage, Cook Time, Timer and End Time features can be set to control your warming time (read their sections for directions). 6. Remove food. Always use oven mitts when removing - Electrolux EW30GS65GS | Complete Owner's Guide (English) - Page 28
low temperature in the oven. low rack, position it in the center of the oven. • Position multiple racks foods to turn crisp or brown. • Cook times will vary; • Preheating the oven will not be necessary when Cook: 1. Arrange interior oven racks and place food in the or lo low (Lo) setting. 5. Press START . 6. - Electrolux EW30GS65GS | Complete Owner's Guide (English) - Page 29
is circulated throughout the oven by the convection fan. Dehydrating is used to dry and/or preserve foods such as fruits, meats, vegetables and herbs. This mode holds an optimum low temperature while circulating the heated air to slowly remove moisture. The oven can be programmed for Dehydrating - Electrolux EW30GS65GS | Complete Owner's Guide (English) - Page 30
proofing time. To set a Bread Proof temperature of 100°F: 1. Arrange interior oven racks and place bread dough in the oven. 2. Select oven by pressing UPPER OVEN . UPPER OVEN 3. Press BREAD PROOF . 4. Press START to begin the bread proofing. 5. The Cook Time, Timer and End Time features - Electrolux EW30GS65GS | Complete Owner's Guide (English) - Page 31
turkey. The convection system gently rack. The broiler pan will catch grease spills and the grid will help prevent spatters. The roasting rack will hold the turkey. • Place an oven rack on next-bottom rack position. • Make sure the roasting rack see PROBE 5. Press START . 6. Remove food from the oven - Electrolux EW30GS65GS | Complete Owner's Guide (English) - Page 32
removing it from the food and outlet. 3. Do not use tongs to pull the cable when inserting or removing the thickest part of the meat Start an available cooking mode by pressing UPPER OVEN UPPER OVEN followed by either BAKE , CONVECTION BAKE or CONVECTION will be accepted after the START - Electrolux EW30GS65GS | Complete Owner's Guide (English) - Page 33
racks and place food. 2. Select oven by pressing UPPER OVEN . UPPER OVEN 3. Press MULTI STAGE . Stage 1 4. Press CONVECTION BAKE . "350" will flash in the display prompting to enter a temperature. 5. Enter a temperature using the numeric pads 0 to 9 . 6. Press START . "00:00" will start - Electrolux EW30GS65GS | Complete Owner's Guide (English) - Page 34
. "00:00" will start flashing in the display prompting to enter a cook time. 17. Enter a cook time using the numeric pads 0 to 9 . 18. Press START . The cooking sequence will begin. Canceling 19. At the end of the sequence, the display will show "End" and a chime will sound. 20. Remove food. 21 - Electrolux EW30GS65GS | Complete Owner's Guide (English) - Page 35
hour operation. When the range is first plugged in, or when the power supply to the range has been interrupted, the display will show "CLO 12:00 time of day to 1:30. The pads hi or lo can also be pressed to raise or lower the actual time displayed. 3. Press START display. to accept the changes - Electrolux EW30GS65GS | Complete Owner's Guide (English) - Page 36
Press hi or lo to toggle between displaying or hiding the clock. 3. Press START display. to accept the changes and go back to user preferences menu Setting toggle the display of the clock in 12 or 24 hours. 3. Press START display. to accept the changes and go back to user preferences menu 4. - Electrolux EW30GS65GS | Complete Owner's Guide (English) - Page 37
has a factory preset built-in 12 Hour Energy Saving feature that will shut off the oven if the oven control is left on for Press hi or lo to toggle the energy saving setting on and off. 3. Press START to accept the changes and go back to user preferences menu display. RE-SETTING TO DEFAULT - Electrolux EW30GS65GS | Complete Owner's Guide (English) - Page 38
modes and features. To save a Favorite (example is a 450°F Bake for 30 minutes): - Saving a Favorite can only be done for an oven which 6. Enter time needed; 3 0 . 7. Press START . 8. Press and hold for 3 seconds any MY FAVORITE above the key will light up. pad. Notice that the red indicator To - Electrolux EW30GS65GS | Complete Owner's Guide (English) - Page 39
continue to step 5. Refer to their section for complete instructions. Remember the oven will shut down after using COOK TIME and therefore may only be used once during the Sabbath/Jewish Holidays. 5. Press START . 6. The oven will turn ON and begin heating immediately. + - 7. Press and hold - Electrolux EW30GS65GS | Complete Owner's Guide (English) - Page 40
or interruption, the oven will shut off. When power is returned the oven will not turn back on automatically. SF (Sabbath Failure) will be displayed in the oven control display. The oven will remember that it is set for the Sabbath and the food may be safely removed from the oven while still - Electrolux EW30GS65GS | Complete Owner's Guide (English) - Page 41
Area outside of 4. Oven racks and oven rack supports must be the Door Gasket removed. If they are not removed the self-cleaning cycle can not start and Remove Racks will appear in the display indicating that you must remove the racks and racks supports. When the cycle has finished and the door - Electrolux EW30GS65GS | Complete Owner's Guide (English) - Page 42
for the oven to cool down and the oven door to unlock. This normally takes about one hour. To set the controls for a Self-Cleaning cycle: 1. Remove the oven racks and the racks supports. 2. Be sure the clock is set with the correct time of day and the oven door is closed. 3. Select oven by - Electrolux EW30GS65GS | Complete Owner's Guide (English) - Page 43
as bluish stains may occur during heating and cannot be removed. Oven Racks Oven racks and oven rack supports must be removed from the oven during the self-clean cycle for cleaning. If they are not removed, the self-clean cycle will not start. Clean them as described above. Oven Door Oven Door - Electrolux EW30GS65GS | Complete Owner's Guide (English) - Page 44
of stainless parts. Please refer to the table provided at the beginning of the General Care & Cleaning section in this Use & Care Manual. To remove and replace oven door 1. Open the door to the fully opened position. 2. Pull up the lock located on each hinge support toward front of range. You may - Electrolux EW30GS65GS | Complete Owner's Guide (English) - Page 45
with a glass shield. The glass shield can be remove to be cleaned manually or to change the oven light. THIS GLASS SHIELD MUST BE IN PLACE WHENEVER THE OVEN IS IN USE. To replace the light bulb: CAUTION: BE SURE THE OVEN IS COOL. 1. Turn the power off at the main source. 2. Wear a leather-faced - Electrolux EW30GS65GS | Complete Owner's Guide (English) - Page 46
46 General Care & Cleaning cLEANING cooktop, BURNER GRATES, BURNER CAPS and BURNER HEADS The cooktop is designed to make cleaning easier. Because the gas burner are sealed, cleanups are easy when spillovers are cleaned up immediately. ! Caution Do not remove any parts from the cooktop until they - Electrolux EW30GS65GS | Complete Owner's Guide (English) - Page 47
replacing. Burner heads Lift the burner cap from the burner head. The surface burner heads are secured to the cooktop and must be cleaned in place. For proper gas flow it may be necessary to clean the burner heads and slots. To clean, first use a clean DAMP cloth to soak up any spills. Remove any - Electrolux EW30GS65GS | Complete Owner's Guide (English) - Page 48
rack overcrowded or rack position too low. • Dark pan absorbs heat too fast. • Allow oven to preheat to the selected temperature before placing food in oven. • Choose pan sizes that will the oven rack. If the water level is uneven, refer to the installation instructions for leveling the range. • Be - Electrolux EW30GS65GS | Complete Owner's Guide (English) - Page 49
replace or tighten the bulb. Self-cleaning cycle does not work • Make sure the oven door is closed. • Make sure you have removed the oven racks and the oven rack supports from the oven. • Controls not set properly. Follow instructions under "Using the Self-Clean Feature". Poor Cooking results • Many - Electrolux EW30GS65GS | Complete Owner's Guide (English) - Page 50
then turn control knob to desired flame size. • Be sure gas supply valve is open. • Burner ports are clogged. Clean burners. See Cleaning the Burner Grates, Burner Caps, Burner Heads in General Care & Cleaning section. With the burner off, clean ports with a smallgauge wire or needle. • Power cord - Electrolux EW30GS65GS | Complete Owner's Guide (English) - Page 51
one year from your original date of purchase, Electrolux will repair or replace any parts of this appliance that prove to be defective in materials or workmanship when such appliance is installed, used, and maintained in accordance with the provided instructions. In addition, the glass cooktop or - Electrolux EW30GS65GS | Complete Owner's Guide (English) - Page 52
-
 1
1 -
 2
2 -
 3
3 -
 4
4 -
 5
5 -
 6
6 -
 7
7 -
8
-
9
-
10
-
11
-
12
-
13
-
14
-
15
-
16
-
17
-
18
-
19
-
20
-
21
-
22
-
23
-
24
-
25
-
26
-
27
-
28
-
29
-
30
-
31
-
32
-
33
-
34
-
35
-
36
-
37
-
38
-
39
-
40
-
41
-
42
-
43
-
44
-
45
-
46
-
47
-
48
-
49
-
50
-
51
-
52
 |
 |

318 205 860 (1001) Rev. A
Use & Care Guide
Gas Slide-In Range