Electrolux FGEF304D Use and Care Manual
Electrolux FGEF304D - 30 in. Electric Range Manual
 |
View all Electrolux FGEF304D manuals
Add to My Manuals
Save this manual to your list of manuals |
Electrolux FGEF304D manual content summary:
- Electrolux FGEF304D | Use and Care Manual - Page 1
TABLE OF CONTENTS Welcome & Congratulations 2 Setting Oven Controls 17 Important Safety Instructions 3 Setting Keep Warm Drawer Control (If equipped) .. 35 Features at Call 40 Before Setting Oven Controls 16 Major Appliance Warranty 44 www.frigidaire.com USA 1-800-944-9044 www.frigidaire.ca Canada - Electrolux FGEF304D | Use and Care Manual - Page 2
, signed and returned to Electrolux Home Products. Serial Plate Location Congratulations on your purchase of a new appliance! At Electrolux Home Products, we are very proud of our product and are completely committed to providing you with the best service possible. Your satisfaction is our - Electrolux FGEF304D | Use and Care Manual - Page 3
at the circuit breaker or fuse box in case of an emergency. • User Servicing. Do not repair or replace any part of the appliance unless specifically recommended in the manuals. All other servicing should be done only by a qualified technician to reduce the risk of personal injury and damage to - Electrolux FGEF304D | Use and Care Manual - Page 4
least 3 hours before connecting it to the power supply. IMPORTANT INSTRUCTIONS FOR USING YOUR COOKTOP • Know which knob controls each surface not use aluminum foil to line oven bottom or any other part of the appliance. Only use aluminum as recommended for baking if used as service without breaking - Electrolux FGEF304D | Use and Care Manual - Page 5
. Doing so could cause the bulb to break. Disconnect the appliance or shut off the power to the appliance before removing and replacing the bulb. IMPORTANT SAFETY INSTRUCTIONS FOR CLEANING YOUR OVEN • Clean the appliance regularly to keep all parts free of grease that could catch fire. Exhaust fan - Electrolux FGEF304D | Use and Care Manual - Page 6
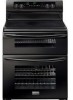
radiant element. 22. Ceramic glass cooktop. 17 18 19 21 20 14 16 7 9 10 11 14 15 8 12 13 Í NOTE The features shown for your appliance may vary according to model type & color. 22 6 - Electrolux FGEF304D | Use and Care Manual - Page 7
. If the surface controls do not function and the "Er" message remains in any display after following these procedures, contact your authorized servicer for assistance. ESEC Lockout Feature ( - - ) The ESEC feature will not operate during a Self-Clean cycle or when the Lockout feature is active - Electrolux FGEF304D | Use and Care Manual - Page 8
cookware bottom is not flat. Be sure to read detailed instructions for ceramic glass cooktop cleaning in the General Care & Cleaning section and Before You Call checklist section of this Use and Care Guide. Cookware material types The cookware material determines how evenly and quickly - Electrolux FGEF304D | Use and Care Manual - Page 9
SETTING SURFACE CONTROLS Single radiant surface elements The cooktop has 2 SINGLE radiant surface elements: the left rear position and the right rear position (Figure 1). To Operate the Single Radiant Surface Elements 1. Place correctly sized cookware on the radiant surface element. 2. Push in and - Electrolux FGEF304D | Use and Care Manual - Page 10
SETTING SURFACE CONTROLS Dual Surface Radiant Element The cooktop is equipped with 1 or 2 dual radiant surface elements located at the left front and the right front position (Figure 1). Symbols around the knob are used to indicate which coil of the dual radiant element will heat. The symbol - Electrolux FGEF304D | Use and Care Manual - Page 11
SETTING SURFACE CONTROLS Keep warm zone The purpose of the keep warm zone is to keep hot cooked foods at serving temperature. Use the keep warm feature to keep cooked foods hot such as: vegetables, gravies, casseroles, soups, stews, breads, pastries and oven-safe dinner plates. Always start with - Electrolux FGEF304D | Use and Care Manual - Page 12
illustration to the right. To remove the oven rack support for a self-clean cycle, pull up the support to disengage it from the brackets. Air circulation rack and slide out. To replace an oven rack, fit the rack onto the guides on the oven walls. Tilt the front of the rack upward and slide the rack - Electrolux FGEF304D | Use and Care Manual - Page 13
BEFORE SETTING OVEN CONTROLS Types of oven racks Your built-in range may be equipped with one or more of the oven racks styles shown; • Flat handle oven rack. • Flat oven half rack. • EffortlessTM oven rack. Figure 1 Flat handle oven rack CAUTION Always use pot holders or oven mitts when adjusting - Electrolux FGEF304D | Use and Care Manual - Page 14
or closed. To assemble the Effortless™ Oven Rack system: 1. Locate all required parts. You will need the supplied oven rack (Effortless™ Oven Rack is a flat ALL oven racks and clean according to instructions provided in the Care & Cleaning section of this manual. Make sure the oven and oven racks - Electrolux FGEF304D | Use and Care Manual - Page 15
use of your oven, become familiar with the various features and functions of the oven as described below. Detailed instructions for each feature and function follow later in this Use & Care Guide. 1 2 5 6 7 8 9 10 11 34 12 13 14 15 16 17 18 19 20 21 1. Upper oven pad-Use to activate - Electrolux FGEF304D | Use and Care Manual - Page 16
59 Hr./Min. 24 Hr. Mode 0:01 Min. 5:59 Hr./Min. 2 hours 4 hours IMPORTANT THINGS TO KNOW BEFORE SETTING ANY OVEN COOKING FEATURE This appliance has been factory pre-set to start any BAKE, CONVECTION BAKE, CONVECTION ROAST or QUICK PREHEAT feature with the oven set temperature automatically set - Electrolux FGEF304D | Use and Care Manual - Page 17
SETTING OVEN CONTROLS SETTING THE CLOCK The SET CLOCK pad is used to set the clock. The clock may be set for 12 or 24 hour time of day operation. The clock has been preset at the factory for the 12 hour operation. When the range is first plugged in, or when the power supply to the range has been - Electrolux FGEF304D | Use and Care Manual - Page 18
flash in the display. Once the oven door is locked the "DOOR" will stop flashing and remain on along with the "Loc", "Control" and the icon will appear. To reactivate normal operation: 1. Press and hold for 3 seconds. A beep will sound. The "UPPER", "LOWER" and "DOOR" will flash in the display until - Electrolux FGEF304D | Use and Care Manual - Page 19
food in the oven. SETTING BAKE The BAKE pad controls normal baking. If a rapid preheating is preferred, refer to the QUICK PREHEAT feature for instructions. The oven can be programmed to bake at any temperature from 170°F to 550°F. When the oven is finished preheating quick preheat will become just - Electrolux FGEF304D | Use and Care Manual - Page 20
Convection Convert section on next page for further instruction on temperature conversion. • Use tested recipes with will appear in the display. 5. Press START. The actual oven temperature and the fan icon will be displayed. A beep will sound once the oven temperature reaches 375°F and the display - Electrolux FGEF304D | Use and Care Manual - Page 21
will be displayed. A beep will sound once the oven temperature reaches 375°F and the display will show "375°", "CONVECT", "BAKE" and the fan icon. 6. Place food in the oven. Í NOTE When using a Bake Time under 20 minutes, the Convection Convert will not beep and display the "CF" message. Í NOTE - Electrolux FGEF304D | Use and Care Manual - Page 22
; "CONVECT" and "BROIL" will flash. 6. Enter the desired roasting temperature using the number pads 5 0 0. 7. Press START; "550", "CONVECT", "BROIL" and the fan icon will be displayed. 8. After 5 minutes of preheat, place food in the oven. Í NOTE Pressing CANCEL will stop the feature at any time - Electrolux FGEF304D | Use and Care Manual - Page 23
frozen meats and most fruits and vegetables. Foods that can easily spoil such as milk, eggs, fish, meat or poultry, should be chilled in the refrigerator first. Even when chilled, they should not stand in the oven for more than 1 hour before cooking begins, and should be removed promptly when cooking - Electrolux FGEF304D | Use and Care Manual - Page 24
SETTING OVEN CONTROLS SETTING BROIL This mode is best for meats, fish and poultry up to 1" thick. Broiling is a method of cooking tender cuts of meat by direct heat under the broil element of the oven. The high heat cooks quickly and gives a rich, brown outer appearance. The BROIL pad controls the - Electrolux FGEF304D | Use and Care Manual - Page 25
. See the Keep Warm feature for more information. 4. Press START. The fan icon will appear in the display. 5. To turn OFF the Chicken Nuggets feature at for a few minutes, but this is not part of the Pizza pad presets. Pizza Tips: • Follow the instructions on the box for preheating and baking times. - Electrolux FGEF304D | Use and Care Manual - Page 26
display. Note: If no pad is touched within 25 seconds the request to turn ON Keep Warm feature will be cancelled. 4. Press START. The oven icon will appear in the display. 5. To turn OFF the KEEP WARM at any time press CANCEL. To set Keep Warm to turn ON automatically: 1. Arrange - Electrolux FGEF304D | Use and Care Manual - Page 27
Time do so at this time. If not, skip this step and continue to step 8. Refer to the Bake Time / Delay Start section for complete instructions. Remember the oven will shut down after using Bake Time or Delay Start and therefore may only be used once during the Sabbath/Jewish Holidays - Electrolux FGEF304D | Use and Care Manual - Page 28
the Self-Clean cycle temperature or the Broil temperature. • The oven temperature adjustments are permanent and will stay forever in the unit memory unless you manually change it again. Even a power outage will not reset these changes. Follow the same procedure again if you wish to change it to - Electrolux FGEF304D | Use and Care Manual - Page 29
: • DO NOT use oven cleaners or oven protective coatings in or around any part of the oven interior. • DO NOT clean the oven door gasket. The woven hot to the touch. DO NOT leave small children unattended near the appliance. The health of some birds is extremely sensitive to the fumes given off - Electrolux FGEF304D | Use and Care Manual - Page 30
multiple times to toggle between 2, 3 or 4 hours. 4. Press START. The "DOOR" icon will flash. 5. As soon as the control is set, the motor driven oven door times to toggle between 2, 3 or 4 hours. 4. Press START. The "DOOR" icon will flash. 5. As soon as the control is set, the motor driven oven door - Electrolux FGEF304D | Use and Care Manual - Page 31
CLEANING VARIOUS PARTS OF YOUR APPLIANCE Before cleaning any part of the appliance, be sure all controls are turned off and the appliance is knobs. To remove, pull each knob straight off the shaft. Clean as instructed above. Squeeze excess water from the cloth before wiping the panel; especially - Electrolux FGEF304D | Use and Care Manual - Page 32
for any other purpose. IMPORTANT Damage to the ceramic glass cooktop may occur if you use an abrasive type scratch pad. Only use cleaning products that have been specifically designed for ceramic glass cooktop. If soils remain, carefully scrape soils with a metal razor blade scraper, holding scraper - Electrolux FGEF304D | Use and Care Manual - Page 33
parts. Refer to the General Care & Cleaning table for detailed cleaning instructions. CHANGING OVEN LIGHT CAUTION Be sure the oven is unplugged and all parts protection against possible broken glass. 3. Replace bulb with a 40 Watt appliance bulb only. 4. For self-cleaning oven, press wire holder to - Electrolux FGEF304D | Use and Care Manual - Page 34
CARE & CLEANING REMOVING AND REPLACING THE LIFTOFF LOWER OVEN DOOR CAUTION The door is heavy. For safe, temporary storage, lay the door flat with the inside of the door facing down. Most oven doors contain glass that can break. Read the following recommendations: 1. Do not close the oven door until - Electrolux FGEF304D | Use and Care Manual - Page 35
SLOT - Door removed from the oven - Figure 2 4. To clean oven door, follow the instructions provided in the General Care & Cleaning table. Lock in normal position Figure 3 Note: Make sure the hinge supports are fully engaged before unlocking the hinge levers. 3. Close the oven door. CAUTION The - Electrolux FGEF304D | Use and Care Manual - Page 36
bake a product may vary slightly from your previously owned appliance. Baking Problems and Solutions Chart Baking Problems Cookies and center of the oven rack. If the water level is uneven, refer to the installation instructions for leveling the range. • Be sure to allow 5.1cm to 10.2cm (2" to - Electrolux FGEF304D | Use and Care Manual - Page 37
Problems) IMPORTANT Before you call for service, review this list. It may save you time and expense. The list includes common occurrences that are not the result of defective workmanship or materials in this appliance level and can adequately support range. If floor . Remove and wash drip bowls as - Electrolux FGEF304D | Use and Care Manual - Page 38
to Common Problems) OCCURRENCE section in the Electronic Oven Control Guide. A cooling fan may automatically turn on and off to cool internal parts. It is normal, and Cycle" in the Electronic Oven Control Guide. Control(s) not set properly. Follow instructions under "Setting Oven Controls". Make - Electrolux FGEF304D | Use and Care Manual - Page 39
NOTES 39 - Electrolux FGEF304D | Use and Care Manual - Page 40
warranted by Electrolux Major Appliances North America, a division of Electrolux Home Products, Inc. In Canada, your appliance is warranted by Electrolux Canada Corp. Electrolux authorizes no person to change or add to any obligations under this warranty. Obligations for service and parts under this
-
 1
1 -
 2
2 -
 3
3 -
 4
4 -
 5
5 -
 6
6 -
 7
7 -
8
-
9
-
10
-
11
-
12
-
13
-
14
-
15
-
16
-
17
-
18
-
19
-
20
-
21
-
22
-
23
-
24
-
25
-
26
-
27
-
28
-
29
-
30
-
31
-
32
-
33
-
34
-
35
-
36
-
37
-
38
-
39
-
40
 |
 |

TABLE OF CONTENTS
www.frigidaire.com
USA 1-800-944-9044
www.frigidaire.ca
Canada 1-800-265-8352
All about the
Use
&
Care
of your
Range
Welcome & Congratulations
...................................
2
Important Safety Instructions
.................................
3
Features at a Glance
..............................................
6
Before Setting Surface Controls
..............................
9
Setting Surface Controls
......................................
12
Before Setting Oven Controls
...............................
16
318205221 (January 2012) Rev. A
Setting Oven Controls
..........................................
17
Setting Keep Warm Drawer Control (If equipped) ..35
Care & Cleaning (Cleaning Chart)
.........................
36
Care & Cleaning
..................................................
37
Before You Call
..................................................
40
Major Appliance Warranty
....................................
44