Electrolux RH30WC60GS Complete Owner's Guide (English)
Electrolux RH30WC60GS Manual
 |
UPC - 012505558733
View all Electrolux RH30WC60GS manuals
Add to My Manuals
Save this manual to your list of manuals |
Electrolux RH30WC60GS manual content summary:
- Electrolux RH30WC60GS | Complete Owner's Guide (English) - Page 1
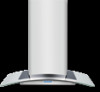
Installation, Use & Care Guide 30" and 36" Free-Standing Range Hood Guia de Instalación, Uso y Cuidado 30" y 36" Campana extractora Guide d'installation, utilisation et d'entretien 30" et 36" Hotte aspirante REHI3300WWCC6600GGSS++REHI3366WWCC6600GGSS 316488522 - Electrolux RH30WC60GS | Complete Owner's Guide (English) - Page 2
Ceiling ducting 10 Wall ducting 10 House wiring location 10 Install framing for hood support 10 Mounting the hood 11 Connecting the ductwork 12 Air deflector installation (Recirculating accessories 12 Making the electrical connections 13 Mounting the glass canopy 13 Mounting the duct cover - Electrolux RH30WC60GS | Complete Owner's Guide (English) - Page 3
LOCAL CODES. IMPORTANT: Save these Instructions for the Local Electrical Inspector's use. INSTALLER: Please leave these Instructions with this unit for the owner. OWNER: Please retain these instructions for future reference. Safety Warning: Turn off power circuit at service panel and lock out panel - Electrolux RH30WC60GS | Complete Owner's Guide (English) - Page 4
Always leave safety grills and filters in place. Without these components, operating blowers could catch onto hair, fingers and loose clothing. The manufacturer declines all responsibility in the event of failure to observe the instructions given here for installation, maintenance and suitable use - Electrolux RH30WC60GS | Complete Owner's Guide (English) - Page 5
grounded. Do not have a fuse in the neutral or ground circuit. IMPORTANT Save Installation Instructions for electrical inspector's use. The range hood must be connected with copper wire only. The range hood should be connected directly to the fused disconnect (Or circuit breaker) box through metal - Electrolux RH30WC60GS | Complete Owner's Guide (English) - Page 6
Materials Parts Included with your Hood • Hood canopy assembly with blower, transition. • Lamp already installed. • Grease filter. • Glass Canopy • Duct cover. • Hardware bag with: • Plastic Gasket. • Template. • Duct cover support bracket (1 piece) • Use, care and installation guide • Glass bracket - Electrolux RH30WC60GS | Complete Owner's Guide (English) - Page 7
Systems greater than specified CFM of air movement. The specified CFM varies from locale to locale. Consult your HVAC professional for specific requirements in your area. • Typical installation Min installation height from the range top to the bottom of the hood is 30" if a gas range is used or 24 - Electrolux RH30WC60GS | Complete Owner's Guide (English) - Page 8
is determined by the following image. Mark the location. Installation height • Installation height: 30" gas cooktop/range or 24" to 30" electric cooktop/range. • Use a level to draw a horizontal straight pencil line on the wall, which is your desired installationheight. • Find the centerline of - Electrolux RH30WC60GS | Complete Owner's Guide (English) - Page 9
Installing the hood 9 Mounting the duct cover bracket The duct bracket should be installed against the back wall and flush with the ceiling. This bracket will hold the telescopic duct cover in place at the top (this a extra accessory available not included with the hood). . Secure the bracket to - Electrolux RH30WC60GS | Complete Owner's Guide (English) - Page 10
. Leave ¼ " of distance between the screw head and the wall. • Remove the grease filter and mount the hood onto the "upper" screws. 8-1/2"min. opening for ductwork View From Rear Cleats 1"x6" Min. Mounting Support Centerline of Installation Space • Mark "lower" wood screw holes locations in the - Electrolux RH30WC60GS | Complete Owner's Guide (English) - Page 11
11 Installing the hood • Remove the hood. • Drive "lower" wood screws, by hand. Remove screws. • Mount the hood onto the "upper" screws. • Drive and tighten the "upper" wood screws, by hand. • Drive and tighten the "lower" wood screws, by hand. • Install the plastic gasket to the front hood flange - Electrolux RH30WC60GS | Complete Owner's Guide (English) - Page 12
12 Installing the hood Connecting the ductwork • Install ductwork, making connections in the direction of airflow as illustrated. • Push duct over the exhaust outlet. • Wrap all duct joints and the flange connections with duct tape for an airtight seal. • Make the same connection in the wall or - Electrolux RH30WC60GS | Complete Owner's Guide (English) - Page 13
cover and reapply screws. Mounting the glass canopy • With the hood mounted on the wall slide the glass canopy over the glass supports. • Insert the glass brackets. • Insert two screws into the bracket holes, drive the screws by hand. • If not already done, install 1/2" conduit connector in j-box - Electrolux RH30WC60GS | Complete Owner's Guide (English) - Page 14
it in the duct cover mounting bracket. • Secure the top of the duct with 2 assembly screws provided. • Secure the bottom of the duct with 2 assembly screws provided. Install the grease filter and turn power on at service panel. Check operation of the hood. IMPORTANT: If the hood doesn't switch ON - Electrolux RH30WC60GS | Complete Owner's Guide (English) - Page 15
Features 1. Blower and light controls 2. Lamp housings 3. Grease filter Handle 4. Grease filter 5. Canopy 6. Duct cover 7. Louver holes (Only for Recirculating version) 15 Features 7 6 2 1 2 5 3 4 2 - Electrolux RH30WC60GS | Complete Owner's Guide (English) - Page 16
set to fourth speed. • If the fan is at fourth speed and the " " button is pressed, a beep will sound. IMPORTANT: If the hood doesn't switch ON, before calling for service, check if the internal General ON/ OFF Pushb-utton Switch is switched ON. General ON/OFF Push button Switch Frontside of the - Electrolux RH30WC60GS | Complete Owner's Guide (English) - Page 17
is active. When this icon is shown in the display, the grease filters installed are required to be washed. • To reset the grease filter saturation alarm the user must press the " " button for 5 seconds, after this action the icon "Grease filter" is not displayed, and the hood has the normal display - Electrolux RH30WC60GS | Complete Owner's Guide (English) - Page 18
when browning or pan frying meat. • Open a window or inside door slightly. • Clean the filters and the wall behind the filters frequently. • The blower • Drafts across the range or cooktop will cause the escape of heat, smoke, moisture, grease and cooking odors from the hood. Such drafts should - Electrolux RH30WC60GS | Complete Owner's Guide (English) - Page 19
disconnect the appliance from the power supply before servicing. Be sure the entire hood (including the filters and light bulbs) has cooled and grease has solidified before attempting to clean any part of the appliance. Filters The metal grease filters are made of stainless steel anodized aluminum - Electrolux RH30WC60GS | Complete Owner's Guide (English) - Page 20
filter (mounting instructions included with charcoal filters kit). The charcoal filters should be replaced every 4-6 months (depending on hood usage). NOTE: DO NOT rinse, or put charcoal filters in an automatic dishwasher. NOTE: Charcoal filters cleaning, place all parts in their proper positions - Electrolux RH30WC60GS | Complete Owner's Guide (English) - Page 21
other rights that vary from state to state. Service under this warranty must be obtained by contacting Electrolux Home Products. This warranty only applies in the 50 states of the U.S.A., Puerto Rico and Canada. Product features or specifications as described or illustrated are subject to change
-
 1
1 -
 2
2 -
 3
3 -
 4
4 -
 5
5 -
 6
6 -
 7
7 -
8
-
9
-
10
-
11
-
12
-
13
-
14
-
15
-
16
-
17
-
18
-
19
-
20
-
21
 |
 |

Installation, Use & Care Guide
30” and 36” Free-Standing Range Hood
Guia de Instalación, Uso y Cuidado
30” y 36” Campana extractora
Guide d’installation, utilisation et d’entretien
30” et 36” Hotte aspirante
EI30WC60GS + EI36WC60GS
316488522