Epson 1250 Scanner Basics
Epson 1250 - Perfection Photo Flatbed Scanner Manual
 |
UPC - 010343836976
View all Epson 1250 manuals
Add to My Manuals
Save this manual to your list of manuals |
Epson 1250 manual content summary:
- Epson 1250 | Scanner Basics - Page 1
EPSON Perfection® 1250/1650 Series Scanner Basics - Epson 1250 | Scanner Basics - Page 2
cameras and scanners. Trademarks EPSON and EPSON Stylus are registered trademarks and EPSON Smart Panel is a trademark of SEIKO EPSON CORPORATION. EPSON Perfection is a registered trademark, EPSON Software is a trademark, and EPSON PhotoCenter, EPSON Store, and SoundAdvice are service marks, of - Epson 1250 | Scanner Basics - Page 3
Scanning Transparencies Using Film Holders Scanning with the EPSON Perfection 1650 PHOTO Scanning with the EPSON Perfection 1250 PHOTO Scanning Reflective Documents or Photographs Problem Solving Scanner Light Problems and Solutions Setup Problems Scanner Problems Software Problems Image Problems - Epson 1250 | Scanner Basics - Page 4
Requirements and Notices 35 System Requirements 35 Windows 35 Macintosh 36 Important Safety Instructions 37 ENERGY STAR Compliance 38 FCC Compliance Statement 39 Declaration of Conformity 40 Warranty 40 Index 43 iv Contents - Epson 1250 | Scanner Basics - Page 5
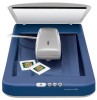
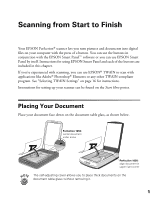
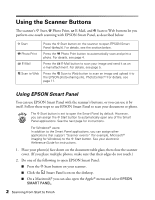
Your EPSON Perfection® scanner lets you turn pictures and documents into digital files on your computer with the press of a button. You can use the buttons in conjunction with the EPSON Smart Panel™ software or you can use EPSON Smart Panel by itself. Instructions for using EPSON Smart Panel and - Epson 1250 | Scanner Basics - Page 6
® users: In addition to the Smart Panel applications, you can assign other applications that support "Scanner events" (for example, Microsoft® Imaging for Windows) to the ] Start button. See your electronic Reference Guide for instructions. 1. Place your photo(s) face down on the document table - Epson 1250 | Scanner Basics - Page 7
The window for that application appears and lets you adjust settings for your scan. Follow the on-screen steps for each application. For instructions on using each of the Smart Panel applications, see your electronic EPSON Smart Panel User's Guide as described on page 32. If you select Copy or Photo - Epson 1250 | Scanner Basics - Page 8
; then close the scanner cover. 3. Press the { Photo Print button on the scanner's control panel. 4. EPSON Smart Panel opens and confirms you have a printer installed on your system. Then EPSON TWAIN automatically scans your image. 5. When the scan completes, the EPSON Photo Print screen appears and - Epson 1250 | Scanner Basics - Page 9
(s) face down on the document table glass; then close the scanner cover. If you place more than one photo on the document table, make sure that their edges do not touch. 3. Press the | E-Mail button. EPSON Smart Panel opens, then EPSON TWAIN automatically scans your image. If you'd rather scan in - Epson 1250 | Scanner Basics - Page 10
your e-mail program the first time you use EPSON Smart Panel. For subsequent scans, it is automatically selected.) select your photo(s) attached. Enter the recipient's e-mail address, type in a message, and then click Send. click Send to deliver your e-mail recipient's e-mail address attached photos - Epson 1250 | Scanner Basics - Page 11
document table glass; then close the cover. If you place more than one photo on the document table, make sure that their edges do not touch. 2. Do one of the following to open EPSON Smart Panel: I Double-click the EPSON Smart Panel icon on the desktop. I On a Macintosh, you can also open the Apple - Epson 1250 | Scanner Basics - Page 12
3. EPSON Smart Panel opens. Click Scan to File. Scan to File EPSON TWAIN automatically scans your image. If you'd rather scan in Manual mode so you can adjust your scan settings, click Cancel. (See page 16 for instructions on selecting TWAIN settings.) After adjusting your settings, close EPSON - Epson 1250 | Scanner Basics - Page 13
4. When the scan completes, the Scan to File dialog box opens. If you want to scan more photos, place them on the document table glass, close the scanner cover, and then click Scan More. When you're finished scanning, click Finish. if you don't want to save a file, click the checkbox to deselect - Epson 1250 | Scanner Basics - Page 14
you're finished, click Save. The photo is saved in your selected folder. The Windows. JPEG is the default file format on Macintosh. Bitmap files are high quality, but have a large file size. To send a photo a larger file size). current folder for saved photos to save your files in a different path, - Epson 1250 | Scanner Basics - Page 15
one photo on the document table, make sure that their edges do not touch. 4. Press the } Scan to Web button. EPSON Smart Panel opens, then EPSON TWAIN automatically scans your image. If you'd rather scan in Manual mode so you can adjust your scan settings, click Cancel. (See page 16 for instructions - Epson 1250 | Scanner Basics - Page 16
need to do this once. For subsequent scans, these are automatically selected.) I Click Upload. The photos upload to the EPSON PhotoCenter. select USA User ID (e-mail address) and password for the EPSON PhotoCenter click Select File, then browse to add more files click Upload to transfer files to - Epson 1250 | Scanner Basics - Page 17
Photo Inbox. Click Photo Inbox to view your photos. click Photo Inbox to view your photos click here to create a new album available albums If you don't see your photos, increase the size of your browser window or use the scroll bar to scroll down until you see your photos. Scanning to the EPSON - Epson 1250 | Scanner Basics - Page 18
album, select New Album from the album selection box. After you click Move or Copy, you will see another window where you can name the album and add a password.) Now that your photos are in an album, you can view them at any time and share them with your friends and family - Epson 1250 | Scanner Basics - Page 19
here Your friends and family can view the photos in the shared albums you've created. After viewing your photos, they can print the photos at home, order reprints, or use the photos in an e-mail postcard. click here for help with the EPSON PhotoCenter select a photo, then click one of these options - Epson 1250 | Scanner Basics - Page 20
scan with. Your EPSON Perfection scanner comes with the EPSON TWAIN driver. Select it as the source in your application (EPSON Smart Panel automatically selects EPSON TWAIN). When you scan with EPSON Smart Panel, the default TWAIN mode is Full Auto and the software automatically selects the settings - Epson 1250 | Scanner Basics - Page 21
and configuration, and use color management 6 Scan the image into your application 5. After you scan your image, close EPSON TWAIN to return to EPSON TWAIN, see your electronic Reference Guide, as described on page 32. To switch back to automatic mode, click Full Auto mode in the EPSON TWAIN windows - Epson 1250 | Scanner Basics - Page 22
software (EPSON TWAIN), however, major photo retouching will need to be done in programs such as Adobe Photoshop Elements or ArcSoft PhotoImpression. If you are manually adjusting the settings in the TWAIN window Color Photo Color Photo Color Photo Text Text Color Document Line Art TPU: Color Neg - Epson 1250 | Scanner Basics - Page 23
1250 TPU: B12B813321 I EPSON Perfection 1650 TPU: B813172 The EPSON Perfection 1650 PHOTO TPU is built into the scanner lid. The optional TPU for the EPSON Perfection 1650 is a separate piece; it is not built into the lid. For instructions on using this TPU, see your electronic Reference Guide - Epson 1250 | Scanner Basics - Page 24
Scanning with the EPSON Perfection 1650 PHOTO If you have an EPSON Perfection 1650 PHOTO scanner, the transparency unit is built into the scanner lid. Follow these steps to use the transparency unit: 1. Unplug the AC adapter. 2. Remove the reflective document mat. To do this, grasp the top of the - Epson 1250 | Scanner Basics - Page 25
cover. 7. In EPSON TWAIN, select TPU: Color Neg. Film, TPU: Monochrome Neg. Film, or TPU: Pos. Film as your image type (see page 18 for recommended settings). For more information on using the transparency unit, see your electronic Reference Guide. Scanning with the EPSON Perfection 1650 PHOTO 21 - Epson 1250 | Scanner Basics - Page 26
with the EPSON Perfection 1250 PHOTO If you have an EPSON Perfection 1250 PHOTO scanner, the transparency unit is included as a separate part. Follow these steps to use the transparency unit: 1. Unplug the AC adapter. 2. Connect the TPU cable to the scanner's transparency unit connector. 3. Plug - Epson 1250 | Scanner Basics - Page 27
as memos or photographs), be sure to: I Unplug the AC adapter, then unplug the transparency unit from the option connector. When you are ready to scan again, plug in the AC adapter. I EPSON Perfection 1650 PHOTO users only: Replace the reflective document mat, as shown below. 1. Open the document - Epson 1250 | Scanner Basics - Page 28
24 Scanning from Start to Finish - Epson 1250 | Scanner Basics - Page 29
and solving scanner problems. For more troubleshooting tips, see the "Troubleshooting" section of your electronic Reference Guide. Scanner Light The ] light indicates the status of the scanner, as described in the tables below. EPSON Perfection 1250/1250 PHOTO Light Color Status Flashing - Epson 1250 | Scanner Basics - Page 30
EPSON Perfection 1650/1650 PHOTO Light Color Status Flashing Green The scanner is initializing (warming up) or is busy scanning. On Green The scanner is ready to scan images. Flashing Red If you are scanning transparencies with the EPSON Perfection 1650 PHOTO, make sure you've removed the - Epson 1250 | Scanner Basics - Page 31
install EPSON TWAIN in Windows 2000. I In Windows 2000, don't select Block under Control Panel, System, Hardware, Driver Signing; select Ignore or Warn instead. I If you see an error message or the software doesn't install correctly on Windows 2000, you may not have software installation privileges - Epson 1250 | Scanner Basics - Page 32
and nothing happens, initialize the scanner by scanning an image from Smart Panel. Then you can use the buttons. You're having trouble scanning while using the transparency unit. I Make sure the transparency unit is correctly installed and connected to the scanner's option interface. I Make sure you - Epson 1250 | Scanner Basics - Page 33
Software Problems The scanner software doesn't work properly. I Make sure your computer meets the system requirements listed on page 35 or page 36 and supports the software applications you're using. I Check if your computer has enough memory for your software. If you're running other software at - Epson 1250 | Scanner Basics - Page 34
color by adjusting the marquee (frame border) so none of the film holder is selected. See your electronic Reference Guide for EPSON TWAIN, click Configuration. 2. On the Preview tab, make sure the checkbox for Automatic Thumbnail Preview for Film is unchecked. When you preview your image, manually - Epson 1250 | Scanner Basics - Page 35
. If that doesn't work, scan in Manual mode (see page 16 for instructions). The image does not look the same as the original. I Your software settings are not correct for your document type. Try different combinations of image settings using your scanner software. I Because your monitor and printer - Epson 1250 | Scanner Basics - Page 36
troubleshooting information, system requirements, safety instructions, and your warranty. I On-screen Help Whenever you're working with EPSON Smart Panel or any of the other software that came with your scanner, you can click the Help button or Help menu. I EPSON Perfection 1250/1650 Reference Guide - Epson 1250 | Scanner Basics - Page 37
information ready: I Product name (EPSON Perfection 1250, 1250 PHOTO, 1650, or 1650 PHOTO) I Product serial number (located on the back of the scanner) I Proof of purchase (such as a store receipt) and date of purchase I Computer configuration I Description of the problem You can purchase supplies - Epson 1250 | Scanner Basics - Page 38
Software Technical Support Software EPSON TWAIN driver EPSON Software™ Film Factory™ EPSON Smart Panel ArcSoft PhotoImpression Adobe Photoshop Elements Telephone Fax Online and E-mail U.S. (562) 276-4382 Canada (905) 709-3839 (800) 922-8911 http://support.epson.com fax-on-demand system (510) - Epson 1250 | Scanner Basics - Page 39
Requirements and Notices This chapter includes system requirements, safety instructions, and other important information about your EPSON Perfection scanner. System Requirements The minimum system requirements for Windows and Macintosh are listed below. For optimum performance, a faster processor - Epson 1250 | Scanner Basics - Page 40
, including the video adapter, monitor, and software. See the documentation for these products for details. EPSON TWAIN supports the Apple ColorSync™ 2.X color management system and QuickTime.™ These extensions are automatically installed during EPSON TWAIN installation. 36 Requirements and Notices - Epson 1250 | Scanner Basics - Page 41
and save them for later reference. Follow all warnings and instructions marked on the scanner. I Place the scanner close enough to the computer for the interface cable to reach it easily. I Place the scanner and AC adapter near an electrical outlet where the power cord can be easily unplugged - Epson 1250 | Scanner Basics - Page 42
instructions.) I For US and Canadian users: Use only the included power cord or a 6 to 10 foot long UL-approved type SPT-2, 2 x 18 AWG cord with a 125 V, 10 polarized AC cord that comes with the scanner. ENERGY STAR Compliance As an ENERGY STAR Partner, EPSON has determined that this product meets - Epson 1250 | Scanner Basics - Page 43
to provide reasonable protection against harmful interference in a residential installation. This equipment generates, uses, and can radiate radio frequency energy and, if not installed and used in accordance with the instructions, may cause harmful interference to radio or television reception - Epson 1250 | Scanner Basics - Page 44
cause undesired operation. Trade Name: EPSON Type of Product: Color Image Scanner Model: EPSON Perfection 1250/1250 PHOTO: G820A EPSON Perfection 1650/1650 PHOTO: G850A Warranty Epson America, Inc. Limited Warranty What Is Covered: Epson America, Inc. ("EPSON") warrants to the first end user - Epson 1250 | Scanner Basics - Page 45
of misuse, abuse, improper installation, neglect, improper shipping, damage caused by disasters such as fire, flood, and lightning, improper electrical current, software problems, interaction with non-EPSON products, or service other than by an EPSON Authorized Servicer. If a claimed defect cannot - Epson 1250 | Scanner Basics - Page 46
42 Requirements and Notices - Epson 1250 | Scanner Basics - Page 47
to 17 F File size, 31 File, scanning to, 7 to 10 Film holders, 19 Film, scanning, 18 to 23 Fluorescent lamp, 28 H Help EPSON, 33 to 34 software, 34 I Image quality problems, 29 to 31 Incorrect colors, 30 to 31 Installation, troubleshooting, 26 to 27 L Lamp, fluorescent, 28 Light, scanner, 25, 26 43 - Epson 1250 | Scanner Basics - Page 48
44 Index Smart Panel, overview, 2 to 3 Software problems, 29 settings, 18 Software installation, troubleshooting, 26 to 27 Start button, 2 to 3 Support, 33 to 34 System requirements, 35 to 36 T Technical support, 33 to 34 Text, scanning, 18 Transparency unit (TPU) EPSON Perfection 1250 PHOTO, 22 to
-
 1
1 -
 2
2 -
 3
3 -
 4
4 -
 5
5 -
 6
6 -
 7
7 -
8
-
9
-
10
-
11
-
12
-
13
-
14
-
15
-
16
-
17
-
18
-
19
-
20
-
21
-
22
-
23
-
24
-
25
-
26
-
27
-
28
-
29
-
30
-
31
-
32
-
33
-
34
-
35
-
36
-
37
-
38
-
39
-
40
-
41
-
42
-
43
-
44
-
45
-
46
-
47
-
48
 |
 |

EPSON Perfection
®
1250/1650 Series
Scanner Basics