Epson 1400 Managing Color Guide
Epson 1400 - Stylus Photo Color Inkjet Printer Manual
 |
UPC - 010343859937
View all Epson 1400 manuals
Add to My Manuals
Save this manual to your list of manuals |
Epson 1400 manual content summary:
- Epson 1400 | Managing Color Guide - Page 1
Epson Stylus® Photo 1400 Managing Color Printing With Adobe® Photoshop® Elements 6.0 - Epson 1400 | Managing Color Guide - Page 2
comply with Seiko Epson Corporation's operating and maintenance instructions. Seiko Epson Corporation shall not be liable for any damages or problems arising from Epson and Epson Stylus are registered trademarks, and Epson Exceed Your Vision is a registered logomark of Seiko Epson Corporation - Epson 1400 | Managing Color Guide - Page 3
designed specifically for your printer model and paper type are installed with your printer driver. For the most precise color in your prints, use these profiles whenever you print. To print using these profiles with Adobe® Photoshop® Elements 6.0, follow the instructions in these sections for - Epson 1400 | Managing Color Guide - Page 4
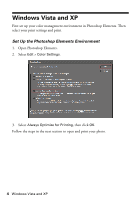
environment in Photoshop Elements. Then select your print settings and print. Set Up the Photoshop Elements Environment 1. Open Photoshop Elements. 2. Select Edit > Color Settings. 3. Select Always Optimize for Printing, then click OK. Follow the steps in the next section to open and print your - Epson 1400 | Managing Color Guide - Page 5
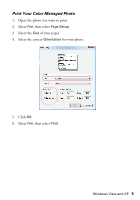
Print Your Color-Managed Photo 1. Open the photo you want to print. 2. Select File, then select Page Setup. 3. Select the Size of your paper. 4. Select the correct Orientation for your photo. 5. Click OK. 6. Select File, then select Print. Windows Vista and XP 5 - Epson 1400 | Managing Color Guide - Page 6
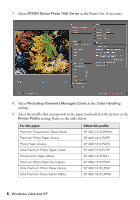
Select EPSON Stylus Photo 1400 Series in the Printer list, if necessary. 8. Select Photoshop Elements Manages Colors as the Color Handling setting. 9. Select the profile that corresponds to the paper you loaded in the printer as the Printer Profile setting. Refer to the table below: For this paper - Epson 1400 | Managing Color Guide - Page 7
setting. Note: If your image contains very saturated colors, select Perceptual. This reduces the color saturation so that the colors fit within the printer's color gamut. 11. Click the Print button. 12. Make sure EPSON Stylus Photo 1400 Series is selected, then click the Preferences or Properties - Epson 1400 | Managing Color Guide - Page 8
13. Click the Advanced button. 8 Windows Vista and XP - Epson 1400 | Managing Color Guide - Page 9
14. Select the Paper Type setting that matches the paper you loaded. 15. Select a Quality Option for your print. 16. Make sure that the Grayscale and Edge Smoothing options are unchecked. Windows Vista and XP 9 - Epson 1400 | Managing Color Guide - Page 10
Make sure that you select Off (No Color Adjustment). If you don't, the printer driver will apply additional correction to the image, producing inaccurate results. 18. Click OK. 19. Click OK or Print to print. If you get unexpected results, see "Solve Color Management Problems" on page 21. 10 Windows - Epson 1400 | Managing Color Guide - Page 11
environment in Photoshop Elements. Then select your print settings and print. Set Up the Photoshop Elements Environment 1. Open Photoshop Elements. 2. Select Edit > Color Settings. 3. Select Always Optimize for Printing, then click OK. Follow the steps in the next section to open and print your - Epson 1400 | Managing Color Guide - Page 12
Print Your Color-Managed Photo 1. Open the photo you want to print. 2. Select File, then select Page Setup. 3. Select EPSON Stylus Photo 1400 in the Format for pop-up menu. 4. Select the Paper Size for the paper you loaded in the printer. 5. Select the correct Orientation for your photo. 6. Click OK - Epson 1400 | Managing Color Guide - Page 13
8. Select EPSON Stylus Photo 1400 in the Printer list, if necessary. 9. Select Photoshop Elements Manages Colors as the Color Handling setting. 10. Select the profile that corresponds to the paper you loaded in the printer as the Printer Profile setting. Refer to the table below: For this paper - Epson 1400 | Managing Color Guide - Page 14
Perceptual. This reduces the color saturation so that the colors fit within the printer's color gamut. 12. Click the Print button. 13. Click d to expand the Print window, if necessary. 14. Select Print Settings from the pop-up menu. 15. Select the Media Type setting for the paper you'll use for the - Epson 1400 | Managing Color Guide - Page 15
: Make sure that you select Off (No Color Adjustment). If you don't, the printer driver will apply additional correction to the image, producing inaccurate results. 20. Click Print to print your photo. If you get unexpected results, see "Solve Color Management Problems" on page 21. Mac OS X 10.5 15 - Epson 1400 | Managing Color Guide - Page 16
environment in Photoshop Elements. Then select your print settings and print. Set Up the Photoshop Elements Environment 1. Open Photoshop Elements. 2. Select Edit > Color Settings. 3. Select Always Optimize for Printing, then click OK. Follow the steps in the next section to open and print your - Epson 1400 | Managing Color Guide - Page 17
Print Your Color-Managed Photo 1. Open the photo you want to print. 2. Select File, then select Page Setup. 3. Select Stylus Photo 1400 in the Format for pop-up menu. 4. Select the Paper Size for the paper you loaded in the printer. 5. Select the correct Orientation for your photo. 6. Click OK. 7. - Epson 1400 | Managing Color Guide - Page 18
8. Select Stylus Photo 1400 in the Printer list, if necessary. 9. Select Photoshop Elements Manages Colors as the Color Handling setting. 10. Select the profile that corresponds to the paper you loaded in the printer as the Printer Profile setting. Refer to the table below: For this paper Premium - Epson 1400 | Managing Color Guide - Page 19
select Perceptual. This reduces the color saturation so that the colors fit within the printer's color gamut. 12. Click the Print button. 13. Select Print Settings from the pop-up menu. 14. Select the Media Type setting for the paper you'll use for the print. 15. Select Advanced as the Mode setting - Epson 1400 | Managing Color Guide - Page 20
: Make sure that you select Off (No Color Adjustment). If you don't, the printer driver will apply additional correction to the image, producing inaccurate results. 19. Click Print to print your photo. If you get unexpected results, see "Solve Color Management Problems" on page 21. 20 Mac OS X 10 - Epson 1400 | Managing Color Guide - Page 21
the Epson printer driver. Return to the "Print Your Color-Managed Photo" instructions for Windows, Mac OS X 10.5, or Mac OS X 10.4, and make sure you selected the correct profile for your printer in the Printer Profile menu. For this paper Ultra Premium Photo Paper Glossy Premium Photo Paper Glossy
-
 1
1 -
 2
2 -
 3
3 -
 4
4 -
 5
5 -
 6
6 -
 7
7 -
8
-
9
-
10
-
11
-
12
-
13
-
14
-
15
-
16
-
17
-
18
-
19
-
20
-
21
 |
 |
Epson Stylus
®
Photo 1400
Managing Color
Printing With Adobe
®
Photoshop
®
Elements 6.0