Epson 1520 User Manual
Epson 1520 - Stylus Color Inkjet Printer Manual
 |
UPC - 010343813328
View all Epson 1520 manuals
Add to My Manuals
Save this manual to your list of manuals |
Epson 1520 manual content summary:
- Epson 1520 | User Manual - Page 1
User's Guide Printed on recycled paper with at least 10% post-consumer content. - Epson 1520 | User Manual - Page 2
maintenance instructions. SEIKO EPSON CORPORATION shall not be liable for any damages or problems arising from the use of any options or any consumable products other than those designated as Original EPSON Products or EPSON Approved Products by SEIKO EPSON CORPORATION. EPSON, EPSON Stylus, and ESC - Epson 1520 | User Manual - Page 3
comply with the limits for a Class B digital device, pursuant to Part 15 of the FCC Rules. These limits are designed to provide reasonable energy and, if not installed and used in accordance with the instructions, may cause harmful interference to radio or television reception. However, there - Epson 1520 | User Manual - Page 4
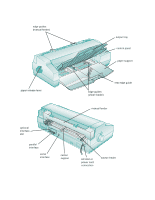
edge guides (manual feeder) output tray control panel paper support paper release lever edge guides (sheet feeder) rear edge guide manual feeder optional interface slot parallel interface serial interface center support AC inlet or power cord connection tractor feeder -xvi - Epson 1520 | User Manual - Page 5
System Requirements 2 How To Use Your Manuals 3 Warnings, Cautions, Notes, and Tips 4 Where To Get Help 5 Electronic Support Services 5 ENERGY STAR Compliance 7 Energy-saving Tips 7 Important Safety Instructions 7 1 Basic Printing Printing from Windows 1-1 Setting Printer - Epson 1520 | User Manual - Page 6
Special Media Types 3-2 Media Loading and Software Setting Guidelines 3-3 Additional Media Loading Guidelines 3-5 Printing on Single Sheets 3-6 Loading Paper in the Built-in Sheet Feeder 3-6 Loading Paper in the Manual Feeder 3-11 Printing on Continuous Paper 3-14 Removing Continuous - Epson 1520 | User Manual - Page 7
Using EPSON Monitor2 4-6 Using the Macintosh Status Monitor 4-7 Network Printing on a PC 4-9 Connecting to the Printer on Windows NT 4.0 Systems 4-9 Connecting to the Printer on Windows NT 3.51 Systems 4-10 Using the Printer Software's Built-in Network Support 4-11 Network Printing on - Epson 1520 | User Manual - Page 8
an Ink Cartridge 6-5 Printing in Black Ink with an Empty Color Cartridge 6-7 Aligning the Print Heads 6-8 Using the Print Head Alignment Utility 6-8 Using the Control Panel 6-9 Cleaning the Printer 6-10 Transporting the Printer 6-10 7 Troubleshooting Diagnosing Problems 7-1 Running - Epson 1520 | User Manual - Page 9
Interface Board A-2 Installing Optional Interfaces A-2 B Using EPSON Plot! Installing EPSON Plot! B-1 Printing with EPSON Plot! B-2 C Specifications Printing C-1 Paper C-3 Ink Cartridges C-5 Mechanical C-6 Electrical C-6 Environmental C-6 Safety Approvals C-7 Interfaces - Epson 1520 | User Manual - Page 10
ink colors. Support for ColorSync™ 2.01 and Windows 95 ICM ensures printouts that closely match the colors on your monitor. You can also perform many printer maintenance procedures right from your computer, such as cleaning and aligning the print heads. And EPSON's extensive online help can guide - Epson 1520 | User Manual - Page 11
PC System Requirements To use your printer and its software with a PC, your system should have: An IBM® compatible PC with at least a 386/25 MHz or faster processor (486/25 MHz or faster for Windows NT) DOS, Windows 95, Windows 3.1x, Windows for Workgroups 3.11, Windows NT™ 4.0, or Windows NT - Epson 1520 | User Manual - Page 12
A. How To Use Your Manuals To set up your printer and install your printer software, see the Quick Setup booklet. This User's Guide contains the following information: Chapter 1, "Basic Printing," gives step-by-step instructions for everyday printing with Windows or Macintosh. Chapter 2, "Custom - Epson 1520 | User Manual - Page 13
Introduction Chapter 6, "Maintenance and Transportation," gives instructions for replacing ink cartridges, cleaning and aligning the print heads, and cleaning and transporting the printer. Chapter 7, "Troubleshooting," provides solutions for any printing problems you may have. Appendix A, "Using - Epson 1520 | User Manual - Page 14
purchase ink cartridges, paper, manuals, accessories, and parts from EPSON Accessories at (800) 873-7766 (U.S. sales only). In Canada, please call (800) 873-7766 for dealer referral. If you need help using software with an EPSON product, see the documentation for that program for technical support - Epson 1520 | User Manual - Page 15
Page at http://www.epson.com. EPSON Download Service You can call the EPSON Download Service at (800) 442-2007. Set your communications software to 8 data bits, 1 stop bit, no parity. Modem speed can be up to 28.8 Kbps. EPSON FaxAdvice Service You can access EPSON's technical information library by - Epson 1520 | User Manual - Page 16
option in your software so you can catch errors before you print something. Send e-mail rather than distributing memos. Not only is this faster, but you'll save paper and storage space too. Important Safety Instructions Before using your printer, read the following safety instructions to make sure - Epson 1520 | User Manual - Page 17
the same circuit as photocopiers or air control systems that regularly switch on and off. Place the printer near a wall outlet where the plug can in this User's Guide, do not attempt to service the printer yourself. Unplug the printer and refer servicing to qualified service personnel under the - Epson 1520 | User Manual - Page 18
sure to read through the following list of precautions before operating your ink jet printer: Do not put your hand inside the printer or touch the print heads during printing. Under normal circumstances, ink will not come out of the cartridges. If it does get on your skin, wash it off with soap - Epson 1520 | User Manual - Page 19
all your color and monochrome (black ink) documents with your EPSON Stylus COLOR 1520. First you have to set up your printer and install the software following the instructions in the Quick Setup booklet. Then read this chapter to find out about the following: Printing from Windows Printing from - Epson 1520 | User Manual - Page 20
choose from. 2. Make sure your EPSON Stylus COLOR 1520 printer is selected, and then click the Printer, Setup, Properties, or Options button. (You may have to click a series of these buttons, depending on the program you're printing with.) You see the printer software's dialog box: : Main tab 1-2 - Epson 1520 | User Manual - Page 21
use EPSON media. 3. If you don't see the dialog box shown in step 2, click the Main tab. 4. Make sure the Mode option is set to Automatic so the printer software can determine the best settings according to the Media Type and Ink settings you make. This is the easiest way to get good printing - Epson 1520 | User Manual - Page 22
these buttons, depending on the program you're printing with.) While you're printing, the EPSON Despooler dialog box appears, showing the printing progress and the status of your printer. (With Windows NT, you don't see the Despooler.) See "Checking Printer Status" on page 1-7 for more information - Epson 1520 | User Manual - Page 23
your software applications are closed before you start. If not, you'll have to close and then reopen them to have the new default settings take effect. Setting Default Options in Windows 95 1. Click Start, point to Settings, and then point to Printers. 2. Right-click the EPSON Stylus COLOR 1520 icon - Epson 1520 | User Manual - Page 24
access the default Windows NT printer software settings only if you have the appropriate network access privileges, such as Administrator or Power User. Setting Default Options in Windows NT 4.0 1. Click Start, point to Settings, and then point to Printers. 2. Click the EPSON Stylus COLOR 1520 icon - Epson 1520 | User Manual - Page 25
Basic Printing Checking Printer Status While your document is printing, the EPSON Despooler dialog box appears on your screen. (With Windows NT you don't see the Despooler. See the next page for more information.) If you don't want the Despooler dialog box to appear each time you print, you can - Epson 1520 | User Manual - Page 26
Chapter 7 for troubleshooting information. The printer is ready to print. The printer is currently printing. The ink level is low or empty; check the Ink Out B or Ink Out A light on the control panel and replace the cartridge if necessary. Checking Printer Status with Windows NT With Windows NT - Epson 1520 | User Manual - Page 27
printer software settings. To cancel your changes and exit the software, click the Cancel button at any time. Printing from a Macintosh When you print with a Macintosh, you need to check the printer software at the front of your printer. (For instructions on printing with the other feeders, see - Epson 1520 | User Manual - Page 28
, always use EPSON media. Click to select your media type 7. Choose the number of copies and indicate which pages you want to print. 8. Make sure the Mode option is set to Automatic so the printer software can determine the best settings according to the Media Type and Ink settings you make - Epson 1520 | User Manual - Page 29
Extension module called EPSON Stylus PowerPlug was installed and enabled when you installed your Macintosh printer software. This extension accelerates the rendering and processing of all documents when you're using a Power Macintosh. Basic Printing 10. Choose Color or Black ink. If you are - Epson 1520 | User Manual - Page 30
-click the Printers icon. Select the EPSON Stylus COLOR 1520 printer window, then open the Printer menu and select Properties. Click Details, then click Job Defaults. In the printer software dialog box, click the Help button. For instructions on using help, read the online "Quick Guide to Using - Epson 1520 | User Manual - Page 31
Basic Printing What To Do When the Printer Lights Come On Operate light Cover Open light Pause light black Ink Out light color Ink Out light Paper Out light The lights on your printer's control panel show the printer's status and alert you to problems, such as paper jams or low ink. Operate S - Epson 1520 | User Manual - Page 32
comes on, you need to replace the ink cartridge. See Chapter 6 for instructions. When the Pause light is on, printing is paused. Press the Pause button to resume. When the Pause light flashes, your printer is charging ink, cleaning the print heads, or performing another operation. See Chapter 6 for - Epson 1520 | User Manual - Page 33
2 Custom Printing Note: For instructions on printing HPGL or HPGL/2 plot files, see Appendix B. When you want to print presentation graphics, photographs, or other special projects, you can use the custom settings in your EPSON Stylus COLOR 1520 software. You can choose predefined settings or - Epson 1520 | User Manual - Page 34
Custom Printing 2. Access the Main printer settings dialog box as described on page 1-2 (Windows) or page 1-9 (Macintosh). You see one , the Quality/Speed slider disappears. Windows Macintosh Click Advanced, then click here to see a list of project types 3. Select Color or Black Ink. 2-2 - Epson 1520 | User Manual - Page 35
drafts of text only, on plain paper. Saves ink. ICM (Windows 95 only) Automatically adjusts printout colors to closely match the colors on your screen. ColorSync (Macintosh only) Automatically adjusts printout colors to closely match the colors on your screen. For more information, see page - Epson 1520 | User Manual - Page 36
a group. Then you can reuse them whenever you print a similar project. See page 2-11 for instructions. 8. Check the Current Settings box on the bottom or project in your application software. 2. Access the Main printer settings dialog box as described on page 1-2 (Windows) or page 1-9 (Macintosh - Epson 1520 | User Manual - Page 37
Macintosh Note: The Print Quality is selected automatically depending on the current Media Type. If you choose a Print Quality setting that is not appropriate for your media, the driver changes the Media you want to use, following the guidelines on page 3-3. 6. Select Color or Black ink. 2-5 - Epson 1520 | User Manual - Page 38
may need to align the print heads. See Chapter 6 for instructions. 7. Choose one of the following Halftoning options: No Halftoning For printing black text only. Error Diffusion For printing photographic or video/digital camera images. Blends each dot of color with the surrounding dots. Fine - Epson 1520 | User Manual - Page 39
. See page 2-11 for instructions. 11. Click OK (Windows) or Print (Macintosh). If you're using Windows, click any other buttons that your application uses for printing. Customizing Color Settings You can choose from several color adjustment modes or manually adjust brightness, contrast, saturation - Epson 1520 | User Manual - Page 40
Windows 95) Macintosh 2. Choose one of the following Color Adjustment Modes or choose another mode, as described in step 4: Automatic Analyzes the color information in your project and optimizes color correction accordingly. Photo-realistic For printing color photographs. Vivid For printing - Epson 1520 | User Manual - Page 41
of ICM depends on your Print Quality, Media Type, and Halftoning settings. Custom Printing No Color Adjustment (Windows NT 4.0 and Macintosh only) With Windows NT 4.0, disables the color adjustment features of the printer software so you can adjust colors using your application. On a Macintosh - Epson 1520 | User Manual - Page 42
including your EPSON Stylus COLOR 1520-to achieve accurate color matching. First you set your monitor's profile. Then you can use your printer software to specify the exact method of "gamut mapping" (color matching) you want to use. Follow these steps: 1. Open ColorSync System Profile under Control - Epson 1520 | User Manual - Page 43
on the right side of the dialog box. 8. For Profile, choose EPSON Standard. 9. Choose one of the following options for Rendering Intent: Perceptual For printing photographs. Adjusts the colors displayed on the monitor so they fit within the printer's gamut, but maintains the relationships between - Epson 1520 | User Manual - Page 44
Printing You see one of the following: Note: You can save up to 10 groups of settings. If you change the Media Type or Ink setting Windows Macintosh 3. Type a unique name for your settings (up to 16 characters) and click the Save button. The name you choose is now available on the Main printer - Epson 1520 | User Manual - Page 45
printer settings as necessary. (If you change the Media Type and Ink setting, the custom setting group name disappears from the list momentarily.) 4. Click Save Settings. 5. Select the name of the custom setting group you're redefining in the Custom Settings box. 6. If you're using Windows - Epson 1520 | User Manual - Page 46
on Special Media Your EPSON Stylus COLOR 1520 lets you print on just about any kind of paper you want to use. You can get great results printing on plain paper, letterhead, and envelopes. But you'll get the best results with EPSON's specially coated ink jet paper. You can choose from a variety - Epson 1520 | User Manual - Page 47
can help determine the ultimate quality of your printed output. You can achieve good results with plain paper, but for better results, use EPSON media for EPSON ink jet printers because they provide the best surface for the ink used in your printer. EPSON ink jet paper comes in a variety of types - Epson 1520 | User Manual - Page 48
Media Type setting in your printer software . . . Plain paper (single sheets) 100 letter size 30 Super A3/B size 30 A2 size Plain paper Continuous paper (plain or labels) Envelopes1 See "Printing on Continuous Paper" on page 3-14. 10 EPSON 360 dpi Ink Jet Paper EPSON Special Coated Paper for - Epson 1520 | User Manual - Page 49
30 cards1 Then select this Media Type setting in your printer software . . . Photo Quality Ink Jet Paper EPSON 720 dpi Index Cards EPSON Photo Quality Self Adhesive See "Loading Paper in the Sheets Manual Feeder" on page 3-11. EPSON Photo Quality Banner Paper See "Loading Roll Paper" on page - Epson 1520 | User Manual - Page 50
on the Main menu. See Chapter 2 for instructions on selecting these settings. Be sure to feed a cleaning sheet through the printer after using any package of special media that comes with the cleaning sheet so you don't experience feeding problems. Printing on Special Media Additional Media Loading - Epson 1520 | User Manual - Page 51
manual feeder at the top of the printer for loading individual, large format sheets or roll paper using the optional Banner Paper Kit. (See page 3-22 for more information on the Banner Paper Kit.) Follow the instructions right edge guide. Load on the printer, but don't send a print job before you - Epson 1520 | User Manual - Page 52
on Special Media 3. Open the printer cover and set the thickness lever to the 0 position when you print on plain paper, ink jet paper, transparencies, or transfer paper. Set it to the + position when you print on envelopes, ink jet cards, or heavy paper. 0 position + position 4. Lock the output - Epson 1520 | User Manual - Page 53
Printing on Special Media If the paper is more than 14.3 inches (364 mm) wide, slide the right edge guide all the way right. left edge guide right edge guide center support 6. Slide the left edge guide to match the approximate width of your paper. Then move the center support midway between the - Epson 1520 | User Manual - Page 54
with the flap edge leading into the feeder. Then slide the left edge guide and the rear paper support guide against the edges of the envelopes. rear paper support guide For C5-size envelopes, remove the rear paper support guide and reinstall it backward, sliding it up to the edge of the envelopes - Epson 1520 | User Manual - Page 55
it forward to the edge of the cards. rear paper support guide Note: Make sure that paper isn't loaded in the manual feeder at the top of the printer before sending your print job. If paper is loaded in the manual feeder, the printer will print on it instead of the paper in the built-in sheet - Epson 1520 | User Manual - Page 56
instructions. Loading Paper in the Manual Feeder You can load one single sheet of paper in the manual feeder without removing paper from the built-in sheet feeder. Load any type of paper that is between 4.1 inches (105 mm) and 17 inches (432 mm) wide. 1. Turn on the printer, but don't send a print - Epson 1520 | User Manual - Page 57
park it out of the way. 5. If you'll be printing on paper that is 14.3 inches (364 mm) wide or less, slide the right edge guide on the manual feeder so its right edge aligns with the arrow mark on the manual feed guide. If the paper is more than 14.3 inches (364 mm - Epson 1520 | User Manual - Page 58
button to eject the paper; then load it again. 7. Now follow the instructions in Chapters 1 or 2 to select the correct Paper Source, Paper Size, and other printer software settings. Then send a one-page print job. 8. When your print job is finished, the Pause and Paper Out lights come on. Press the - Epson 1520 | User Manual - Page 59
paper can advance to the tear-off position automatically. Follow the instructions on page 5-3. Printing on Continuous Paper You can load continuous paper in the built-in tractor feeder on the back of the printer without removing paper from the built-in sheet feeder. Load any type of continuous - Epson 1520 | User Manual - Page 60
Printing on Special Media 4. Make sure the thickness lever is in the 0 position; see page 3-11 for instructions. 5. Remove the manual feeder from the top of the printer by pulling it straight back. Then set it aside. 6. Install the cable cover by inserting the three posts on the cover into the three - Epson 1520 | User Manual - Page 61
Printing on Special Media Note: The maximum printable width is 13.6 inches (345 mm) on any size paper. 9. Slide the right sprocket to the approximate width of your paper. Then position the center support midway between the two sprockets, as shown in the previous illustration. 10. Flip open both - Epson 1520 | User Manual - Page 62
rear paper support guide 15. Follow the instructions in Chapters 1 or 2 as necessary to send a print job. Be sure to select Tractor Feeder as the Paper Source option and then choose the correct Paper Size. The continuous paper loads and printing begins when the printer receives the print job - Epson 1520 | User Manual - Page 63
the auto tear-off feature is turned off (the default setting) and you're printing labels, tear off the next sheet of labels at the back of the printer. Then press the LF/FF button on the printer's control panel as many times as necessary to eject the remaining pages forward out of - Epson 1520 | User Manual - Page 64
paper-park position so it's ready for printing the next time you need it. If the ink smears on your document, set the thickness lever to the + position and reprint; see page 3-7. If your margins are not where you want them, adjust them in your application software. However, if you need to adjust - Epson 1520 | User Manual - Page 65
be corrected in your software program. You can even set separate loading positions for continuous paper, manually fed paper, or sheet-feeder fed paper. If you're using continuous paper and the perforation does not align with the printer's tear-off edge when you're done printing, you can use these - Epson 1520 | User Manual - Page 66
backward to the paper-park position so it's ready for printing the next time you need it. The tear-off position you select remains in effect until you change it again, even when you turn off the printer. For instructions on setting your printer's auto tear-off mode, see page 5-3. Switching Between - Epson 1520 | User Manual - Page 67
3-14 for paper loading instructions.) Then see the appropriate printing instructions for your software-Windows or Macintosh-in the sections that follow. Note: To print on roll paper, you need the optional EPSON Banner Paper Kit (C81101*). Contact your EPSON dealer or EPSON Accessories at the phone - Epson 1520 | User Manual - Page 68
the paper release lever is set to the single sheet position. (See page 3-6 for instructions.) 3. Remove the manual feeder from the back of the printer so you can install the banner paper holders on it. 4. Remove the edge guides from the manual feeder by pushing off their bottom edges from inside the - Epson 1520 | User Manual - Page 69
Printing on Special Media 5. Attach the banner paper holders to the front of the manual feeder by positioning the top edges first, then snapping down the bottom edges. 6. Reattach the manual feeder to the back of the printer. 3-24 - Epson 1520 | User Manual - Page 70
Printing on Special Media 7. Clip the banner paper cutting guide onto the output tray posts. Caution: Adjust the banner paper holders so they fit the roll paper snugly, but not so tightly that the roll can't rotate. If they're too tight, the paper won't feed into the printer the printer as shown - Epson 1520 | User Manual - Page 71
paper is crooked, press the Load/Eject button to unload it and try again.) 11. Before you print, raise the cutting guide to an upright position so the roll paper feeds beneath it. 12. Follow the instructions in the next sections to print your banner on either a Windows computer or a Macintosh. 3-26 - Epson 1520 | User Manual - Page 72
or other custom-size project from a Windows application: 1. Create the document in your word processor or other application software. 2. Choose Print or Print Setup from the File menu. You see a printing dialog box for your application. 3. Make sure your printer is selected, and then click the - Epson 1520 | User Manual - Page 73
3-3. (For continuous computer paper, choose Plain Paper.) Check the rest of the printer software settings as described in Chapters 1 and 2. Then click OK. 11. Click Close, OK, or Print to print your banner. 12. When it's finished printing, follow the steps on page 3-30 to remove your banner from the - Epson 1520 | User Manual - Page 74
in your word processor or other application software. 2. Choose Page Setup from the File menu. You see a dialog box like the following: Click to select your paper source Click to define a custom paper size 3. If you're printing on roll paper, select Manual Feed Slot (Banner) from the Paper Source - Epson 1520 | User Manual - Page 75
see page 3-18. Removing a Printed Banner Follow these steps to remove a printed banner using the cutting guide: 1. Lower the banner paper cutting guide over the top of the paper. 2. If you turned auto tear-off mode on (as instructed in step 1 on page 3-22), the printer automatically feeds the paper - Epson 1520 | User Manual - Page 76
you change it again, even when you turn off the printer. Printing on Special Media Press Micro Adjust D and Micro Adjust guide. cut-off position 3. Hold down the cutting guide. Then, using a sharp knife, cut straight across the paper, pressing the knife against the inside edge of the cutting guide - Epson 1520 | User Manual - Page 77
See Appendix C for optimum storage conditions. You can use the banner paper holders as your edge guides on the manual feeder, but if you want to remove and reinstall the manual feeder's original edge guides, follow steps 2 through 4 on page 3-23. Then reattach the manual feeder to the printer. 3-32 - Epson 1520 | User Manual - Page 78
mode instructions on page 5-3. If you'll be printing on continuous paper, also be sure to reset the paper release lever, as described on page 3-14. Printing a Backlit Display You can use EPSON Ink Jet Back Light Film to print crisp, translucent images for backlit display. Your printer software - Epson 1520 | User Manual - Page 79
click a series of these buttons, depending on your software.) You see the Main printer settings dialog box, as shown on page 1-2. 4. Select Ink Jet Back Light Film as the Media Type setting. This chooses the best printer driver settings for printing on back light film and automatically turns on the - Epson 1520 | User Manual - Page 80
Ink Jet Back Light Film as the Media Type setting. This chooses the best printer driver settings for printing on back light film and automatically turns on the Flip Horizontal feature so your image will appear correctly when viewed from the reverse side. 7. Check the rest of the printer software - Epson 1520 | User Manual - Page 81
provides instructions for the following: Managing print jobs with Windows 95 or 3.1 Managing print jobs with Windows NT Managing print jobs on a Macintosh Network printing on a PC Network printing on a Macintosh Managing Print Jobs with Windows 95 or 3.1 Your Windows printer software - Epson 1520 | User Manual - Page 82
when you send a job to the printer. It displays on your screen to alert you about printer and ink status. Using the Spool Manager The Spool Manager works like the Windows Print Manager. When you send a job to your printer, your printer software creates a temporary print job file, stores it in the - Epson 1520 | User Manual - Page 83
to store print job files, for example, C:\SPLTEMP. 2. Open the Spool Manager as described on page 4-2. 3. Choose Default Spool Directory from the Options menu. 4. In the dialog box, change the spool directory to the one you created in step 1. Then click OK. 5. Make sure EPSON Stylus COLOR 1520 is - Epson 1520 | User Manual - Page 84
Monitor, available only if you're using Windows 95, displays automatically in the Despooler window when you send a print job to the printer. However, you can use it at any time to see how much ink you have left. Follow these steps: 1. Access the Main printer settings dialog box as described on page - Epson 1520 | User Manual - Page 85
: 4. Check the amount of ink you have left. (For more information about the Despooler window, see page 1-7.) Managing Print Jobs with Windows NT Windows NT 4.0 servers and workstations include a messenger service to alert you to printer errors or let you know when a print job is finished. If you - Epson 1520 | User Manual - Page 86
. The Status Monitor alerts you to any problems that occur during printing. You can also use it any time to see how much ink you have left. Note: Background printing is slower and may also slow down your system. Using EPSON Monitor2 The EPSON Monitor2 utility lets you continue to work on your - Epson 1520 | User Manual - Page 87
it or just use this window to track the print job's progress. Using the Macintosh Status Monitor You can use the Status Monitor to check the level of ink in your printer and to control the way your software warns you about printer problems. Follow these steps: 1. Choose Print from the File menu or - Epson 1520 | User Manual - Page 88
Jobs and Network Printing 3. Click the Status Monitor icon. The software checks the amount of ink remaining and displays the Status Monitor: Click to control messages and warnings Click to recheck ink level 4. If you want to change printer messages and warnings, click the Configuration button - Epson 1520 | User Manual - Page 89
each system on the network using the TCP/IP (or LPR) protocol. 1. Follow the instructions to configure the interface card in the manual that came with the card. 2. To connect the printer to a TCP/IP (or LPR) port, open the Control Panel and select Printers. 3. Right-click the EPSON Stylus COLOR 1520 - Epson 1520 | User Manual - Page 90
Follow the instructions to install the LPR software and configure the interface card in the manual that came with the card. 2. To configure the printer for TCP/IP (or LPR) printing, double-click the Print Manager icon in the Main program group. 3. Select the EPSON Stylus COLOR 1520 window. 4. Choose - Epson 1520 | User Manual - Page 91
Printing Using the Printer Software's Built-in Network Support To use your printer software's built-in network support, you first need to install the printer software on all the network computers that will use the printer. See the Quick Setup booklet for instructions. Once the printer software - Epson 1520 | User Manual - Page 92
want to use your printer on a network running Windows 95, you need to set up the port and network path on the computer connected to the printer. Follow these steps: 1. Double-click My Computer. 2. Double-click the Printers folder. 3. Right-click the EPSON Stylus COLOR 1520 icon and choose Properties - Epson 1520 | User Manual - Page 93
, then specify the network path to the printer and click OK. 6. Open the Spool Manager window as described on page 4-2. 7. In the Spool Manager window, double-click your printer's queue. The Queue Setup dialog box appears. 8. Make sure the Use Print Manager for this port option is checked. Then - Epson 1520 | User Manual - Page 94
Jobs and Network Printing Assigning a Name to the Printer Follow these steps to use the EPSON Namer utility: 1. Double-click the EPSON Namer icon on your hard drive. 2. Click the EPSON Stylus(AT) icon in the Device Types window. 3. Select the AppleTalk zone where your printer is located. 4. Under - Epson 1520 | User Manual - Page 95
Jobs and Network Printing 4. Click the name you assigned to your EPSON Stylus COLOR 1520 in step 4 of the previous section. You see a prompt asking you to confirm your choice. 5. Click OK. If your printer name doesn't appear, make sure the printer is turned on and correctly connected, then click - Epson 1520 | User Manual - Page 96
require you to select from a list of available printer drivers. If EPSON Stylus COLOR 1520 is not included in the list, you can contact your software manufacturer to obtain an updated driver. If an updated driver is not available, pick the first printer available in the lists on the next page. 5-1 - Epson 1520 | User Manual - Page 97
Note: The drivers for the printers listed do not provide all EPSON Stylus COLOR 1520 features, such as 1440-dpi printing, 720-dpi printing, and MicroWeave. When printing black and color, select: EPSON Stylus 1500 EPSON Stylus Pro EPSON Stylus Pro XL EPSON Stylus COLOR 500 EPSON Stylus COLOR II LQ - Epson 1520 | User Manual - Page 98
panel. Follow the steps in the next section. Note: The printer's control panel buttons perform different functions while the printer is in defaultsetting mode. Be sure to carefully follow the instructions your printer prints and don't try to perform standard control panel functions until you - Epson 1520 | User Manual - Page 99
Both lights off French Ink Out B on and Ink Out A off Spanish Both lights on Portuguese Ink Out B flashing and Ink Out A on German Ink Out B flashing and Ink Out A off Italian Ink Out B off and Ink Out A on 5. Press the Pause button. The printer prints instructions on changing the default settings - Epson 1520 | User Manual - Page 100
you'll need to turn it off or align the print heads (see page 5-7 for instructions). For the most accurate alignment when printing graphics, select Uni-D. Courier, Roman, Sans Serif, Script Prestige, Roman T, Sans Serif H, Draft If your software doesn't let you select fonts, you can select one of - Epson 1520 | User Manual - Page 101
Your Printer with DOS Setting Software (emulation mode) Auto CR (IBM XL24E mode only) AGM (IBM XL24E mode only) Character table International character set for Italic table Auto line feed Network I/F (interface) mode 0 slash Page length Skip over perforation Options Description ESC/P 2, IBM - Epson 1520 | User Manual - Page 102
5-3 for instructions on checking your default settings. Maintaining the Printer When you're printing from DOS applications, you can perform most printer maintenance operations as they're described in Chapter 6, such as replacing the ink cartridges and cleaning or aligning the print heads from the - Epson 1520 | User Manual - Page 103
press Enter to start the program. 7. You see the EPSON Print Head Alignment Utility main screen. Make sure your printer is listed on the screen and select Next. 8. Follow the instructions on the utility screens to align your print heads. Note: Some tables contain the same characters for hex codes - Epson 1520 | User Manual - Page 104
Using Your Printer with DOS PC437 (U.S., Standard Europe) PC437 Greek (Greek) PC850 (Multilingual) PC853 (Turkish) 5-9 - Epson 1520 | User Manual - Page 105
Using Your Printer with DOS PC855 (Cyrillic) PC852 (East Europe) PC857 (Turkish) PC860 (Portuguese) 5-10 - Epson 1520 | User Manual - Page 106
Using Your Printer with DOS PC863 (Canadian-French) PC865 (Norwegian) PC866 (Russian) PC861 (Icelandic) 5-11 - Epson 1520 | User Manual - Page 107
Using Your Printer with DOS PC869 (Greek) BRASCII (Brazilian, Portuguese) Abicomp (Brazilian, Portuguese) Roman 8 5-12 - Epson 1520 | User Manual - Page 108
Using Your Printer with DOS ISO Latin 1 MAZOWIA (Poland) Code MJK (CSFR) ISO 8859-7 (Latin/Greek) 5-13 - Epson 1520 | User Manual - Page 109
Using Your Printer with DOS ISO Latin 1T (Turkish) Bulgaria (Bulgaria) PC774 (LST 1283:1993) Estonia (Estonia) 5-14 - Epson 1520 | User Manual - Page 110
Using Your Printer with DOS ISO 8859-2 PC866 LAT (Latvian) Italic No characters are available for hex code 15 in the italic character table. 5-15 - Epson 1520 | User Manual - Page 111
Using Your Printer with DOS International Character Sets You can select one of these international character sets using default-setting mode (as described on page 5-3) or the ESC R command (as described on page 5-17). When you select a character set, such as Italic France, the characters in the - Epson 1520 | User Manual - Page 112
in the next section. Using Printer Commands You can operate your printer by using commands in one of two control code modes. For the best font and graphics control, always use EPSON ESC/P 2 mode. (For details on using ESC/P 2, see the ESC/P Reference Manual available from EPSON.) If you need to - Epson 1520 | User Manual - Page 113
, SI, ESC w, ESC G, ESC H, ESC T, ESC S, ESC -, ESC ( -, ESC q Spacing: ESC SP, ESC c, ESC ( U Character handling: ESC t, ESC ( t, ESC R, ESC %, ESC &, ESC :, ESC 6, ESC 7, ESC ( ^ Bit image: ESC * Graphics: ESC ( G, ESC ., ESC ( e, ESC ( i, ESC ( \, ESC ( s Color: ESC r, ESC ( r Printing mode: ESC - Epson 1520 | User Manual - Page 114
as part of the command. General operation: NUL, DC3, ESC j, BEL, CAN, DC1, ESC Q, ESC [ K, ESC U Paper feeding: FF, LF, ESC 5, ESC A, ESC A (AGM), ESC 0, ESC 1, ESC 2, ESC 3, ESC 3 (AGM), CR Page format: ESC C, ESC X, ESC N, ESC O, ESC 4 Print position motion: ESC d, ESC R, ESC D, HT, ESC B, VT, ESC - Epson 1520 | User Manual - Page 115
EPSON Stylus COLOR 1520 printer working at its best. All you have to do is follow the simple instructions in this chapter for replacing ink cartridges, performing routine maintenance, and moving the printer. This chapter covers the following procedures: Cleaning the print heads Replacing an ink - Epson 1520 | User Manual - Page 116
clean the color print head, make sure the Ink Out A light is off. 3. Access the Main printer settings dialog box as described in Chapter 1. 4. Click the Utility tab (Windows) or the Utility button (Macintosh). You see the Utility menu. 5. Click the Head Cleaning icon. 6. Follow the instructions on - Epson 1520 | User Manual - Page 117
. Maintenance and Transportation Using the Control Panel 1. Make sure the printer is turned on and not printing. 2. To clean the black print head, make sure the Ink Out B light is off. To clean the color print head, make sure the Ink Out A light is off. 3. Press the Pause button. The Pause light - Epson 1520 | User Manual - Page 118
, clean the print heads again, as explained in the previous sections. Caution: For best results, don't replace an ink cartridge unless its Ink Out light is flashing or on. To ensure good results, use genuine EPSON cartridges and do not refill them. Other products may cause damage to your printer - Epson 1520 | User Manual - Page 119
come on. 3. Remove the new ink cartridge from its packaging. Then completely remove the yellow portion of the tape seal as shown: black cartridge color cartridge 4. Hold down the Alt button on the printer's control panel for about three seconds. The print heads move slightly left and the Pause - Epson 1520 | User Manual - Page 120
it, even if it contains ink. 8. Press down the ink cartridge clamp until it locks in place. 9. Press the Alt button and close the printer cover. The printer moves the print heads and begins charging the ink delivery system. (Even if you don't press the button, ink charging begins 60 seconds after - Epson 1520 | User Manual - Page 121
. To switch back to color printing, follow the steps beginning on page 6-4 to replace the color ink cartridge. Then turn the printer off and on again to reset color printing mode. Before you print, be sure to set the Ink setting to Color in your printer software as described in Chapters 1 and - Epson 1520 | User Manual - Page 122
If you're using a Windows or Macintosh computer connected directly to the printer, you can use the Print Head Alignment utility in your printer software, as described below. If you're printing from DOS, you can use the DOS Print Head Alignment utility. See page 5-7 for instructions. If you're - Epson 1520 | User Manual - Page 123
and Ink Out A off Italian Ink Out B off and Ink Out A on 5. Press the Pause button. The printer prints instructions on aligning the print heads using the control panel. 6. Follow the instructions on the sheet. When the print heads are aligned, turn off the printer to exit print head alignment - Epson 1520 | User Manual - Page 124
Notice Sheet that was packed with the printer. Be sure to keep the printer level, in an upright position, as you transport it. If print quality declines after transporting the printer, clean the print heads; if output is misaligned, align the print heads. See the instructions in this chapter. 6-10 - Epson 1520 | User Manual - Page 125
panel. See page 1-13 for instructions. You can also use the Status Monitor utility to identify common problems. For instructions, see page 4-4 (Windows 95) or page 4-7 (Macintosh). To determine whether the problem is caused by the printer itself, run a printer self test. See the next section - Epson 1520 | User Manual - Page 126
Troubleshooting If you're experienced with reading hexadecimal code, you can print a hex dump to identify possible communication problems. See page 7-3 for instructions. For the latest information, check the EPSON Stylus COLOR 1520 Help program and the ReadMe file in the EPSON program group or - Epson 1520 | User Manual - Page 127
code, you can print a hex dump to pinpoint communication problems between your computer and printer. Then you can interpret the code yourself or report the results to a support technician. 1. Load several sheets of paper in the built-in sheet feeder, making sure the right edge guide is positioned - Epson 1520 | User Manual - Page 128
print head nozzles are Clean the print heads. See Chapter 6 for instructions. clogged. The ink cartridges are low Check the Ink Out B and Ink Out A lights to see which cartridge on ink. you may need to replace. See Chapter 6. The MicroWeave option is Turn on MicroWeave in the printer software - Epson 1520 | User Manual - Page 129
Clean the print heads. See Chapter 6 for instructions. clogged. The ICM (Windows 95) or ColorSync (Macintosh) settings are incorrect for your document. Use the Automatic mode setting or choose a different project type setting. See Chapter 2 for more information. The ink cartridges are low on ink - Epson 1520 | User Manual - Page 130
be able to adjust various color settings in your application software. See your software documentation for more information. The printed image is faint or has gaps. Possible cause Solution The print head nozzles are Clean the print heads. See Chapter 6 for instructions. clogged. The Media Type - Epson 1520 | User Manual - Page 131
color ink cartridge following the instructions in Chapter 6. Turn off High Speed mode following the instructions in Chapter 2. (If you're printing with DOS, turn off Bi-D printing in default-setting mode; see Chapter 5.) Then align the print heads following the instructions in Chapter 6 (for Windows - Epson 1520 | User Manual - Page 132
Troubleshooting Solving Printing Problems If the printer won't print, first check that: The printer is turned on and the Operate light is on. Paper is loaded in the printer. The printer is securely plugged into a working electrical outlet that's not controlled by a switch or timer. The - Epson 1520 | User Manual - Page 133
, EPSON folder, and Spool folder. Then delete any queued files. If the printer sounds like it's trying to print but nothing prints, clean the print heads; see Chapter 6 for instructions. If cleaning doesn't help, replace the cartridges. For information on cartridge life and replacement instructions - Epson 1520 | User Manual - Page 134
you turn it back on, contact EPSON as described in the Introduction. The printer sounds like it's printing but nothing prints. Possible cause Solution The print head nozzles are Clean the print heads. See Chapter 6 for instructions. clogged. The ink cartridges are too old. For information on - Epson 1520 | User Manual - Page 135
Troubleshooting You see a spooling error message (Windows 95/3.1). Possible cause Spooling error messages or very slow printing may be caused by temporary files. Solution Change the Spool Manager default directory, following the instructions in Chapter 4. Your hard drive is too full. Delete - Epson 1520 | User Manual - Page 136
EPSON Monitor2 and EPSON Stylus Color, and restart your Macintosh. Printing is too slow. Possible cause Your printer software options are set incorrectly. Your system doesn't have enough resources. You're using background printing on a Macintosh. Your Spool Manager settings are incorrect (Windows - Epson 1520 | User Manual - Page 137
Troubleshooting Fixing Paper Problems You can avoid most paper handling problems by doing the following: Use smooth, high-quality media designed for ink jet printers release lever is set to the single sheet position. The edge guides fit the paper's width snugly, but not too tightly. No - Epson 1520 | User Manual - Page 138
Troubleshooting Paper doesn't feed correctly from the manual feeder. Try this Remove the paper from the manual feeder. Then do this eject any sheets.) Before printing, check that: The paper source and paper size are set correctly in your application or printer software. If you're using DOS - Epson 1520 | User Manual - Page 139
Troubleshooting much paper for your media type and feeder. Adjust the edge guides or sprockets to fit the width of your paper snugly, but not your application software, printer software, or default-setting mode. (See the paper specifications in Appendix C for the paper sizes you can print with.) - Epson 1520 | User Manual - Page 140
printer software for each DOS application you use, as in your DOS applications. described in Chapter 5. Printing is stalled in Spool Manager (Windows 95/3.1) or in the Windows NT print queue. Delete the stalled print jobs in Spool Manager or the Windows NT print queue following the instructions - Epson 1520 | User Manual - Page 141
print head nozzles are Clean the print heads following the instructions in Chapter 6. clogged. Paper settings in the printer Select the correct paper settings for your paper size. See software are incorrect for Chapters 1 and 2 for more information. your paper size. Your printer is not the Windows - Epson 1520 | User Manual - Page 142
A Using Optional Interfaces Your EPSON Stylus COLOR 1520 includes both parallel and serial interfaces so you can connect it to a PC or Macintosh, or both at the same time. If you want to connect to another system or to a network, you can install an optional interface board. You can install one of - Epson 1520 | User Manual - Page 143
terminator. The Ethernet transceiver is included on the EPSON Ethernet board, so you don't need an adapter box for the printer. Using the PC Serial Interface Board Before you install the serial interface board in your printer, follow the instructions that come with the board for setting the baud - Epson 1520 | User Manual - Page 144
any interface cables from the back of the printer. 3. Use a Phillips-head screwdriver to remove the two screws securing the interface cover. Then lift off the cover. 4. Set any switches and jumpers on the interface board as described in its manual. If your board has a jumper labeled JG, make - Epson 1520 | User Manual - Page 145
detects the interface you're using. However, if you have trouble printing through an installed interface board, you may need to change the printer's I/F (interface) mode setting using default-setting mode. See page 5-3 for instructions. To remove the interface board, first follow steps 1 and 2 in - Epson 1520 | User Manual - Page 146
the program and print with EPSON Plot! and your Windows printer driver. You can install and use EPSON Plot! on any system running Windows 3.1, Windows 95, or Windows NT (3.51 or 4.0). Make sure to connect the printer to that system and install the printer software following the instructions in the - Epson 1520 | User Manual - Page 147
to prepare for printing: Install the EPSON Stylus COLOR 1520 Windows printer software on the computer connected to the printer. (See the Quick Setup booklet for instructions.) Turn on the printer. Create an HPGL or HPGL/2 plot file using your plotter software on any system. Copy that plot - Epson 1520 | User Manual - Page 148
in the printer software may resize your image differently than it is displayed in EPSON Plot!. 4. Select Printer Setup from the File menu. 5. Select the EPSON Stylus COLOR 1520 printer, if necessary, and click Options. You see the Main printer settings menu. 6. Follow the instructions in Chapters - Epson 1520 | User Manual - Page 149
plot file looks how you want it to, select Print from the File menu. 10. Click OK to print the file on your EPSON Stylus COLOR 1520. See Chapters 1 and 4 for information on managing the print job while it prints. 11. When you're finished printing with EPSON Plot!, select Exit from the File menu to - Epson 1520 | User Manual - Page 150
ink jet Monochrome (black) 128 nozzles Color (cyan, magenta, yellow) 192 nozzles, 64 of each color Character pitch Draft printing LQ printing (characters per inch) Printing for text and graphics. (Auto print direction can be set in default-setting mode.) ESC/P 2 and expanded raster graphics code - Epson 1520 | User Manual - Page 151
ESC/P 2 commands as described on page 5-17. Scalable fonts Font Minimum point size EPSON Roman 8 EPSON Sans Serif 8 EPSON Roman T 8 EPSON Sans Serif H 8 Maximum point size 32 32 32 32 Increments 2 2 2 2 Note: The printer always uses the fonts you selected with your software application - Epson 1520 | User Manual - Page 152
× 364 mm) B5 (182 × 257 mm) Plain bond paper and 0.0025 to 0.004 inch special ink jet papers (0.065 to 0.11 mm) distributed by EPSON Built-in sheet feeder: 17 to 24 lb (64 to 90 g/m2) Manual feeder: 14 to 24 lb (52 to 90 g/m2) Minimum size each sheet: Plain paper 4 to - Epson 1520 | User Manual - Page 153
of any non-EPSON brand or type of paper. Always test samples of paper stock before purchasing large quantities or printing large jobs. Poor quality paper may reduce print quality and cause paper jams and other problems. If you encounter problems, switch to a higher grade of paper. Ink jet paper - Epson 1520 | User Manual - Page 154
on how often you clean the print head. ** It thaws and is usable after approximately 3 hours at 77 °F (25 °C). Caution: To ensure good results, use genuine EPSON ink cartridges. Other products may cause damage to your printer not covered by EPSON's warranty. Don't use an ink cartridge if the date - Epson 1520 | User Manual - Page 155
Paper feed method Paper path Sheet feeder capacity Total print volume Dimensions Storage Printing Weight Friction, tractor feeder Sheet feeder, front entry Manual feeder, rear entry Tractor feeder, rear entry 100 sheets of 17 lb (64 g/m2) paper For detailed information, see Chapter 3. 75,000 - Epson 1520 | User Manual - Page 156
Serial interface Specifications UL 1950 with D3, CSA C22.2 950 with D3 FCC part 15 subpart B class B Data format: 8-bit parallel, IEEE-1284 compatibility mode Stop bit: 1 bit Connector: 8-pin mini-circular connector Recommended cable: Apple System Peripheral-8 cable (preferably Belkin brand) C-7 - Epson 1520 | User Manual - Page 157
images with solid colors, such as charts and graphs. See also halftoning. Dots per inch. The dpi measures the resolution. See also resolution. A software program that sends instructions to a computer device to tell it what to do. For example, your printer driver accepts print data from your word - Epson 1520 | User Manual - Page 158
all EPSON printers and supported by most application programs for personal computers. The enhanced version of the ESC/P printer command language. Commands in this language produce laser-like features, such as scalable fonts and enhanced graphics printing. This printer driver setting automatically - Epson 1520 | User Manual - Page 159
fine increments to reduce the possibility of banding. See also banding. monochrome This means printing with only one color of ink, which is generally black ink. parallel interface See interface. print queue Print jobs that are sent to the printer while it is busy are stored in a waiting line, or - Epson 1520 | User Manual - Page 160
Manager Status Monitor subtractive colors See interface. The process by which the printer driver converts the print data into codes that your printer understands. This data is then sent to the printer directly or to the print server. An EPSON software program that converts print data into codes - Epson 1520 | User Manual - Page 161
1-14 C Cable cover, 3-15 Cancelling changes, printer software, 1-4, 1-9 Canvas cloth, see Ink Jet Canvas Cloth Cards, see Ink jet cards Character tables, 5-6, 5-8 to 5-17, C-2 Characters, incorrect or garbled, 7-16 Cleaning print heads, 6-1 to 6-4, 7-4 printer, 6-10 sheet, special media, 3-5 Coarse - Epson 1520 | User Manual - Page 162
5-19 selecting printer software for, 5-1 to 5-2 using printer with, 5-1 to 5-19 Download Service, EPSON, 6 Draft printing, 2-3, 2-5 E Economy settings, 2-3, 2-5, 7-4 Electrical specifications, C-6 Electronic support services, EPSON, 5 to 6 Empty color ink cartridge, printing with, 6-7, 7-7 Emulation - Epson 1520 | User Manual - Page 163
margins, 7-17 Index cards, see Ink jet cards Ink monitoring level, 1-7 to 1-8, 4-5, 4-8 setting, 1-3, 1-11, 2-2, 2-5, 6-7 Ink cartridge printing with empty color, 6-7 problems, 7-4, 7-7, 7-9 to 7-10 replacing, 6-4 to 6-7, 7-4 specifications, C-5 Ink Jet Back Light Film choosing, 3-3 to - Epson 1520 | User Manual - Page 164
11 Magenta setting, 2-9 Maintaining printer, 6-1 to 6-10 Managing print jobs Macintosh, 4-6 to 4-8 Windows 3.1 or 95, 1-7, 4-1 to 4-5 Windows NT, 1-8, 4-5 Manual feeder, 3-11 to 3-13, 7-14 Manuals, how to use, 3 to 4 Margins adjusting, 3-10, 3-13, 3-19 problems, 7-17 specifications, C-4 to C-5 with - Epson 1520 | User Manual - Page 165
head cleaning, 6-1 to 6-4, 7-4 Print jobs, managing Macintosh, 4-6 to 4-8 Windows 3.1 or 95, 1-7, 4-1 to 4-5 Windows NT, 1-8, 4-5 Print quality problems, 7-4 to 7-7 Print Quality setting, 2-4 to 2-6 Print Using a Temporary File setting, 2-7 Printable area, 3-6, 3-16, C-4 to C-5 columns, C-1 Printer - Epson 1520 | User Manual - Page 166
cartridge, C-5 interface, C-7 mechanical, C-6 paper, C-3 to C-5 printing, C-1 to C-2 Spool directory, 4-3 to 4-4 Spool Manager problems, 7-8, 7-11 to 7-12, 7-16 using, 4-2 to 4-4 Status Monitor Macintosh, 4-7 to 4-8 problems, 7-1, 7-11 Windows, 1-7 to 1-8, 4-4 to 4-5 Support, EPSON, 5 to 6 System - Epson 1520 | User Manual - Page 167
printer, 6-10 Troubleshooting, 7-1 to 7-17 Twinax interface board, A-1 U User Defined paper size, 3-28 to 3-30 Utilities EPSON Namer, 4-14 EPSON Plot!, 1, B-1 to B-4 Head Cleaning, 6-2 Monitor2, 4-6 to 4-7, 7-9, 7-16 Nozzle Check, 6-2 to 6-4 Print Head Alignment, see Print head alignment
-
 1
1 -
 2
2 -
 3
3 -
 4
4 -
 5
5 -
 6
6 -
 7
7 -
8
-
9
-
10
-
11
-
12
-
13
-
14
-
15
-
16
-
17
-
18
-
19
-
20
-
21
-
22
-
23
-
24
-
25
-
26
-
27
-
28
-
29
-
30
-
31
-
32
-
33
-
34
-
35
-
36
-
37
-
38
-
39
-
40
-
41
-
42
-
43
-
44
-
45
-
46
-
47
-
48
-
49
-
50
-
51
-
52
-
53
-
54
-
55
-
56
-
57
-
58
-
59
-
60
-
61
-
62
-
63
-
64
-
65
-
66
-
67
-
68
-
69
-
70
-
71
-
72
-
73
-
74
-
75
-
76
-
77
-
78
-
79
-
80
-
81
-
82
-
83
-
84
-
85
-
86
-
87
-
88
-
89
-
90
-
91
-
92
-
93
-
94
-
95
-
96
-
97
-
98
-
99
-
100
-
101
-
102
-
103
-
104
-
105
-
106
-
107
-
108
-
109
-
110
-
111
-
112
-
113
-
114
-
115
-
116
-
117
-
118
-
119
-
120
-
121
-
122
-
123
-
124
-
125
-
126
-
127
-
128
-
129
-
130
-
131
-
132
-
133
-
134
-
135
-
136
-
137
-
138
-
139
-
140
-
141
-
142
-
143
-
144
-
145
-
146
-
147
-
148
-
149
-
150
-
151
-
152
-
153
-
154
-
155
-
156
-
157
-
158
-
159
-
160
-
161
-
162
-
163
-
164
-
165
-
166
-
167
 |
 |

User’s Guide
Printed on recycled paper with at least 10% post-consumer content.