Epson 7900p Supplemental / Late Breaking Information
Epson 7900p - PowerLite XGA LCD Projector Manual
 |
UPC - 010343852464
View all Epson 7900p manuals
Add to My Manuals
Save this manual to your list of manuals |
Epson 7900p manual content summary:
- Epson 7900p | Supplemental / Late Breaking Information - Page 1
EPSON® Lens Installation Installing an optional lens in the no-lens model of your PowerLite® projector CPD-18790 - Epson 7900p | Supplemental / Late Breaking Information - Page 2
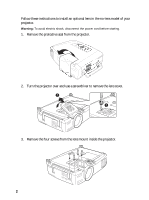
Follow these instructions to install an optional lens in the no-lens model of your projector. Warning: To avoid electric shock, disconnect the power cord before starting. 1. Remove the protective seal from the projector. 2. Turn the projector over and use a screwdriver to remove the lens cover. 3. - Epson 7900p | Supplemental / Late Breaking Information - Page 3
rear caps from the new lens. 5. Lower the lens into the projector, making sure the focus and zoom knobs face downward so they fit through the slot in the projector's case. Caution: Make sure to support the front of the lens and keep it level, or you could damage the guide pins. Also, use care not - Epson 7900p | Supplemental / Late Breaking Information - Page 4
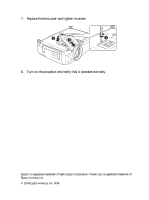
7. Replace the lens cover and tighten its screw. 8. Turn on the projector and verify that it operates normally. Epson is a registered trademark of Seiko Epson Corporation. PowerLite is a registered trademark of Epson America, Inc. © 2004 Epson America, Inc. 8/04 4 - Epson 7900p | Supplemental / Late Breaking Information - Page 5
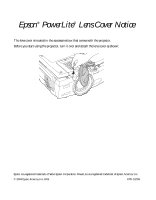
accessories box that comes with the projector. Before you start using the projector, turn it over and attach the lens cover as shown: Epson is a registered trademark of Seiko Epson Corporation. PowerLite is a registered trademark of Epson America, Inc. © 2004 Epson America, Inc. 8/04 CPD-18789
-
 1
1 -
 2
2 -
 3
3 -
 4
4 -
 5
5
 |
 |

Lens Installation
Installing an optional lens in the no-lens model
of your PowerLite projector
CPD-18790
®
EPSON
®