Epson 875DC Product Information Guide
Epson 875DC - Stylus Photo Color Inkjet Printer Manual
 |
View all Epson 875DC manuals
Add to My Manuals
Save this manual to your list of manuals |
Epson 875DC manual content summary:
- Epson 875DC | Product Information Guide - Page 1
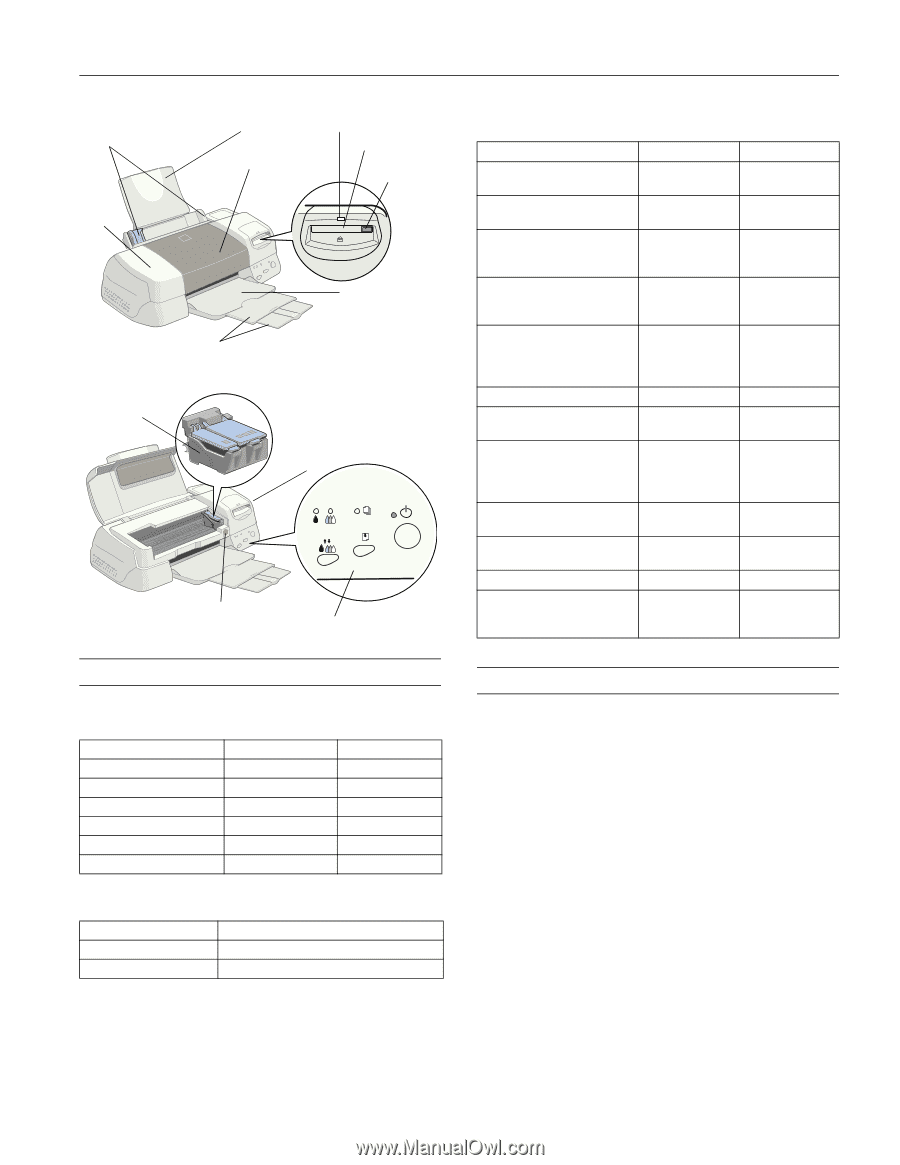
EPSON Stylus Photo 875DC edge guides printer cover paper support card access light memory card slot printer cover window card eject lever output tray extensions ink cartridge holders (not removable) output tray thickness lever ink cartridge replacement button control panel Accessories - Epson 875DC | Product Information Guide - Page 2
(14.0 mm). * You can extend the minimum bottom margin to 0.12 inch (3.0 mm) by selecting Maximum as the Printable Area setting. However, print quality may decline in the expanded area. Before printing large jobs, print a single sheet to confirm print quality. 3 - EPSON Stylus Photo 875DC 4/00 - Epson 875DC | Product Information Guide - Page 3
is based on continuous printing after ink replacement. Actual print capacity may vary, depending on how often you turn on the printer and clean the print head. ***Ink thaws and is usable after approximately 3 hours at 77 °F (25 °C). To ensure good results, use genuine EPSON cartridges and do not - Epson 875DC | Product Information Guide - Page 4
ink will leak out. t Don't touch the green chip on the back of the cartridge. This may inhibit normal operation and printing. t Never turn off the printer when the P power light is flashing, unless the printer hasn't moved or made any noise for more than five minutes. 5 - EPSON Stylus Photo 875DC - Epson 875DC | Product Information Guide - Page 5
immediately with water. Before you begin, make sure the printer is plugged into an electrical outlet and turned on. 1. Lower the output tray and open the cover. orange ink cartridge replacement button EPSON Stylus Photo 875DC 4. Tilt each cartridge forward slightly as you lower it into its holder - Epson 875DC | Product Information Guide - Page 6
EPSON Stylus Photo 875DC 4. Hold down the E load/eject button, then press and release the Ppower button. Continue holding down the E load/eject button until the Ppower light starts to flash, then release it. The printer prints one page showing its ROM version number, ink counter, and a nozzle check - Epson 875DC | Product Information Guide - Page 7
card slot (see "Removing the Memory Card"). 2. Windows: Click Start, point to Programs, EPSON USB RW Switcher, and select EPSON USB RW Switcher. Macintosh: Open the EPSON USB RW Switcher folder on your hard drive. Double-click the EPSON USB RW Switcher icon. 4/00 EPSON Stylus Photo 875DC - 8 - Epson 875DC | Product Information Guide - Page 8
and aligning the print head, you can replace one or both cartridges. To check the level of ink you have left, see the graphic in the printer driver (Windows) or click the ink level icon in the printer driver or EPSON Monitor 3 utility (Macintosh). You cannot print if either ink cartridge is empty - Epson 875DC | Product Information Guide - Page 9
EPSON Stylus Photo 875DC Follow these steps to replace ink cartridges: 1. Make sure the printer is turned on and not printing (the Ppower light should be on, but not flashing). 2. Check the B black and A color ink out lights to see which ink cartridge you need to replace. 3. Open the printer cover - Epson 875DC | Product Information Guide - Page 10
an ink out light is flashing, replace the ink cartridge instead.) 2. If you have an application running, access the printer settings dialog box. Or, with Windows, click Start, point to Settings, then select Printers. Right-click your EPSON Stylus Photo 875DC printer icon in the Printers window. Then - Epson 875DC | Product Information Guide - Page 11
EPSON Stylus Photo 875DC Using the Control Panel to Clean the Print Head Follow these steps to clean the print head: 1. Make sure the printer is turned on but not printing, and both the B black and A color ink out lights are off. (If an ink out light is flashing, replace the ink cartridge instead.) - Epson 875DC | Product Information Guide - Page 12
test your printer. If you notice a decline in print quality, clean the print head (see page 11); if output is misaligned, align the print head (see page 12). Related Documentation TM-SP875DC PL-SP875DC CPD-9809 CPD-9810 CPD-10109 CPD-9811 EPSON Stylus Photo 875DC Service Manual EPSON Stylus Photo
-
 1
1 -
 2
2 -
 3
3 -
 4
4 -
 5
5 -
 6
6 -
 7
7 -
8
-
9
-
10
-
11
-
12
 |
 |
EPSON Stylus Photo 875DC
4/00
EPSON Stylus Photo 875DC
- 2
Accessories
User Replaceable Parts
Ink Cartridges
Media
Printer Specifications
Printing
Printing method
6-color (CMYKcm) drop on-demand
Micro Piezo
™
ink jet printing
Nozzle configuration
Black
48 nozzles
Color
240 nozzles
(48 each: cyan, magenta, yellow, light cyan,
light magenta)
Resolution
Maximum 1440
×
720 dpi
Print direction
Bidirectional with logic seeking
Control code
ESC/P Raster,
™
EPSON Remote
Input buffer
256KB
Standard interface
USB
Paper capacity
Input paper tray: 100 sheets/10 envelopes
Output paper tray: 30 sheets
Part name
Reference number
Part number
Printer cover
101
1050507
Paper support
102
1040615
Printer cover window
110
1049929
Logo plate B
115
1053917
PC card cover
140
1050514
CompactFlash
™
adapter
336
2034142
Cartridge
Part number
Black (Standard Capacity)
U.S.: T007201; Canada: T007311
Color
U.S.: T008201; Canada: T008311
printer cover window
edge
guides
paper support
output tray
extensions
output tray
thickness
lever
control panel
ink cartridge holders
(not removable)
ink cartridge
replacement button
card access light
memory card slot
card eject
lever
printer
cover
Media name
Size
Part number
EPSON 360 dpi Ink Jet Paper
Letter
A4
S041060
S041059
EPSON High Quality Ink Jet
Paper
Letter
A4
S041111
S041117
EPSON Photo Quality Ink Jet
Paper
Letter
Legal
A4
S041062
S041067
S041061
EPSON Photo Quality Glossy
Film
Letter
A6
A4
S041072
S041107
S041071
EPSON Photo Paper
Letter
4
×
6 inches
Panoramic
A4
S041141
S041134
S041145
S041140
EPSON Ink Jet Transparencies
Letter
S041064
EPSON Photo Quality Ink Jet
Cards
A6
S041054
EPSON Photo Stickers Kit
(CD-ROM and paper)
EPSON Photo Stickers
(refill, paper only)
A6, 16 frames per
sheet
A6, 16 frames per
sheet
S041144-KIT
S041144
EPSON Iron-On Cool Peel
Transfer Paper
Letter
S041153/S041155
EPSON Photo Quality Self
Adhesive Sheets
A4
S041106
Matte Paper - Heavyweight
Letter
S041257
EPSON Premium Glossy Photo
Paper
Letter
Roll (3.9 inches
×
26.2 feet)
S041286
S041302