Epson AcuLaser CX11N Basics
Epson AcuLaser CX11N Manual
 |
View all Epson AcuLaser CX11N manuals
Add to My Manuals
Save this manual to your list of manuals |
Epson AcuLaser CX11N manual content summary:
- Epson AcuLaser CX11N | Basics - Page 1
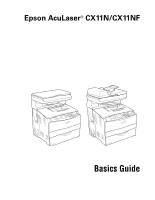
Epson AcuLaser® CX11N/CX11NF Basics Guide - Epson AcuLaser CX11N | Basics - Page 2
Epson Corporation's operating and maintenance instructions. Seiko Epson Corporation shall not be liable for any damages or problems Epson encourages each user to be responsible and respectful of the copyright laws when using printers, digital cameras, and scanners. Trademarks Epson, Epson AcuLaser - Epson AcuLaser CX11N | Basics - Page 3
Your Software 6 2 Handling Paper and Originals Loading Paper 7 Selecting Your Paper Source 12 Selecting a Paper Tray 12 Placing Originals for Copying and Scanning 14 3 Printing Printing in Windows 19 Printing in Macintosh 23 Using Epson Status Monitor 3 29 Canceling Printing 32 Network - Epson AcuLaser CX11N | Basics - Page 4
the Product Parts 79 Consumable Replacement Messages 81 Replacing a Toner Cartridge 82 Replacing the Photoconductor 86 Cleaning the CX11N 91 Ordering Parts Online 97 8 Solving Problems Status and Error Messages 99 Printing Problems 102 Scanning Problems 105 Copying Problems 109 Paper - Epson AcuLaser CX11N | Basics - Page 5
use your Epson AcuLaser CX11N. It also tells you how to maintain it and troubleshoot problems. For instructions on setting up your product and installing your software, see your Start Here sheet. For information on configuring your product to work on a network see your on-screen Network Guide. You - Epson AcuLaser CX11N | Basics - Page 6
■ Your scanner software lets you scan from your computer and control how your scans look. You can't scan without it. Tip: It's a good idea to check Epson's support web site periodically for free updates to your Epson AcuLaser CX11N software. Visit http://support.epson.com. Download instructions are - Epson AcuLaser CX11N | Basics - Page 7
to load paper, select paper types, and place originals on the document table for scanning and copying. Loading Paper You can load paper in the MP (multi-purpose) . 2. Pinch the knob and paper guide together, then slide the right paper guide outward. MP tray cover Handling Paper and Originals 7 - Epson AcuLaser CX11N | Basics - Page 8
: When loading paper, do not exceed the maximum stack height marker inside the paper guide. 4. Close the MP tray cover. Note: After loading paper, press the Setup button on the control panel, press the r button to select Printer Settings, press the d button to select Tray Menu, and match the MP Tray - Epson AcuLaser CX11N | Basics - Page 9
Using the Optional 500-Sheet Paper Cassette Unit Follow these steps to load paper into the optional Paper Cassette Unit: 1. Pull out the optional paper cassette. 2. Pinch the knob in the front as you slide the paper guides outward. Loading Paper 9 - Epson AcuLaser CX11N | Basics - Page 10
the short edge first and the printable surface facing up. Note: When loading paper, do not exceed the maximum stack height marker inside the paper guide. 4. Pinch the knob in the front as you slide the paper - Epson AcuLaser CX11N | Basics - Page 11
in. Note: After loading paper, press the Setup button on the control panel, press the r button to select Printer Settings, press the d button to select Tray Menu, and match the LC Tray Size and LC Type settings (Lower Cassette) with the loaded paper size. Removing Printouts From the Output Tray The - Epson AcuLaser CX11N | Basics - Page 12
source manually or set up automatic paper source detection (recommended). ■ To manually select a paper source for Windows, access the printer driver properties Recycled paper, Colored paper, Transparencies, Labels, Extra thick, Coated Plain paper, Letterhead, Recycled paper, Colored paper Note: You - Epson AcuLaser CX11N | Basics - Page 13
MP Tray The MP tray can hold the following types and sizes of paper. Paper type Plain paper Semi-thick paper Envelopes Labels Thick paper Extra thick paper Paper size A4, A5, B5, Letter (LT), Government Letter (GLT), Half Letter (HLT), Legal (LGL), Government Legal (GLG), F4, Executive (EXE) - Epson AcuLaser CX11N | Basics - Page 14
The optional Paper Cassette Unit can hold the following types and sizes of paper. Paper Type Plain paper Paper Size A4, Letter (LT) Capacity Up to 500 sheets in a cassette Total stack thickness: 2.2 in. Placing Originals for Copying and Scanning You can place originals on either the document - Epson AcuLaser CX11N | Basics - Page 15
Placing Originals on the Document Table Before scanning or copying, make sure the transportation lock on the left side of the document table is set to the unlock position. Always keep the document table clean. 1. Open the document cover and place your original face-down on the glass as shown, in the - Epson AcuLaser CX11N | Basics - Page 16
Placing Large or Thick Originals (CX11N Only) When you scan large or thick originals, you can remove the document cover. Just open it and pull it straight up. If you need to press the document flat while you copy or scan it, do not press too hard and be careful not to move it. Caution - Epson AcuLaser CX11N | Basics - Page 17
Size Capacity B5, A4, Letter (LT), Legal (LGL) Up to 50 sheets (Total stack thickness: 0.4 in.) 1. Slide the edge guides all the way outward. 2. Arrange your originals so the page you want scanned or copied first is on the top of the stack. Note: Pages are fed from the top and ejected - Epson AcuLaser CX11N | Basics - Page 18
18 Handling Paper and Originals - Epson AcuLaser CX11N | Basics - Page 19
You can print documents using Windows or Macintosh OS X 10.2.4 to 10.4.x. This chapter tells you how to select print settings, print, and monitor your print job. Printing in Windows See these sections for instructions on selecting printer settings in Windows: ■ "Printing From an Application" below - Epson AcuLaser CX11N | Basics - Page 20
2. Make sure EPSON AL-CX11 Advanced is selected. 3. Click the Properties or Preferences button. (If you see a Setup, Printer, or Options button, click it. Then click Properties or Preferences on the next screen.) You see the Basic Settings window: 4. Make sure Automatic is selected. 5. Select from - Epson AcuLaser CX11N | Basics - Page 21
-sided, select Duplex (Manual). 9. Click OK. 10. At the Print window, click OK or Print to start printing. Customizing Windows Print Settings If you a Setup, Printer, or Options button, click it. Then click Properties or Preferences on the next screen.) You see the basic print settings window. - Epson AcuLaser CX11N | Basics - Page 22
the type of document or image you want to print. Other settings-such as Resolution, Screen, and Color Management-are set automatically. 5. Click More Settings. 6. Choose Color or Black as the Color setting. Choose a desired resolution from 300 dpi to 600 dpi using the Resolution slider. Note: This - Epson AcuLaser CX11N | Basics - Page 23
8. Click OK. 9. At the Print window, click OK or Print to start printing. Printing in Macintosh See these sections for instructions on selecting printer settings in Mac OS X: ■ "Printing From an Application" below ■ "Customizing Mac OS X Print Settings" on page 26 Printing From an Application After - Epson AcuLaser CX11N | Basics - Page 24
6. Open the File menu and select Print. You see a window like this one: Select AL-CX11 7. Select AL-CX11 from the Printer pop-up menu. 8. Select Printer Settings from the pop-up menu. Select Printer Settings Click Automatic Select a Resolution 9. Make sure the Paper Type and Paper Size settings - Epson AcuLaser CX11N | Basics - Page 25
Handling: Select page printing options, such as Reverse print order. ■ ColorSync or Color Management: Select ColorSync,® or adjust the color controls, change the gamma setting, or turn off color adjustments in the printer software. ■ Summary: View a list of all your selections. 13. To save your - Epson AcuLaser CX11N | Basics - Page 26
Hold to pause printing ■ Click a print job marked "Hold" and click Resume to resume printing 16. When you are finished, close the printer window or Print Center. Customizing Mac OS X Print Settings If you need more control over your printout or want to make detailed settings, you can customize print - Epson AcuLaser CX11N | Basics - Page 27
most appropriate setting from the predefined list for the type of document or image you want to print. Other settings such as Resolution, Screen, and Color Management are set automatically. Printing in Macintosh 27 - Epson AcuLaser CX11N | Basics - Page 28
5. Click More Settings. The following window appears: Note: For more information about printer settings, click the ? button. 6. Select Color or Black as the Color setting. 7. Choose a printing Resolution (either Fast [300 dpi] or Fine [600 dpi]). 8. Click OK to return to the Basic Settings screen. - Epson AcuLaser CX11N | Basics - Page 29
and displays information about your paper and toner status. Windows Note: Windows XP users ■ Shared Windows XP LPR connections and shared Windows XP Standard TCP/IP connections with Windows clients do not support the Job Management function. ■ EPSON Status Monitor 3 is not available when printing - Epson AcuLaser CX11N | Basics - Page 30
3. Click EPSON Status Monitor 3. You see a window like this: You can monitor printer status and see information on toner levels, paper levels, and the remaining life of the photoconductor. Note: This screen may vary depending on your operating system version. Macintosh 1. Open the File menu and - Epson AcuLaser CX11N | Basics - Page 31
2. Select Printer Settings from the pop-up menu, then select the Utility tab. Click your printer's icon 3. Click your printer's icon. You see a window like this: Using Epson Status Monitor 3 31 - Epson AcuLaser CX11N | Basics - Page 32
toner levels, paper levels, and the remaining life of the photoconductor. Note: This screen may vary depending on your operating system version. Canceling Printing If you need to cancel printing, follow the steps for your operating system below. Windows Double-click the printer users. 32 Printing - Epson AcuLaser CX11N | Basics - Page 33
other users. Network Printing for Macintosh Note: The CX11N must be turned on and securely connected to the network before installing the software. For details, see your Start Here sheet. The software must be installed on each computer that will be using the CX11N on the network. 1. Insert the Epson - Epson AcuLaser CX11N | Basics - Page 34
Scan ■ Printer Driver ■ EPSON Status Monitor 3 ■ User's Guide Then click Install. 7. Follow the prompts to install the software. Note: If you are asked to restart your computer, click No. 8. Open the Applications folder, then open the Utilities folder and double-click Printer Setup Utility (OS X 10 - Epson AcuLaser CX11N | Basics - Page 35
on the document table or in the Auto Document Feeder (CX11NF only). For instructions, see page 14. 3. Press the Copy button on the control panel. The Copy light turns on. The LCD panel displays Copy Mode for a few seconds, then changes to the copy mode screen. 4. Specify your copy settings as - Epson AcuLaser CX11N | Basics - Page 36
Start (to make a black-and-white copy) or x Color Start button (to make a color copy). Note: If you press the x B&W Start button Copy Settings You can make changes to the copy settings described in this section. Use the u or d button to move between menu items. Changing the Number of Copies You can - Epson AcuLaser CX11N | Basics - Page 37
MP A4, MP B5, MP LGL, and MP LT. For the optional paper cassette unit, the paper size loaded in the cassette is displayed (LC A4 or LC LT). Selecting and catalogs. Removes moiré patterns, sharpens the outline, and removes the backgrounds. Photo For color photos or other color images. Accurately - Epson AcuLaser CX11N | Basics - Page 38
The current Contrast value is highlighted. 3. Press the r button to increase the contrast. Press the l button to decrease the contrast. Adjusting the Color You can adjust the image colors by selecting from 7 levels (-3 to 3) for red (R), green (G), and blue (B). The higher the level, the richer the - Epson AcuLaser CX11N | Basics - Page 39
You can adjust the copy size by selecting a specific zoom ratio or a specific percentage for enlargement or reduction (25 to 400%). 400% using the numeric keypad. Turning Off Slight Copy Size Reduction Normally, the CX11N slightly reduces copies so that any image area that extends to the edges of a - Epson AcuLaser CX11N | Basics - Page 40
sided document and the CX11N automatically reduces them to entire original document in the Auto Document Feeder (CX11NF only). For instructions, see page 14. 3. Press the Menu make a black-and-white copy or press the x Color Start button to make a color copy. If you placed the first page of your - Epson AcuLaser CX11N | Basics - Page 41
display. Note: Pressing and holding the Reset button resets settings for all modes. The other way to reset the copy settings is through the Setup menu. Follow these steps to reset all copy settings. 1. Press the Setup button. The Setup light turns on and the Setup menu appears in the LCD panel - Epson AcuLaser CX11N | Basics - Page 42
42 Copying - Epson AcuLaser CX11N | Basics - Page 43
access EPSON Scan from any application that supports the TWAIN standard. When you are finished, the scanned image opens in your scanning program so you can modify, print, and save it. Note: In this chapter, the operation of EPSON Scan is explained using Windows examples. Scanning Modes EPSON Scan - Epson AcuLaser CX11N | Basics - Page 44
Do one of the following to start EPSON Scan: Windows: Double-click the EPSON Scan icon on your desktop. Or select Start > All Programs or Programs > EPSON Scan > EPSON Scan. Mac OS X: Open the Applications folder and click the EPSON Scan icon. The EPSON Scan window appears: Change scan mode here 44 - Epson AcuLaser CX11N | Basics - Page 45
option, choose it and select your Epson AL-CX11 there first. 3. Select your EPSON AL-CX11. Note: For Windows XP users, do not choose WIA-EPSON from the menu to select the product. If you select it, you cannot use the Epson scanner function fully. EPSON Scan starts immediately. Starting EPSON Scan 45 - Epson AcuLaser CX11N | Basics - Page 46
Size" on page 59 ■ "Finishing the Scan" on page 61 ■ "Selecting File Save Settings" on page 63 Note: For Mac OS X users, most illustrations shown in this section are for Windows, so they may vary in appearance from what actually appears on your screen. The instructions are the same, except as noted - Epson AcuLaser CX11N | Basics - Page 47
Selecting Basic Settings When you start EPSON Scan in Home or Professional Mode, you see the main EPSON Scan window: Home Mode Office Mode Selecting EPSON Scan Settings 47 - Epson AcuLaser CX11N | Basics - Page 48
select the basic settings for a document or photo in EPSON Scan: 1. Do one of the following to select your document type: Home Mode: Click the arrow to open the Document Type list and select the type of original you are scanning. Then click the Color, Grayscale, or Black & White button to select the - Epson AcuLaser CX11N | Basics - Page 49
scanned image in the Destination box: ■ Screen/Web for images you will view only on a computer screen or post on the web. ■ Printer for images you will be printing or converting to editable text with an OCR (Optical Character Recognition) program. ■ Other if you want to select a specific resolution - Epson AcuLaser CX11N | Basics - Page 50
so you can use them at a larger size, you can accept the Resolution setting selected by EPSON Scan based on your original and destination settings. ■ You will scan the images at their original size, but then enlarge them later in an image-editing program. If you plan to enlarge your images later - Epson AcuLaser CX11N | Basics - Page 51
. EPSON Scan displays the preview image(s) in a separate Preview window on your screen. There are two types of preview: ■ Normal preview displays your previewed images in their entirety. You must select the scan area and make any image quality adjustments manually. Normal is the default preview type - Epson AcuLaser CX11N | Basics - Page 52
, Office, or Professional Mode: 1. Click the Preview button toward the bottom of the EPSON Scan window. If you want to check or change the preview type, click the arrow next to the Preview button, if it is available. EPSON Scan prescans your image(s) and displays them in one of the following Preview - Epson AcuLaser CX11N | Basics - Page 53
tab near the top of the Preview window. (Available only when you've scanned multiple images at one time.) ■ To scan area, and modifying the color and image settings, you can select the size of your scanned image, if you have not already selected it. See page 59 for instructions. Selecting EPSON Scan - Epson AcuLaser CX11N | Basics - Page 54
area. Marquee You can move the marquee, adjust its size, and create multiple marquees on one image (Normal preview only) to scan different image areas in separate scan files. Follow these steps: 1. To draw a marquee, move your cursor over a preview image. The pointer becomes a set of cross-hairs - Epson AcuLaser CX11N | Basics - Page 55
. You can move and resize all the marquees as described in step 3. To delete a marquee, click inside it and click the delete marquee icon. Selecting EPSON Scan Settings 55 - Epson AcuLaser CX11N | Basics - Page 56
Mode. For details on adjusting these settings, click Help in the EPSON Scan window. When you are finished making adjustments, you can size your scanned images (see page 59) or go ahead and scan (see page 61). Setting Color Restoration Brightness Available mode(s) and description Home, Office, and - Epson AcuLaser CX11N | Basics - Page 57
setting. Professional only: Adjusts the density of colors in the overall image. Color Balance Click the Image Adjustment button to access Professional: Removes the rippled pattern that can appear in subtly shaded image areas, such as in skin tones. Also improves results when scanning magazine - Epson AcuLaser CX11N | Basics - Page 58
graphical interface for adjusting tone levels individually. For advanced users only. Threshold Click the Tone Correction button to use changing settings in the window that appears. See EPSON Scan Help for details. To undo any image quality adjustments you make to the preview image, click the Reset - Epson AcuLaser CX11N | Basics - Page 59
a particular size, such as 8 × 10 inches, you should select the Target Size setting after previewing it, but before adjusting your scan area (indicated by the marquee). This sets the scan area to the correct proportions so your image will not be cropped unexpectedly. Selecting EPSON Scan Settings 59 - Epson AcuLaser CX11N | Basics - Page 60
For instructions on previewing your image(s), see page 51. Then follow these steps to select the Target Size setting: 1. You can choose a predefined scan size Click the arrow in the list and select Customize. You see the Target Size window: Type a name for your custom size, enter the size, click the - Epson AcuLaser CX11N | Basics - Page 61
click Help in the EPSON Scan window. 5. Now you are ready to scan your image(s). See below for instructions. Finishing the Scan When you have finished selecting scan settings, you are ready to scan. Click the Scan button. After a few moments, your images are scanned. Selecting EPSON Scan Settings 61 - Epson AcuLaser CX11N | Basics - Page 62
scan from a scanning program (such as Adobe® Photoshop Elements), your scanned image(s) open in the program window. Click Close to close the EPSON Scan window : ■ BITMAP (*.BMP) (windows only) ■ EPS format (*.EPS) ■ JPEG (*.JPG) ■ Multi-TIFF (*.TIF) ■ PDF (*.PDF) ■ PICT (*.PICT) (Mac OS X only) ■ PNG - Epson AcuLaser CX11N | Basics - Page 63
check box is cleared, the File Save Settings window does not appear automatically. To open the window, click the arrow to the right of the Scan button on the EPSON Scan window and then select File Save Settings. 1. In the File Save Settings window, specify the file folder in which you want to save - Epson AcuLaser CX11N | Basics - Page 64
before saving them. To open Multi-TIFF files, you need a program that supports it. TIFF (*.TIF) A file format created for exchanging data between many programs, such as graphic and DTP software. When scanning black & white images, you can specify the compression type. PDF (*.PDF) A document - Epson AcuLaser CX11N | Basics - Page 65
buttons on the CX11N control panel (Push Scan). Before using this feature, make sure you have installed EPSON Scan, EPSON Creativity Suite, and Presto! PageManager on your computer. Selecting a Scanning Mode for a Network PC Note: You cannot use Push Scan over a Macintosh network, only on a local - Epson AcuLaser CX11N | Basics - Page 66
u or d button to select your network computer, and then press the r button. 5. Press the l or r button to select a file format. 6. Press the x B&W Start or x Color Start button on the control panel. EPSON Scan starts scanning. When the scanning is complete, remove your originals from the document - Epson AcuLaser CX11N | Basics - Page 67
CX11N as a printer, copier, and scanner. If you have the CX11NF you can fax as well. You can use the control panel to do all of these things, customize the way the CX11N CX11N, it enters the Print mode automatically. To change modes, just press a mode button. In addition, you can also use the Setup - Epson AcuLaser CX11N | Basics - Page 68
and the following screen appears: Print mode is automatically selected when you turn on the CX11N and you return to it when you exit other modes. Copy Mode To copy, press the Copy button. When the CX11N is in Copy mode, the following screen appears: Note: You can receive faxes even while - Epson AcuLaser CX11N | Basics - Page 69
is in Fax mode, the following Note: While sending or receiving a fax, you cannot scan or print with the CX11NF. Scan Mode To scan, press the Scan button. When the CX11N is in Scan mode, the following screen appears: Note: You can scan and print from your computer, and receive faxes, when the - Epson AcuLaser CX11N | Basics - Page 70
only to select settings you cannot make in your software or printer driver. 1. Make sure the CX11N is turned on, then press the Setup button. The Setup light turns on and the LCD screen displays Setup Mode for a few seconds, then changes to the Setup menu screen. 2. Use the u and d buttons to select - Epson AcuLaser CX11N | Basics - Page 71
from the Setup menu. Setup submenu Printer Settings Host I/F Settings Fax Settings (CX11NF) Copy Settings Scan Settings Available menu items Information (see below) Tray (see page 72) Setup (see page 73) Reset (see page 74) USB Settings (see page 75) Network Settings (see the Network Guide for - Epson AcuLaser CX11N | Basics - Page 72
amount of black toner left in the toner cartridge Remaining service life of the photoconductor unit Total number of pages printed by the CX11N Total number of color pages printed by the CX11N Total number of black and white pages printed by the CX11N 1 Appears only when the network interface board - Epson AcuLaser CX11N | Basics - Page 73
Letterhead, Recycled, Color Select the paper type you loaded in the standard and optional paper cassettes. Setup Menu This menu printer driver. When you select On (Normal), the MP tray has higher priority. When you select Off (Last), the MP tray has lower priority. Size Ignore Off, On The CX11N - Epson AcuLaser CX11N | Basics - Page 74
want to reset when there is a problem with a print job and you cannot print. Restarts the printer. Restores the printer settings to their original factory settings. Moves the selected toner cartridge into position so that it can be replaced. See page 83. Resets the fuser unit service life counter - Epson AcuLaser CX11N | Basics - Page 75
On, Off HS, FS After these settings are changed, the new settings don't take effect until after a reset or after the power is turned off and on again, even though it is shown on the Status Sheet. Network Menu These settings control communication with the CX11N when it is connected to a computer - Epson AcuLaser CX11N | Basics - Page 76
you may want to print a status sheet. 1. Make sure the CX11N is turned on. 2. Press the Setup button. The Setup light turns on and the Setup menu appears. 3. Make sure Printer settings is selected, then press the r button. The Printer settings menu appears. 4. Make sure Information Menu is selected - Epson AcuLaser CX11N | Basics - Page 77
jobs the CX11N is currently receiving or printing. Using the Reset Menu Selecting Reset from the Setup menu stops printing, clears the print job being received from the active interface, and clears errors that may have occurred. 1. Press the Setup button. 2. Make sure Printer settings is selected - Epson AcuLaser CX11N | Basics - Page 78
78 Using the Control Panel - Epson AcuLaser CX11N | Basics - Page 79
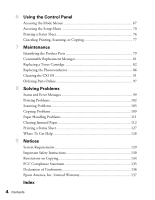
Maintenance 7 This chapter describes the parts of the product, how to replace the toner cartridges and photoconductor, how to clean the CX11N, and how to order more toner. Identifying the Product Parts Auto Document Feeder (CX11NF only) Cover (CX11NF only) Cover C Cover B Option cover Power - Epson AcuLaser CX11N | Basics - Page 80
Cover F Handle Cleaner cover Cover E Telephone interface connectors (CX11NF only) USB connector Network interface connector AC inlet Fuser Paper guides (MP tray) Photoconductor access lever Photoconductor Cleaning knob access lever Toner cartridge 80 Maintenance - Epson AcuLaser CX11N | Basics - Page 81
or in the EPSON Status Monitor 3 window. LCD screen message Description Replace Toner uuuu1 The indicated toner cartridge is empty. Replace Photocondctr2 The photoconductor is at the end of its service life. 1 The letters C, M, Y, and K appear in this position, indicating the color of the empty - Epson AcuLaser CX11N | Basics - Page 82
job. See: ■ "Changing a Low Toner Cartridge" on page 83 ■ "Removing and Replacing an Empty Toner Cartridge" on page 83 Handling Precautions Always follow these precautions when replacing a toner cartridge: ■ Install a genuine Epson toner cartridge. Using a non-Epson toner cartridge may affect print - Epson AcuLaser CX11N | Basics - Page 83
u or d button to select Change Toner C/M/Y/K for the color of the toner cartridge you want to change, then press the r button. 5. Continue with the steps in the next section to remove and replace the toner cartridge. Removing and Replacing an Empty Toner Cartridge 1. Make sure the CX11N is turned on - Epson AcuLaser CX11N | Basics - Page 84
the lock lever on the right to unlock the toner cartridge. 4. Pull out the toner cartridge. 5. Remove the new toner cartridge from its package and gently shake it as shown below. Warning: Do not touch the toner. Keep the toner away from your eyes. If toner gets on your skin or clothes, wash it off - Epson AcuLaser CX11N | Basics - Page 85
gently pull the toner seal upward and remove it. 7. Insert the toner cartridge with the arrow mark facing you. Push it all the way into its slot, pushing on both sides evenly, until it stops securely. 8. Push down the right lever to lock the toner cartridge. Note: The toner cartridge is installed - Epson AcuLaser CX11N | Basics - Page 86
A. 10. Check for toner messages on the LCD screen. If another toner cartridge needs to be replaced, you see another error message. Repeat steps 2 to 9 to replace the other cartridges. Replacing the Photoconductor Handling Precautions Always follow these precautions when replacing the photoconductor - Epson AcuLaser CX11N | Basics - Page 87
Removing and Replacing the Photoconductor 1. Make sure the CX11N is turned on. 2. Remove any paper loaded in the ADF (CX11NF only). 3. Slowly flip back the scanner until it stops. 4. Close the output tray extension. Replacing the Photoconductor 87 - Epson AcuLaser CX11N | Basics - Page 88
5. Lift up cover B. 6. Pull up the orange lever inside cover B. 88 Maintenance - Epson AcuLaser CX11N | Basics - Page 89
off the protective sheet. Caution: Do not touch the belt on the top of the photoconductor or the blue area; otherwise, print quality may decrease. Avoid exposing the photoconductor to light any longer than necessary. Do not touch any other components inside the CX11N. Replacing the Photoconductor 89 - Epson AcuLaser CX11N | Basics - Page 90
9. Hold the photoconductor by its handle and insert it into the slots marked with blue arrows inside the CX11N. Push it in until it clicks into place. 10. Flip down the orange lever, then close cover B. 90 Maintenance - Epson AcuLaser CX11N | Basics - Page 91
components. To clean other parts of the CX11N, see these sections: ■ "Cleaning the Pickup Roller" on page 92 ■ "Cleaning the Print Head" on page 93 ■ "Cleaning the Exposure Window and Document Table" on page 95 ■ "Cleaning the ADF Pickup Rollers (CX11NF Only)" on page 96 Cleaning the CX11N 91 - Epson AcuLaser CX11N | Basics - Page 92
Cleaning the Pickup Roller 1. Open the MP tray cover and remove any loaded paper. 2. Gently wipe the pickup roller inside the MP tray with a moistened cloth. Pickup roller 92 Maintenance - Epson AcuLaser CX11N | Basics - Page 93
Cleaning the Print Head If there are white vertical lines, you will need to clean the print head. 1. Pull off the cleaner cover from the right side of the CX11N. 2. Open cover A. 3. Pull forward on the blue lever inside of the CX11N. Cleaning the CX11N 93 - Epson AcuLaser CX11N | Basics - Page 94
4. Grasp the blue cleaner slowly and move it out and in once. Note: Move the cleaner all the way out and in; otherwise, the CX11N may not be cleaned completely. 5. Push in the blue lever inside the CX11N. 6. Close cover A and replace the cleaner cover. 94 Maintenance - Epson AcuLaser CX11N | Basics - Page 95
a decrease in scan or copy quality, clean the exposure window. You can use a soft dry cloth to clean the document table. Caution: Do not spray cleaning solution on the document table glass or the exposure window or you will damage the CX11N. Exposure window Document table Cleaning the CX11N 95 - Epson AcuLaser CX11N | Basics - Page 96
Cleaning the ADF Pickup Rollers (CX11NF Only) If the Auto Document Feeder fails to feed paper, open the ADF cover on the left side. Then close the cover and wipe the rollers with a soft moist cloth to remove paper dust. Pickup rollers 96 Maintenance - Epson AcuLaser CX11N | Basics - Page 97
Parts Online The CX11N lets you know when you need new toner cartridges or a new photoconductor. To order toner cartridges or a photoconductor online, click the Order Online button in the EPSON Status Monitor 3 window or in the printer driver Basic Settings window. You see the Order Online window - Epson AcuLaser CX11N | Basics - Page 98
Toner Cartridge (Cyan) High Capacity Toner Cartridge (Black) Standard Capacity Toner Cartridge (Yellow) Standard Capacity Toner Cartridge (Magenta) Standard Capacity Toner Cartridge (Cyan) Photoconductor Product code 0187 0188 0189 0190 0191 0192 0193 1104 Toner Recycle Program Save with the Epson - Epson AcuLaser CX11N | Basics - Page 99
. Message C/M/Y/K Toner Low Calibrating Printer Cancel All Print Job Cancel Print Job Can't Print Check Transparency Action The indicated toner cartridge is near the end of its service life. Make sure you have a replacement toner cartridge ready. See page 97 to order a toner cartridge. The product - Epson AcuLaser CX11N | Basics - Page 100
paper type setting in the printer driver. Check that you loaded the correct paper size and type in the current paper source. To clear this error, select Clear Warning from Reset. See page 73 for instructions. The ADF cover is open. Close the ADF cover, and try scanning again. The specified cover is - Epson AcuLaser CX11N | Basics - Page 101
Then press the x B&W Start or x Color Start button to restart the incomplete scanning job. Replace Toner C/M/Y/K The indicated toner cartridge is empty. Replace the cartridge with a new one. See page 83 for instructions. Scanner ADF error You turned on the CX11NF with the ADF installed. Turn off - Epson AcuLaser CX11N | Basics - Page 102
not set up correctly. Make sure that the CX11N is selected in your software. Information about the The time interval specified in the Consumables Info Settings toner cartridges or window is too long, causing a difference in the information. photoconductor on Shorten the time interval or press the - Epson AcuLaser CX11N | Basics - Page 103
Print three pages containing only one character per page to clean the internal components. • There may be a problem with the photoconductor. Replace the photoconductor as described on page 86. • If you still have toner smudging, contact Epson as described on page 128. Areas are missing in • Your - Epson AcuLaser CX11N | Basics - Page 104
Printing Problems Problem You cannot print in color The printout color differs when printed from different printers The color in your printout looks different from the screen colors Solution • If Black is selected as the Color setting in the printer driver, change the setting to Color. • The color - Epson AcuLaser CX11N | Basics - Page 105
Scanning Problems Operation Problems If you have problems scanning check your: ■ Interface connections ■ Computer setup and software installation ■ Software instructions for scanning steps Check the Start Here sheet to see if you set up your CX11N correctly. Also, check your computer and software - Epson AcuLaser CX11N | Basics - Page 106
. If so, uninstall EPSON Scan, then reinstall it following the instructions in your Start Here sheet. The scanner software • For Windows users: does not work Double-click the Scanners and Cameras icon in the Control properly Panel. Delete the CX11N icon and reinstall EPSON Scan as described in - Epson AcuLaser CX11N | Basics - Page 107
or blurred • Do not move the document while scanning. • Change the Display Gamma setting for your output device, such as a monitor or the CX11N, in the Configuration window. • Select Unsharp Mask Filter in Professional Mode. • Select Color Control and check Continuous auto exposure in the - Epson AcuLaser CX11N | Basics - Page 108
adapter, and software. Some computers can change the color palette to adjust the colors on your screen. See your software and hardware manuals for details. • Use the color management system for your computer: ICM for Windows or ColorSync for Macintosh. For Windows, add a color profile that matches - Epson AcuLaser CX11N | Basics - Page 109
try again. • Remove any jammed paper, then reload the document and restart EPSON Scan. Copying Problems Operation Problems Problem Solution The CX11N does not • paper, Colored paper, Transparencies, Labels • Optional paper cassette: Plain paper, Letterhead, Recycled paper, Colored paper Coated - Epson AcuLaser CX11N | Basics - Page 110
. Replace the toner cartridge with a new one. • The accuracy of the copy depends on the quality and size of the original. Try adjusting the Contrast. If your original is too light, the CX11N might not be able to compensate, even if you adjust the contrast. • If the original has a colored background - Epson AcuLaser CX11N | Basics - Page 111
Problem Paper does not feed properly Problems Using Options Paper does not feed from the optional paper cassette Solution • The paper guides may not be set correctly. Make sure the paper guides cassette, it may not be installed properly. For instructions on installing it, see page 9. To confirm your - Epson AcuLaser CX11N | Basics - Page 112
load the same paper type as the selected Paper Type setting in the printer driver. Warning: Be careful not to touch the fuser, which is marked CAUTION HIGH TEMPERATURE, or the surrounding areas. If you have been using the CX11N, the fuser and the surrounding areas may be very hot. Do not insert your - Epson AcuLaser CX11N | Basics - Page 113
Removing Jams From Cover C Note: Before lifting up the scanner, make sure that the document cover is closed. 1. Flip back the scanner. Warning: Do not touch the lever under the scanner or the document cover may fall down, damaging the CX11N and causing injury. Don't touch Clearing Jammed Paper 113 - Epson AcuLaser CX11N | Basics - Page 114
2. Open cover C. 3. Lift up the two green levers on the fuser to unlock the guide. 114 Solving Problems - Epson AcuLaser CX11N | Basics - Page 115
, or the surrounding areas. If you have been using the CX11N, the fuser and surrounding areas may be very hot. 5. Gently lay the guide down. 6. Push down the two green levers on the fuser to lock it. 7. Close cover C, then return the scanner to the original position. Clearing Jammed Paper 115 - Epson AcuLaser CX11N | Basics - Page 116
Removing Jams From Cover E 1. Open cover E on the back of the CX11N. 2. Gently pull out any paper with both hands. Be careful not to tear the jammed paper. 3. Close cover E. 116 Solving Problems - Epson AcuLaser CX11N | Basics - Page 117
Removing Jams From Cover F Note: Before raising the scanner, make sure the document cover is closed. 1. Flip back the scanner. Warning: Do not touch the lever under the scanner or the document cover may fall down, damaging the CX11N and causing injury. Don't touch Clearing Jammed Paper 117 - Epson AcuLaser CX11N | Basics - Page 118
2. Open cover C, then pull up the two green levers on the fuser to unlock the guide. 3. Open cover E on the back, then open cover F. 118 Solving Problems - Epson AcuLaser CX11N | Basics - Page 119
4. Gently pull out paper with both hands. Be careful not to tear the jammed paper. 5. Close cover F and cover E. 6. Push down the two green levers on the fuser, then close cover C. 7. Lower the scanner to its original position. Clearing Jammed Paper 119 - Epson AcuLaser CX11N | Basics - Page 120
Removing Jams From the MP Tray 1. Open the MP tray cover and remove any loaded paper. 2. Gently pull out any sheets of paper that have fed part way into the product. 3. Reload the paper and close the MP tray cover. 120 Solving Problems - Epson AcuLaser CX11N | Basics - Page 121
4. Open and close cover A to clear the error message. Removing Jams From the Optional Paper Cassette and Cover G 1. Pull out the paper cassette from the optional paper cassette. Clearing Jammed Paper 121 - Epson AcuLaser CX11N | Basics - Page 122
2. If you find any jammed paper inside, gently pull it out. 3. Push in the paper cassette. If the jammed paper is not visible inside the optional paper cassette, or to check if there is any jammed paper inside cover G, go to step 4. 4. Open cover G on the back of the CX11N. 122 Solving Problems - Epson AcuLaser CX11N | Basics - Page 123
5. Gently pull out any paper with both hands. Be careful not to tear the jammed paper. 6. Close cover G. Removing Jammed Transparencies From the MP Tray 1. Open the MP tray cover and remove all the loaded transparencies. Clearing Jammed Paper 123 - Epson AcuLaser CX11N | Basics - Page 124
2. Open cover E on the back and gently pull out any transparencies with both hands. Be careful not to tear the jammed transparency. 3. Close cover E. 4. Reload transparencies into the MP tray. 124 Solving Problems - Epson AcuLaser CX11N | Basics - Page 125
5. Open and close cover A to clear the error message. Removing Jams From the Auto Document Feeder 1. Open the Auto Document Feeder cover. 2. Gently pull out any paper with both hands. Be careful not to tear - Epson AcuLaser CX11N | Basics - Page 126
3. Roll the knob counterclockwise to help remove any jammed paper. 4. Close the Auto Document Feeder cover. 126 Solving Problems - Epson AcuLaser CX11N | Basics - Page 127
the CX11N is turned on. 2. Open the stopper on the extension tray. 3. Press the Setup button. The Setup light turns on and the Setup menu appears. 4. Make sure Printer securely connecting them to the CX11N. If you cannot print a status sheet, contact Epson as described on page 128. Printing a - Epson AcuLaser CX11N | Basics - Page 128
to common problems. You can download drivers and documentation, get FAQs and troubleshooting advice, or e-mail Epson with your questions. Speak to a Support Representative Before you call for support, please have the following information ready: ■ Product name (Epson AcuLaser CX11N or CX11NF - Epson AcuLaser CX11N | Basics - Page 129
9 This chapter describes the system requirements for your computer when using the AcuLaser CX11N/CX11NF, important safety information, regulatory notices, and your warranty. System Requirements Windows ■ A Microsoft® Windows compatible PC with a Pentium® 233 MHz or faster (450 MHz or faster - Epson AcuLaser CX11N | Basics - Page 130
safe, efficient operation. ■ Unless specifically instructed in the documentation, be careful not to touch the fuser, which is marked CAUTION HOT SURFACE. If you have been using the CX11N, the fuser may be very hot. ■ Do not attempt to modify or take apart the toner cartridge. It cannot be refilled - Epson AcuLaser CX11N | Basics - Page 131
a need for service. When Using the CX11N ■ The CX11N weighs about 70.3 lb (33.1 kg). One person should not attempt to lift or carry the CX11N. Two people should carry it. ■ Follow all warnings and instructions marked on the CX11N. ■ Unplug the CX11N from the wall outlet before cleaning. ■ Use a well - Epson AcuLaser CX11N | Basics - Page 132
of any kind on the CX11N. ■ Except as specifically explained in the documentation, do not attempt to service this product yourself. Opening or removing those covers that are marked Do Not Remove may expose you to dangerous voltage points or other risks. Refer all servicing in those compartments to - Epson AcuLaser CX11N | Basics - Page 133
Limit The recommended exposure limit for ozone is 0.1 parts per million (ppm) expressed as an average time-weighted concentration over an eight (8) hour period. The Epson CX11N laser printer generates less than 0.1 ppm for eight (8) hours of continuous printing. Important Safety Instructions 133 - Epson AcuLaser CX11N | Basics - Page 134
laser printers in a confined area ■ Operation in conditions of extremely low humidity ■ Poor room ventilation ■ Long, continuous printing together with any of the above CX11N Location The CX11N , etc. Responsible use of copyrighted materials Scanners can be misused by improperly copying copyrighted - Epson AcuLaser CX11N | Basics - Page 135
service. 7. If trouble is experienced with this equipment Model EU-96, for repair or warranty information, please contact Epson America, Inc. 800-556-6025. If the equipment is causing harm to the telephone network, the telephone company may request that you disconnect the equipment until the problem - Epson AcuLaser CX11N | Basics - Page 136
Registration Tool (EPSON Speed Dial Utility). 10. According to major nationwide problem. 11. Canada 1. This product meets the applicable Industry Canada technical specifications Part 2 and 15 of the FCC rules as a Class B digital device. Each product marketed is identical to the representative unit - Epson AcuLaser CX11N | Basics - Page 137
Problems: Should your Epson Product require service during the warranty period, you must contact Epson at 800-556-6025 for service diagnostic and repair instructions. If service is needed, Epson will provide on-site service, where available, to repair or replace the Product without charge for parts - Epson AcuLaser CX11N | Basics - Page 138
cartridges or third party parts, components, or peripheral devices added to the Epson product after its shipment from Epson, e.g., dealer or user-added boards or components. Epson is not responsible for warranty service should the Epson label or logo or the rating label or serial number be removed - Epson AcuLaser CX11N | Basics - Page 139
Color Balance 57 copy setting 38 EPSON Scan 56 to 58 Image Type setting 49 Management (Macintosh) ...... 25 Management (Windows) ........22 matching problems 108 Restoration 56 ColorSync 25 Consumables ordering 97 replacement messages 81 replacing photoconductor .......86 replacing toner - Epson AcuLaser CX11N | Basics - Page 140
47 color, adjusting 56 to 58 file save settings 63 finishing scan 61 image settings 56 to 58 marquee 54 previewing 51 problems 106 resolution 50 scan area 51 scan size 59 settings 46 to 65 starting 44, 45 Epson Status Monitor 3 about (Macintosh 30 about (Windows 29 printer status - Epson AcuLaser CX11N | Basics - Page 141
81, 82, 86 pickup roller 92 printer (print head 93 product 91 Messages error 99 replacement 81 status 99 Mode menus 67 Copy mode 68 Fax mode 69 Print mode 68 Scan mode 69 Setup 70 Moir 107 MP tray available paper 13 loading paper 7 paper jams 120, 123 N Network cable 66 menu 75 - Epson AcuLaser CX11N | Basics - Page 142
Product cleaning 91 parts 79 Professional Mode color, adjusting 56 to 58 description 43 finishing scan 61 image settings 56 to 58 marquee, adjusting 54 previewing 51 resolution 50 scan area 51 scan size 59 selecting settings 46 to 61 R Replacing photoconductor 86 to 91 toner cartridges - Epson AcuLaser CX11N | Basics - Page 143
Size, selecting 59 Technical support 128 Telephone equipment 132 Toner cartridges ordering 97 to 98 replacing 82 to 86 Toner recycle program 98 Transportation lock 106 Troubleshooting color matching 108 copy quality 109 copying problems 109 EPSON Scan 106 options 111 paper handling - Epson AcuLaser CX11N | Basics - Page 144
144 Index
-
 1
1 -
 2
2 -
 3
3 -
 4
4 -
 5
5 -
 6
6 -
 7
7 -
8
-
9
-
10
-
11
-
12
-
13
-
14
-
15
-
16
-
17
-
18
-
19
-
20
-
21
-
22
-
23
-
24
-
25
-
26
-
27
-
28
-
29
-
30
-
31
-
32
-
33
-
34
-
35
-
36
-
37
-
38
-
39
-
40
-
41
-
42
-
43
-
44
-
45
-
46
-
47
-
48
-
49
-
50
-
51
-
52
-
53
-
54
-
55
-
56
-
57
-
58
-
59
-
60
-
61
-
62
-
63
-
64
-
65
-
66
-
67
-
68
-
69
-
70
-
71
-
72
-
73
-
74
-
75
-
76
-
77
-
78
-
79
-
80
-
81
-
82
-
83
-
84
-
85
-
86
-
87
-
88
-
89
-
90
-
91
-
92
-
93
-
94
-
95
-
96
-
97
-
98
-
99
-
100
-
101
-
102
-
103
-
104
-
105
-
106
-
107
-
108
-
109
-
110
-
111
-
112
-
113
-
114
-
115
-
116
-
117
-
118
-
119
-
120
-
121
-
122
-
123
-
124
-
125
-
126
-
127
-
128
-
129
-
130
-
131
-
132
-
133
-
134
-
135
-
136
-
137
-
138
-
139
-
140
-
141
-
142
-
143
-
144
 |
 |

Epson AcuLaser
®
CX11N/CX11NF
Basics Guide