Epson C11C546011-N Start Here Card
Epson C11C546011-N - Stylus Photo R200 Manual
 |
UPC - 010343849976
View all Epson C11C546011-N manuals
Add to My Manuals
Save this manual to your list of manuals |
Epson C11C546011-N manual content summary:
- Epson C11C546011-N | Start Here Card - Page 1
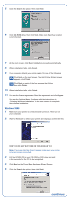
-00 XXX Start Here EPSON Stylus® Photo R200 1 Unpack 1 Remove everything from the box. Printer Software CD-ROM Printer Basics Power cord Small CD insert CD/DVD tray CD position Ink cartridges check disk 2 Remove any tape and packing material inside and around the printer. The tape may be - Epson C11C546011-N | Start Here Card - Page 2
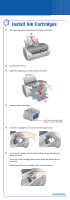
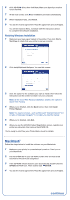
Cartridges 1 Flip open the paper support and pull up the extension. 2 Lift the printer cover. 3 Open the output tray and pull out the extension. 4 Unwrap the ink cartridges. Don't touch the green circuit boards or remove any labels 5 Open the cartridge cover and remove the paper insert. 6 Lower each - Epson C11C546011-N | Start Here Card - Page 3
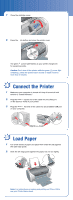
available USB port on your computer. 5 Load Paper 1 Fan a few sheets of paper and place them under the tab against the right edge guide. 2 Slide the left edge guide against the paper, but not too tightly. Note: For instructions on loading and printing on CDs or DVDs, see your Printer Basics book. - Epson C11C546011-N | Start Here Card - Page 4
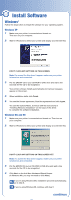
instructions in "Finishing Windows Installation" on the back of this sheet to complete the software installation. Windows Me and 98 1 Make sure your printer a screen like this doesn't appear, make sure your printer is turned on and connected. 3 Put the EPSON CD in your CD-ROM or DVD drive and wait - Epson C11C546011-N | Start Here Card - Page 5
the instructions in "Finishing Windows Installation" in the next column to complete the software installation. Windows 2000 1 Make sure your printer is If a screen like this doesn't appear, make sure your printer is turned on and connected. 3 Put the EPSON CD in your CD-ROM or DVD drive and wait a - Epson C11C546011-N | Start Here Card - Page 6
Netscape Navigator® 4.0 or later-to view the manual. 5 When you're finished, click Exit. 6 When you see the EPSON Product Registration screen, register your printer as instructed, then remove the EPSON CD. You're ready to print! See your Printer Basics book for details. Macintosh® Follow the steps - Epson C11C546011-N | Start Here Card - Page 7
your printer as instructed, then remove the EPSON CD. Go to the section below for your OS to finish setting up your printer. Mac OS X 1 Open the Applications folder on your hard drive, then open the Utilities folder and select Print Center. 2 Select Stylus Photo R200 in the Printer List window - Epson C11C546011-N | Start Here Card - Page 8
Questions? Here's where to look for answers: EPSON Stylus Photo R200 Printer Basics book On-screen Reference Guide Double-click the SP R200 Reference Guide icon on your desktop to view the Reference Guide. On-screen Help for EPSON Software™ Film Factory™ Click the Help button or question mark that
-
 1
1 -
 2
2 -
 3
3 -
 4
4 -
 5
5 -
 6
6 -
 7
7 -
8
 |
 |

EPSON Stylus
®
Photo R200
Start Here
1
Remove everything from the box.
2
Remove any tape and packing material inside and around the printer.
The tape may be in slightly different places on your printer, so check
carefully.
3
Lift the printer cover and remove the tape securing the ink
cartridge holder.
Unpack
1
CD/DVD tray
CD position
check disk
Software
CD-ROM
Printer Basics
Printer
Ink cartridges
4046837-00
XXX
Remove tape
1
Connect the printer’s power cord
to the printer, then plug it into a
grounded electrical outlet.
2
Press the printer’s power
button until the green power light
comes on.
Caution:
Use only the printer’s
power button to turn the
printer on and off.
Power On
2
2
Small CD insert
Power cord