Epson C11CA20201 Quick Guide
Epson C11CA20201 Manual
 |
View all Epson C11CA20201 manuals
Add to My Manuals
Save this manual to your list of manuals |
Epson C11CA20201 manual content summary:
- Epson C11CA20201 | Quick Guide - Page 1
Epson Stylus® NX400 Series Quick Guide Basic Copying, Printing, and Scanning Maintaining Your All-in-One Solving Problems - Epson C11CA20201 | Quick Guide - Page 2
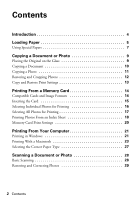
Printing From a Memory Card 14 Compatible Cards and Image Formats 14 Inserting the Card 15 Selecting Individual Photos for Printing 16 Selecting All Photos for Printing 17 Printing Photos From an Index Sheet 18 Memory Card Print Settings 20 Printing From Your Computer 21 Printing in Windows - Epson C11CA20201 | Quick Guide - Page 3
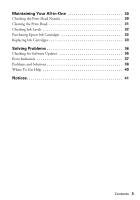
Checking the Print Head Nozzles 30 Cleaning the Print Head 31 Checking Ink Levels 32 Purchasing Epson Ink Cartridges 32 Replacing Ink Cartridges 33 Solving Problems 36 Checking for Software Updates 36 Error Indicators 37 Problems and Solutions 38 Where To Get Help 40 Notices 41 Contents 3 - Epson C11CA20201 | Quick Guide - Page 4
■ Solve simple problems This book tells you how to do most of these things without ever turning on your computer! Of course, your NX400 Series can do a lot more when you connect it to your Windows® or Macintosh® computer. For additional instructions, see the on-screen User's Guide by double-clicking - Epson C11CA20201 | Quick Guide - Page 5
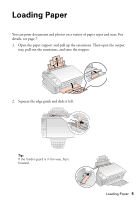
Loading Paper You can print documents and photos on a variety of paper types and sizes. For details, see page 7. 1. Open the paper support and pull up the extensions. Then open the output tray, pull out the extensions, and raise the stopper. 2. Squeeze the edge guide and slide it left. Tip: If the - Epson C11CA20201 | Quick Guide - Page 6
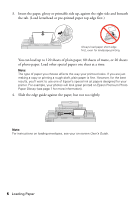
to use one of Epson's special ink jet papers designed for your printer. For example, your photos will look great printed on Epson Premium Photo Paper Glossy (see page 7 for more information). 4. Slide the edge guide against the paper, but not too tightly. Note: For instructions on loading envelopes - Epson C11CA20201 | Quick Guide - Page 7
of high quality papers, making it easy to maximize the impact of your photos, presentations, and creative projects. You can purchase genuine Epson ink and paper at Epson Supplies CentralSM at www.epson.com/ink3 (U.S. sales) or www.epson.ca (Canadian sales). You can also purchase supplies from an - Epson C11CA20201 | Quick Guide - Page 8
Paper type Epson Presentation Paper Matte Epson Photo Quality Self-adhesive Sheets Epson Iron-on Cool Peel Transfer Paper Size Letter (8.5 x 11 inches) Legal (8.5 x 14 inches) A4 (8.3 × 11.7 inches) Letter (8.5 x 11 inches) Part number S041062 S041067 S041106 S041153 - Epson C11CA20201 | Quick Guide - Page 9
Copying a Document or Photo Follow the instructions in this section to position your originals correctly on the glass and make color or black and white copies. Placing the Original on the Glass 1. - Epson C11CA20201 | Quick Guide - Page 10
would on a copy machine. 1. Press the P On button to turn on the NX400 Series. 2. Load letter- or A4-size plain paper or Epson special paper in the sheet feeder (see page 5). 3. Place your original document on the need to cancel copying, press y Stop/Clear Settings. 10 Copying a Document or Photo - Epson C11CA20201 | Quick Guide - Page 11
with or without borders and convert color photos to black and white. 1. Press the P On button to turn on the NX400 Series. 2. Load 4 × 6-inch, 5 × 7-inch, letter-size, or A4-size Epson photo paper in the sheet feeder (see page 5). 3. Place your original photo on the document table (see page 9). Note - Epson C11CA20201 | Quick Guide - Page 12
on your computer. 1. Press the P On button to turn on the NX400 Series. 2. Load 4 × 6-inch, 5 × 7-inch, letter-size, or A4-size Epson photo paper. 3. Place your original photo on the document table. Note: You can copy up to 2 photos at the same time. Place them 0.2 inches (5 mm) apart. 4. Press the - Epson C11CA20201 | Quick Guide - Page 13
you loaded. Paper type Plain paper Epson Bright White Paper Epson Presentation Paper Matte Epson Premium Presentation Paper Matte Epson Premium Photo Paper Glossy Epson Premium Photo Paper Semi-gloss Epson Ultra Premium Photo Paper Glossy Epson Photo Paper Glossy Paper Type setting Plain Paper - Epson C11CA20201 | Quick Guide - Page 14
one of the memory card slots and you're ready to print. See the User's Guide for instructions on copying memory card files between your NX400 Series and a computer; printing photos directly from your camera; printing photos pre-selected in your camera (DPOF™ or Digital Print Order Format); printing - Epson C11CA20201 | Quick Guide - Page 15
NX400 Series supports image files that meet the following requirements: Media format File format Image size Number of files DCF version 1.0 or 2.0 compliant* JPEG Supports your photos on the LCD display screen and print them (page 16) ■ Print an index sheet so you can select which photos to print - Epson C11CA20201 | Quick Guide - Page 16
of its slot. Caution: Do not remove the card or turn off the NX400 Series while the memory card access light is flashing; you may lose data on the card. Selecting Individual Photos for Printing You can select individual photos for printing as you view them on the LCD display screen. 1. Press the - Epson C11CA20201 | Quick Guide - Page 17
for Printing You can quickly select all of the photos on your memory card for printing. 1. Press l or r to select Print All Photos, then press OK. 2. To print one copy of all the photos on 4 × 6-inch Epson photo paper (various types available), press x Start and go to step 5. To select multiple - Epson C11CA20201 | Quick Guide - Page 18
Index Sheet You can print an index sheet containing small versions of all the photos on your memory card. Then you can select the photos you want by marking them on the sheet and scanning the sheet. The NX400 Series automatically prints them. Printing an Index Sheet 1. Load several sheets of plain - Epson C11CA20201 | Quick Guide - Page 19
size you want to use. ■ Select Borderless or With Border layout. ■ If you want to print the date the photo was taken on each photo, fill in the Print date on photos circle. ■ Fill in one circle beneath each photo you want to print. The numbers indicate how many copies you want of that - Epson C11CA20201 | Quick Guide - Page 20
print quality, select Quality and choose Standard, Best, or Draft. Note: For photos, the default setting for Quality is Standard. You can change this setting only when you print on plain paper. ■ To print the date on your photos and select the format for it, select Date and choose the format you - Epson C11CA20201 | Quick Guide - Page 21
instructions). Printing in Windows 1. Load paper (see page 5). 2. Open a photo or document in a Windows program. 3. Open the File menu and select Print. You see a window like this one: Select EPSON Stylus NX400 Series Click here to open your printer software 4. Make sure EPSON Stylus NX400 Series - Epson C11CA20201 | Quick Guide - Page 22
you see a Setup, Printer, or Options button, click for details). Select the type of document you're printing (choose Photo or Best Photo for pictures) Select your paper Type Select your paper Size Select your on-screen User's Guide. 8. Click OK to save your settings. 22 Printing From Your Computer - Epson C11CA20201 | Quick Guide - Page 23
ink cartridge status Cancel printing Printing With a Macintosh See the section below for your Mac OS® operating system. Mac OS X 10.5 1. Open a photo or document in an application. 2. Open the File menu and select Print. 3. Select EPSON Stylus NX400 Series as the Printer setting. Select EPSON - Epson C11CA20201 | Quick Guide - Page 24
5. Select the basic copy and page settings. For borderless photos, choose a Paper Size setting with a Sheet Feeder - Borderless option. Note: If your Media Type (see page 27) Select Color or Black Ink Only output Select higher quality or faster printing (if available) 24 Printing From Your Computer - Epson C11CA20201 | Quick Guide - Page 25
print job, click the printer icon in the dock. Cancel printing Pause or resume printing Select the print job Mac OS X 10.3 to 10.4 1. Open a photo or document in an application. 2. Open the File menu and select Page Setup. Select the following settings: Select Stylus NX400 Select your Paper Size - Epson C11CA20201 | Quick Guide - Page 26
4. Select Print from the File menu. Select Stylus NX400, choose Print Settings from the pop-up menu, and select the following settings as necessary: Select your Media Type (see page 27) Select Color or Black ink Select higher quality or faster printing (if available) Select Automatic mode Note: In - Epson C11CA20201 | Quick Guide - Page 27
your printer software. This tells the NX400 Series what kind of paper you're using, so the ink coverage can be adjusted accordingly. For this paper Plain paper Epson Bright White Paper Epson Presentation Paper Matte Epson Ultra Premium Photo Paper Glossy Epson Premium Photo Paper Glossy Epson Photo - Epson C11CA20201 | Quick Guide - Page 28
Scanning a Document or Photo You can use your Epson Stylus NX400 Series all-in-one to scan a photo or document and save it on your computer or other device. You can even restore and correct photographs as you scan (see page 29). The Epson Scan software provides three scanning modes: ■ Full Auto Mode - Epson C11CA20201 | Quick Guide - Page 29
restore faded color in a photo or make other corrections, click Customize. Then follow the instructions below. 6. Click OK. photo is not oriented correctly, turn off Auto Photo Orientation and try again. Note: For more information, see the on-screen User's Guide. You can also click Help on the Epson - Epson C11CA20201 | Quick Guide - Page 30
Maintaining Your All-in-One Follow the instructions in this chapter for checking and cleaning the print head nozzles and replacing ink cartridges. To align the print head, if necessary, see your on-screen User's Guide. Caution: To keep your NX400 Series looking like new, don't place anything on top - Epson C11CA20201 | Quick Guide - Page 31
. Then try cleaning the print head again. If quality does not improve, one of the ink cartridges may need to be replaced. If that doesn't help, contact Epson as described on page 40. If you do not use your NX400 Series often, it is a good idea to print a few pages at least once a month - Epson C11CA20201 | Quick Guide - Page 32
Note: To disable checking for ink offers or updates from Epson, see the instructions in your on-screen User's Guide. Purchasing Epson Ink Cartridges You can purchase genuine Epson ink and paper from Epson Supplies Central at www.epson.com/ink3 (U.S. sales) or www.epson.ca (Canadian sales). You can - Epson C11CA20201 | Quick Guide - Page 33
in the print head nozzles may dry out. 1. Turn on the NX400 Series. 2. If an ink cartridge is low or expended, you see a message on the NX400 Series display screen. Note which cartridges need to be replaced and press OK. If a cartridge is expended, you must replace it to be able to print. If - Epson C11CA20201 | Quick Guide - Page 34
3. Open the scanner, and open the cartridge cover. 4. Squeeze the tab on the cartridge and lift it up. Dispose of it carefully. Do not take the used cartridge apart or try to refill it. Warning: If ink gets on your hands, wash them thoroughly with soap and water. If ink gets into your eyes, flush - Epson C11CA20201 | Quick Guide - Page 35
. Caution: Never turn off the NX400 Series while ink is charging or you'll waste ink. If you see an ink replacement message on the display screen, press OK and press down all the cartridges securely. Note: If you replaced a cartridge while copying a document or photo, cancel printing and make sure - Epson C11CA20201 | Quick Guide - Page 36
at epson.com/support (U.S.) or epson.ca (Canada). With Windows, you can select Driver Update on the Maintenance tab in the printer settings window. You can also click Start or , select Programs or All Programs, select EPSON, and click Epson Stylus NX400 Series Driver Update. 36 Solving Problems - Epson C11CA20201 | Quick Guide - Page 37
on again. Please see your documentation. A scanner error has occurred. See your documentation. Waste ink pad in the printer is saturated. Cannot recognize the memory card or disk. Problem and solution Replace the expended ink cartridges (see page 33.) Turn the NX400 Series off, make sure no paper - Epson C11CA20201 | Quick Guide - Page 38
out jammed paper from the output tray or sheet feeder. 2. Follow the instructions on the LCD display screen. 3. If paper is stuck inside, turn off the NX400 Series. 4. Open the scanner, remove the jammed paper and torn pieces, close the scanner, and turn the NX400 Series back on. 38 Solving Problems - Epson C11CA20201 | Quick Guide - Page 39
your printer software (see page 27). ■ For the best print quality, use Epson special paper (see page 7) and genuine Epson ink cartridges (see See your User's Guide for instructions. ■ The ink cartridges may be low on ink. Check your cartridge status (see page 32) and replace cartridges, if necessary - Epson C11CA20201 | Quick Guide - Page 40
to common problems. You can download drivers and documentation, get FAQs and troubleshooting advice, or e-mail Epson with your questions. Speak to a Support Representative Before you call Epson for support, please have the following information ready: ■ Product name (Epson Stylus NX400 Series - Epson C11CA20201 | Quick Guide - Page 41
Notices Important Safety Instructions Before using your Epson Stylus NX400 Series all-in-one, read and follow these safety instructions: ■ Be sure to follow all warnings and instructions marked on the NX400 Series. ■ Use only the type of power source indicated on the NX400 Series label. ■ Use only - Epson C11CA20201 | Quick Guide - Page 42
inside or around the NX400 Series. Doing so may cause fire. Ink Cartridge Safety Instructions ■ Keep ink cartridges out of the reach of children and do not drink the ink. ■ Be careful when you handle used ink cartridges; there may be ink remaining around the ink supply port. If ink gets on your skin - Epson C11CA20201 | Quick Guide - Page 43
installation. This equipment generates, uses, and can radiate radio frequency energy and, if not installed and used in accordance with the instructions, may cause harmful interference to radio or television reception. However, there is no guarantee that interference will not occur in a particular - Epson C11CA20201 | Quick Guide - Page 44
or CPU Boards and Power Supplies used with Class B Personal Computers: We: Located at: Epson America, Inc. MS 3-13 3840 Kilroy Airport Way Long Beach, CA 90806 Telephone: ( that may cause undesired operation. Trade Name: Epson Type of Product: Multifunction printer Model: C351C 44 Notices - Epson C11CA20201 | Quick Guide - Page 45
Will Do To Correct Problems: Should your Epson printer prove defective during the warranty period, please call the Epson ConnectionSM at (562) 276-4382 (U.S.) or (905) 709-3839 (Canada) for warranty repair instructions and return authorization. An Epson service technician will provide telephone - Epson C11CA20201 | Quick Guide - Page 46
with non-Epson products, or service other than by an Epson Authorized Servicer. If a claimed defect Epson Authorized Reseller nearest you, visit our website at: http://www.epson.com. To find the Epson Customer Care Center nearest you, visit: http://www.epson.com/support. You can also write to: Epson - Epson C11CA20201 | Quick Guide - Page 47
or alterations to this product, or (excluding the U.S.) failure to strictly comply with Seiko Epson Corporation's operating and maintenance instructions. Seiko Epson Corporation shall not be liable for any damages or problems arising from the use of any options or any consumable products other than - Epson C11CA20201 | Quick Guide - Page 48
CPD-25346R1 Printed in XXXXXX
-
 1
1 -
 2
2 -
 3
3 -
 4
4 -
 5
5 -
 6
6 -
 7
7 -
8
-
9
-
10
-
11
-
12
-
13
-
14
-
15
-
16
-
17
-
18
-
19
-
20
-
21
-
22
-
23
-
24
-
25
-
26
-
27
-
28
-
29
-
30
-
31
-
32
-
33
-
34
-
35
-
36
-
37
-
38
-
39
-
40
-
41
-
42
-
43
-
44
-
45
-
46
-
47
-
48
 |
 |
Epson Stylus
NX400 Series
Quick Guide
Basic Copying, Printing, and Scanning
Maintaining Your All-in-One
Solving Problems
®