Epson CX5200 Start Here Card
Epson CX5200 - Stylus Color Inkjet Manual
 |
UPC - 010343844575
View all Epson CX5200 manuals
Add to My Manuals
Save this manual to your list of manuals |
Epson CX5200 manual content summary:
- Epson CX5200 | Start Here Card - Page 1
-00 CPD-15142R1 Start Here EPSON Stylus® CX5200 1 Unpack 1 Make sure you have all the parts shown here. If any parts are missing, contact EPSON as described on the back of this sheet. EPSON Stylus CX5200 Software CD-ROM Booklet Paper support USB cable Ink cartridges Feeder guard 2 Remove any - Epson CX5200 | Start Here Card - Page 2
under the lid. 2 Slide the transportation lock back to the unlock position. Caution: Make sure you unlock the scanner, or it won't work. 3 Close the scanner lid. 3 Attach the Parts 1 Insert the paper support into its two grooves. 2 Set the feeder guard into its two slots in front of the paper - Epson CX5200 | Start Here Card - Page 3
scanner unit. 3 Shake the package of ink cartridges four or five times. Then remove the cartridges from the package. Don't touch the green part Caution: You must install all cartridges and leave them installed for all types of printing. To avoid damaging the Stylus CX, never move the print head - Epson CX5200 | Start Here Card - Page 4
continued 6 Lower the scanner unit. The Stylus CX begins charging the ink delivery system. Charging takes about 2 minutes. The green light flashes and the Stylus CX makes various sounds. Don't turn it off while the green light is flashing or you'll waste ink. 6 Load Paper 1 Flip the feeder guard - Epson CX5200 | Start Here Card - Page 5
cable to your Stylus CX USB port. After you connect your Stylus CX, Windows displays several messages as it detects your device. If you don't see the messages, make sure your Stylus CX is turned on. 8 Continue following the instructions on the screen to install the rest of your software. Note: It - Epson CX5200 | Start Here Card - Page 6
CD-ROM. Now you're ready to copy, scan, and print. See the next section or your on-screen EPSON User's Guide for instructions. Note: Your CD-ROM also includes EPSON Software™ Film Factory™, a photo-management program that supports Exif Print. If you want to install Film Factory, see your on-screen - Epson CX5200 | Start Here Card - Page 7
the Stylus CX before installing the software. You see an error message when you try to print or scan. Make sure your Stylus CX is connected to your computer, plugged into a power source, and turned on. The Stylus CX doesn't work. Make sure you remove the tape from the ink cartridge holder - Epson CX5200 | Start Here Card - Page 8
Software Telephone Fax Internet and E-mail EPSON Smart Panel (510) 445-8616 (510) 445-8601 [email protected] ArcSoft PhotoImpression (510) 440-9901 8:30 AM to 5:30 PM, PT Monday-Friday (510) 440-1270 www.arcsoft.com [email protected] How To Get Paper and Ink For the best prints
-
 1
1 -
 2
2 -
 3
3 -
 4
4 -
 5
5 -
 6
6 -
 7
7 -
8
 |
 |

EPSON Stylus
®
CX5200
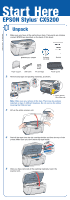
Start Here
1
Make sure you have all the parts shown here. If any parts are missing,
contact EPSON as described on the back of this sheet.
2
Remove any tape and packing materials, as shown.
Note:
Make sure you remove all the tape. There may be packing
materials or tape in different locations. Do not remove the sticker
covering the USB port yet.
3
Lift up the entire scanner unit.
4
Peel off the tape from the ink cartridge holder and from the top of the
printer. Make sure you don’t leave any tape inside.
5
After you have removed all the packing materials, lower the
scanner unit.
Unpack
1
Paper support
USB cable
Software
CD-ROM
Booklet
EPSON Stylus CX5200
Ink cartridges
Feeder guard
Don’t remove
this sticker yet
4040293-00
CPD-15142R1