Epson CX6000 Product Information Guide
Epson CX6000 - Stylus Color Inkjet Manual
 |
UPC - 010343858992
View all Epson CX6000 manuals
Add to My Manuals
Save this manual to your list of manuals |
Epson CX6000 manual content summary:
- Epson CX6000 | Product Information Guide - Page 1
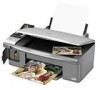
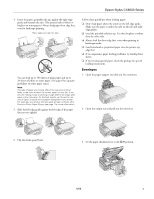
CX6000 Series Document cover Document table AC inlet USB port Memory card slots Output tray and extension Left edge guide Memory card cover Paper support extension Paper support Feeder guard USB external device connector (camera only) Control panel (button and lights) Scanner Ink cartridges - Epson CX6000 | Product Information Guide - Page 2
Epson Stylus CX6000 Series Paper name Epson Photo Paper Glossy Epson Glossy Photo Paper Epson Premium Presentation Paper Matte Epson Matte Paper Heavyweight Epson Premium Presentation Paper Matte Double-Sided Epson Double-Sided Matte Paper Epson Presentation Paper Matte Epson Photo Quality Ink Jet - Epson CX6000 | Product Information Guide - Page 3
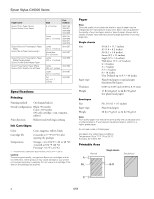
Epson Stylus CX6000 Series * When printing with the borderless feature, print quality may decline in the expanded area. Before printing large jobs using the borderless setting, print a single sheet to confirm printout quality. Envelopes A: The minimum top margin is 0.12" (3.0 mm). B-L: The - Epson CX6000 | Product Information Guide - Page 4
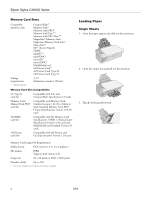
Epson Stylus CX6000 Series Memory Card Slots Compatible memory cards Voltage requirements * Up to 999 * DCF is the "Design rule for Camera File system" standard Loading Paper Single Sheets 1. Open the paper support and slide out the extensions. 2. Open the output tray and pull out the extension - Epson CX6000 | Product Information Guide - Page 5
Epson Stylus CX6000 Series 4. Insert the paper, printable side up, against the right edge guide and beneath the tabs. (The printed side is whiter or brighter on some papers.) Always load paper short edge first, even for landscape printing. Place paper beneath the tabs You can load up to 100 sheets - Epson CX6000 | Product Information Guide - Page 6
Epson Stylus CX6000 Series 4. Load up to 10 envelopes at a time, flap edge left, printable side up, against the right edge guide. Load the flap edge left, printable side up Note: For best results, press each envelope flat before loading, or load one envelope at a time. 5. Slide the left edge guide - Epson CX6000 | Product Information Guide - Page 7
Epson Stylus CX6000 Series 2. Close the document cover gently so that your original does not move. Positioning Multiple Photos You can copy or scan two or more photos at the same time. Make sure each photo is larger than 1.2 × 1.6 inches (30 × 40 mm) and leave room between them. 0.2 inch (5 - Epson CX6000 | Product Information Guide - Page 8
Epson Stylus CX6000 Series 9. Press the x Start button to begin copying. The On light flashes and after a moment the CX6000 Series starts printing. If you need to stop copying, press the y Stop/ Clear Settings button. Do not pull out paper that is being printed Start button to scan and preview your - Epson CX6000 | Product Information Guide - Page 9
, scan the sheet, and let the CX6000 Series automatically print the selected photos. 1. Make sure your CX6000 Series is not connected to your computer (or your computer is turned off). 2. Load several sheets of letter-size, plain paper. (Use only letter-size paper to print the index sheet.) Up to - Epson CX6000 | Product Information Guide - Page 10
so the CX6000 Series can scan it correctly. Now follow the instructions in the next section to select photos and print. Selecting Photos on the Index Sheet 1. Once you have printed the index sheet, use a dark pen or pencil to fill in one of the circles beneath each photo you want to print to - Epson CX6000 | Product Information Guide - Page 11
Epson Stylus CX6000 Series 4. Press the C Memory Card button until the Print All/PictBridge light comes on. 5. If your memory card contains DPOF information, you see DPOF on the photo viewer screen. 6. Select Photo Paper, Matte Paper, or Plain Paper (whichever you loaded). 7. If you select Plain - Epson CX6000 | Product Information Guide - Page 12
EPSON Stylus CX6000 Series. You see the EPSON Scan standby window: Depending on the CX6000 Series settings and your digital camera settings, some combinations of paper type, size, and layout may not be supported. In addition, some of your digital camera settings may not be reflected in the printed - Epson CX6000 | Product Information Guide - Page 13
on how you started EPSON Scan. See the on-screen User's Guide for details. Checking the Print Head Nozzles and Ink If your printouts are faint or have gaps in them, some of the nozzles in the print head may be clogged or ink may be running low in one or more of the ink cartridges. Follow the steps - Epson CX6000 | Product Information Guide - Page 14
Note: If you don't see any improvement after cleaning the print head three times, turn off the CX6000 Series and wait overnight. This lets any dried ink soften. Then try cleaning the print head again. If quality still does not improve, one of the ink cartridges may be old or damaged and needs to be - Epson CX6000 | Product Information Guide - Page 15
one. Leaving cartridges uninstalled can dehydrate the print head and may prevent the CX6000 Series from printing. Leave the expended cartridge installed until you have obtained a replacement, or the ink remaining in the print head nozzles may dry out. To ensure good results, use genuine Epson ink - Epson CX6000 | Product Information Guide - Page 16
Epson Stylus CX6000 Series 5. Open the cartridge cover. Caution: If you do not remove the yellow tape before installing the ink cartridge, print quality may decline or you may not be able to print. Do not remove any other seals from the cartridges. Caution: Never attempt to open the cartridge - Epson CX6000 | Product Information Guide - Page 17
folder and select EPSON Print Utility. Select your CX6000 Series in the printer list, click OK, and select Print Head Alignment. 4. Follow the instructions on the screen to print a vertical alignment sheet. You see a window like this one: 6. Click Print to print a black horizontal alignment - Epson CX6000 | Product Information Guide - Page 18
21816 Epson Stylus CX6000 Series Start Here sheet Epson Stylus CX6000 Series Quick Guide Epson Stylus CX6000 Series CD-ROM (includes on-screen User's Guide) Caution: Be sure to remove the tape after installing the printer in its new location, but before you turn it on. 6. Close the scanner section
-
 1
1 -
 2
2 -
 3
3 -
 4
4 -
 5
5 -
 6
6 -
 7
7 -
8
-
9
-
10
-
11
-
12
-
13
-
14
-
15
-
16
-
17
-
18
 |
 |

Epson Stylus CX6000 Series
6/06
1
Epson Stylus CX6000 Series Parts
Accessories
Ink Cartridges
Media
Paper support
extension
Feeder guard
Left edge
guide
Memory
card cover
USB external device
connector (camera only)
Document
cover
Document
table
Memory card slots
Output tray and
extension
Control panel
(button and lights)
Scanner
Ink cartridges
Paper support
Paper
thickness
lever
Color
Part number
T code number
Black
69
T069120
68
(High Capacity)
T068120
(High Capacity)
Cyan
69
T069220
Magenta
69
T069320
Yellow
69
T069420
Paper name
Size
Part
number
Epson Ultra Premium Photo Paper
Glossy
Epson Ultra Premium Glossy Photo
Paper
Borderless
4 x 6 inches
S041934
Letter
(8.5 x 11 inches)
S041935
Epson Premium Bright White Paper
Letter
(8.5 x 11 inches)
S041586
Epson Premium Photo Paper Glossy
Epson Premium Glossy Photo Paper
Borderless
4 x 6 inches
S041808
S041727
Borderless
5 x 7 inches
S041464
Borderless
8 x 10 inches
S041465
Letter
(8.5 x 11 inches)
S041286
S041667
Epson Premium Photo Paper
Semigloss
Epson Premium Semigloss Photo
Paper
Letter
(8.5 × 11 inches)
S041331
USB port
AC inlet