Epson CX9475Fax Start Here Book (with wireless print server)
Epson CX9475Fax - Stylus Color Inkjet Manual
 |
UPC - 010343867918
View all Epson CX9475Fax manuals
Add to My Manuals
Save this manual to your list of manuals |
Epson CX9475Fax manual content summary:
- Epson CX9475Fax | Start Here Book (with wireless print server) - Page 1
Epson Stylus® CX9475Fax Start Here - Epson CX9475Fax | Start Here Book (with wireless print server) - Page 2
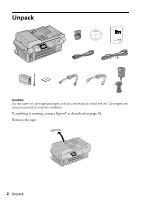
Unpack Caution: Do not open ink cartridge packages until you are ready to install the ink. Cartridges are vacuum packed to maintain reliability. If anything is missing, contact Epson® as described on page 20. Remove the tape. 2 Unpack - Epson CX9475Fax | Start Here Book (with wireless print server) - Page 3
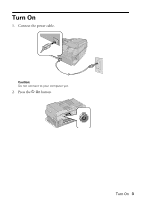
Turn On 1. Connect the power cable. Caution: Do not connect to your computer yet. 2. Press the P On button. Turn On 3 - Epson CX9475Fax | Start Here Book (with wireless print server) - Page 4
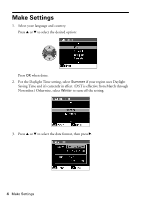
Make Settings 1. Select your language and country. Press u or d to select the desired option: Press OK when done. 2. For the Daylight Time setting, select Summer if your region uses Daylight Saving Time and it's currently in effect. (DST is effective from March through November.) Otherwise, select - Epson CX9475Fax | Start Here Book (with wireless print server) - Page 5
4. Use the numeric keypad to set the date. 5. Press u or d to select the time format, then press r. 6. Use the numeric keypad to set the time. 7. Press OK when done. Make Settings 5 - Epson CX9475Fax | Start Here Book (with wireless print server) - Page 6
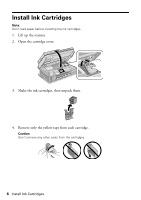
Ink Cartridges Note: Don't load paper before installing the ink cartridges. 1. Lift up the scanner. 2. Open the cartridge cover. 3. Shake the ink cartridges, then unpack them. 4. Remove only the yellow tape from each cartridge. Caution: Don't remove any other seals from the cartridges. 6 Install Ink - Epson CX9475Fax | Start Here Book (with wireless print server) - Page 7
5. Insert the cartridges in the holder for each color. 6. Press the cartridges down until they click. 7. Close the ink cartridge cover and press it down until it clicks. 8. Close the scanner. Install Ink Cartridges 7 - Epson CX9475Fax | Start Here Book (with wireless print server) - Page 8
9. Press the OK button to charge ink. Charging takes about 2 minutes. Caution: Don't turn off the CX9475Fax while the On light is flashing or you'll waste ink. Load Paper 1. Open the paper support and pull up its extension. 2. Open the output tray. 3. Slide the edge guide to the left and flip the - Epson CX9475Fax | Start Here Book (with wireless print server) - Page 9
4. Load paper against the right edge guide and behind the tab, with the printable side face up. Note: Don't load the paper sideways; always load it short edge first. 5. Slide the edge guide over. Load Paper 9 - Epson CX9475Fax | Start Here Book (with wireless print server) - Page 10
wall jack to the LINE port on the CX9475Fax. To connect a telephone or answering machine, see the Quick Guide for instructions. Note: If you're connecting to a print server's antenna and to secure the print server to the all-in-one. 1. Attach the antenna to the print server and hand-tighten it. - Epson CX9475Fax | Start Here Book (with wireless print server) - Page 11
with Windows® XP, XP Professional x64 Edition, and Windows Vista® 32- and 64-bit. Follow the instructions in this section to set up the CX9475Fax for use on a network. If you're installing the all-in-one in an Ad Hoc environment, see "Configuring the Print Server and Installing Software for Ad Hoc - Epson CX9475Fax | Start Here Book (with wireless print server) - Page 12
You need to install the drivers and other software for the all-in-one and print server. Follow the on-screen instructions to connect and power on the print server. Note: ABBY® Fine Reader Sprint is not included with the Epson Stylus CX9475Fax. 1. Insert the CX9475Fax software installation CD. With - Epson CX9475Fax | Start Here Book (with wireless print server) - Page 13
the print server and your network access point or router. 5. Follow the on-screen instructions to complete the installation. 6. When you're done, remove the CD. You're ready to print, copy, scan, and fax. See your Quick Guide or on-screen User's Guide. Install Software and Set Up the Print Server 13 - Epson CX9475Fax | Start Here Book (with wireless print server) - Page 14
Next. 4. Do one of the following: ■ If you chose to configure the address manually, you see a configuration window. Enter the IP address, subnet mask, and default gateway. ■ If you chose to configure the address automatically, continue with the next step. 5. Select your wireless network, then click - Epson CX9475Fax | Start Here Book (with wireless print server) - Page 15
instructions in this section to set up the CX9475Fax for Ad Hoc mode. 1. Plug the included USB cable into the print server and your all-in-one. 2. Plug one the print server and an electrical outlet. 4. Make sure your all-in-one is plugged in and turned on. 5. Configure your computer with a static - Epson CX9475Fax | Start Here Book (with wireless print server) - Page 16
. 14. Insert the CX9475Fax software installation CD. With Windows Vista, if you see the AutoPlay window, click Run Epsetup.exe. When you see the User Account Control screen, click Continue. 15. Click Install and follow the on-screen instructions. 16. Select Install driver for network connection and - Epson CX9475Fax | Start Here Book (with wireless print server) - Page 17
: 1. Double-click the MFP Manager icon in the Windows taskbar. You see a window like this one: 2. Select your all-in-one in the MFP Server List and click Connect. 3. When you're done, select your all-in-one in the MFP Server List and click Disconnect. Using the Scanner and Card Reader 17 - Epson CX9475Fax | Start Here Book (with wireless print server) - Page 18
Solving Problems Check the solutions below if you're having trouble installing your all-in-one. The print server can't be found that your wireless access point is set to use one of the print server's supported security settings: None, WEP 64, WEP 128, or WPA-PSK. ■ If your wireless access point - Epson CX9475Fax | Start Here Book (with wireless print server) - Page 19
of wireless interference. ■ If your wireless access point and print server are located next to each other, you can try connecting them with an ethernet cable. The software installation failed Remove and reinsert the software installation CD. Then follow the steps on page 11. Solving Problems 19 - Epson CX9475Fax | Start Here Book (with wireless print server) - Page 20
common problems. You can download drivers and documentation, get FAQs and troubleshooting advice, or e-mail Epson with your questions. Speak to a Support Representative Before you call Epson for support, please have the following information ready: ■ Product name (Epson Stylus CX9475Fax all-in-one - Epson CX9475Fax | Start Here Book (with wireless print server) - Page 21
Epson and Epson Stylus are registered trademarks, and Epson Exceed Your Vision is a trademark of Seiko Epson Corporation. General Notice: Other product names used herein are for identification purposes only and may be trademarks of their respective owners. Epson disclaims any and all rights in those - Epson CX9475Fax | Start Here Book (with wireless print server) - Page 22
- Epson CX9475Fax | Start Here Book (with wireless print server) - Page 23
- Epson CX9475Fax | Start Here Book (with wireless print server) - Page 24
CPD-25134 Printed in USA
-
 1
1 -
 2
2 -
 3
3 -
 4
4 -
 5
5 -
 6
6 -
 7
7 -
8
-
9
-
10
-
11
-
12
-
13
-
14
-
15
-
16
-
17
-
18
-
19
-
20
-
21
-
22
-
23
-
24
 |
 |

Epson Stylus
CX9475Fax
Start Here
®