Epson ELPDC02 User Manual
Epson ELPDC02 Manual
 |
View all Epson ELPDC02 manuals
Add to My Manuals
Save this manual to your list of manuals |
Epson ELPDC02 manual content summary:
- Epson ELPDC02 | User Manual - Page 1
EPSON® ELPDC02 High Resolution Document Imager User's Guide - Epson ELPDC02 | User Manual - Page 2
: Never open any cover on the document camera. Dangerous electrical voltages inside the document camera can severely injure you. Do not attempt to service this product yourself. Refer all servicing to qualified service personnel. WARNING: The document camera and its accessories come packaged in - Epson ELPDC02 | User Manual - Page 3
2 Getting More Information 3 Registration 3 Setting Up the Document Camera 5 Unpacking the Document Camera 6 Installing Batteries in the Remote Control 7 Unfolding the Document Camera 8 Positioning the Document Camera 10 Connecting to a Projector or Monitor 11 Connecting the RGB Video Cable - Epson ELPDC02 | User Manual - Page 4
Lenses 26 Cleaning the Document Camera Case 27 Transporting the Document Camera 28 Solving Problems 29 Solving Problems with the Image 30 Switching Between NTSC and PAL 31 Solving Problems with the Remote Control 32 Where to Get Help 32 Telephone Support Services 33 Technical Specifications - Epson ELPDC02 | User Manual - Page 5
6 Notices 39 Important Safety Instructions 39 Remote Control Information 42 Declaration of Conformity 43 FCC Compliance Statement 44 Warranty 45 Index 47 v - Epson ELPDC02 | User Manual - Page 6
vi - Epson ELPDC02 | User Manual - Page 7
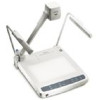
WWelcome The EPSON® ELPDC02 High Resolution Document Imager is a high resolution document camera that can be connected to all types of projectors and display devices. From boardrooms to auditoriums, you can show fine detail in a large variety of presentation materials. The document camera's upper - Epson ELPDC02 | User Manual - Page 8
if your projector has only one video input port. See page 14 for more information. I Using the remote control The remote control lets you control the lamps, zoom and focus your image, and switch the display from the camera to a computer. See Chapter 2 for details. Using Your Documentation This book - Epson ELPDC02 | User Manual - Page 9
help after checking this User's Guide and the sources listed above, you can use the EPSON PrivateLine® Support service to get help fast. Call (800) 637-7661 and enter the PIN on the card included with your document camera. Or take advantage of EPSON's electronic support services 24 hours a day. See - Epson ELPDC02 | User Manual - Page 10
4 Welcome - Epson ELPDC02 | User Manual - Page 11
to set up the document camera for a video presentation. You'll find instructions for the following in this chapter: I Unpacking the document camera I Installing batteries in the remote control I Unfolding the document camera I Positioning the document camera I Connecting to a projector or monitor - Epson ELPDC02 | User Manual - Page 12
power cord document camera RGB video cable RCA cable S-Video cable Save all packaging in case you need to ship the document camera. Always use the original packaging (or the equivalent) when you need to send the document camera to another location. For transportation instructions, see page - Epson ELPDC02 | User Manual - Page 13
Installing Batteries in the Remote Control Before using the remote control, you need to install its batteries as described below. 1. Press down of used batteries according to local regulations. I Remove batteries if you won't be using the document camera for a long period of time. Setting Up the - Epson ELPDC02 | User Manual - Page 14
Unfolding the Document Camera Follow the steps below to unfold the document camera. 1. Unfold the first lighting unit arm (1) and then the second (2) as shown until they stop. 2 1 8 Setting Up the Document Camera - Epson ELPDC02 | User Manual - Page 15
original position and you hear a click. Make sure the camera arm is securely locked. camera head lighting unit 3 4 lighting unit 3. Rotate the camera head so that the lens faces the stage (downward). 4. Rotate the lighting units so that the lamps face the stage. Setting Up the Document Camera 9 - Epson ELPDC02 | User Manual - Page 16
your output source. I Make sure you are within 23 feet (7 m) of the front or back of the document camera to use the remote control. I With the control panel facing you, place the document camera directly in front of you. Otherwise, items you place on the stage may appear upside-down. stage control - Epson ELPDC02 | User Manual - Page 17
You can connect the document camera to any projector or monitor that has a standard RGB video, composite video, or S-Video input port. EPSON projectors support all three connections. Most computer monitors support only RGB video, while many television monitors support S-Video and composite video - Epson ELPDC02 | User Manual - Page 18
the S-Video cable to the S-Video input port on the projector or monitor. or Connecting the RCA Cable Before you start, make sure your document camera and projector or monitor are turned off. 1. Connect one end of the RCA cable to the document camera's VIDEO port. 2. Connect the other end of the RCA - Epson ELPDC02 | User Manual - Page 19
to OFF when connected to a projector or ON when connected to a monitor. The frequency selection switch is factory set to 60 Hz. In an area where power frequency is 50 Hz, set the switch to 50 to reduce flickering. gamma selection switch frequency selection switch Setting Up the Document Camera 13 - Epson ELPDC02 | User Manual - Page 20
input ports as described below, and connect the document camera to the projector's input port as shown on page 11. This way, you can use the camera's control panel or remote control to switch easily between picture sources. Follow the instructions on page 18 to switch between the sources. Connecting - Epson ELPDC02 | User Manual - Page 21
the following: I Turning on the document camera and other equipment I Switching between picture sources I Adjusting the lighting I Adjusting the image position and size I Using the camera head as a conventional video camera I Turning off and storing the document camera Using the Document Camera 15 - Epson ELPDC02 | User Manual - Page 22
and other equipment are set up and connected correctly, as described in Chapter 1. Always turn on your projector or monitor first. Then turn on your document camera, as described below, followed by any other equipment you've connected to it. You can turn on your computer and video equipment in - Epson ELPDC02 | User Manual - Page 23
see an image on screen. Once you see your image, turn to page 19 for instructions on making adjustments. If your image doesn't appear, see the next section for help. When you're done with your presentation, turn off the document camera as described on page 23. note If you turn off the - Epson ELPDC02 | User Manual - Page 24
may need to switch video sources. See the next section for instructions. I If an image still doesn't appear, refer to Chapter 4 for more help. Switching Between Picture Sources If you have external video sources connected to the document camera, such as a laptop or desktop computer, you can switch - Epson ELPDC02 | User Manual - Page 25
base lamp. Press the Base button on the control panel or remote control to turn on the base lamp. The upper lamps will turn off automatically. Upper Control panel note You can't have the upper and base lamps turned on simultaneously. Remote control Base Upper Base Using the Document Camera 19 - Epson ELPDC02 | User Manual - Page 26
control panel or remote control to enlarge the image, and use the Wide button to reduce it. The document camera will automatically manually focus these objects, use the Near or Far button. Control panel Tele Wide Far Tele Wide Near Auto Focus Near Far Auto Focus 20 Using the Document Camera - Epson ELPDC02 | User Manual - Page 27
on the remote control to enlarge the image. Use the up and/or left Position arrow buttons to reduce the image. Control panel note You can't adjust the position or size of an image captured with the overhead camera or an image output through the RGB video output port. Main The document camera will - Epson ELPDC02 | User Manual - Page 28
The document camera is initially set to auto iris. When using the camera, you can manually Remote control Normal Open Close Using the Camera Head as a Conventional Video Camera By adjusting the camera head to a horizontal position, you can use the document camera like a conventional video camera - Epson ELPDC02 | User Manual - Page 29
. If you're using a monitor or projector, shut it down last. 1. Turn off the document camera. 2. Unplug the power cord and disconnect any attached video cables. 3. If the close-up lens is flipped down, close it. 4. Place the remote control inside the remote control storage compartment and close the - Epson ELPDC02 | User Manual - Page 30
not to let the camera arm drop, or you may damage it. 5. Hold the camera arm and press the camera arm release button (1). Then fold down the camera arm (2). 1 2 6. Fold down the first lighting unit arm (3) and then the second (4). Store the camera as shown. 4 3 24 Using the Document Camera - Epson ELPDC02 | User Manual - Page 31
power cord. Never open any cover on the document camera. Dangerous electrical voltages in the document camera can injure you severely. Don't try to service this product yourself. Refer all servicing to qualified service personnel. Your document camera needs little maintenance. All you need to do - Epson ELPDC02 | User Manual - Page 32
cleaner and gently wipe the lens surface. I Clean both sides of the close-up lens. main lens close-up lens 26 Maintaining and Transporting the Document Camera - Epson ELPDC02 | User Manual - Page 33
Case Before you clean the case, first turn off the document camera and unplug the power cord. I To remove dirt or dust, wipe the case with a soft, dry, lint-free cloth. I or you may scratch it. Scratches on the stage may appear on your image. stage Maintaining and Transporting the Document Camera 27 - Epson ELPDC02 | User Manual - Page 34
the document camera. I When transporting the document camera a long distance, pack it in a firm box, using cushioning around the document camera. I When you are hand-carrying the document camera, be sure to use the carrying handle. I When transporting the document camera, you may leave the remote - Epson ELPDC02 | User Manual - Page 35
you solve problems with your document camera, and tells you how to contact technical support for problems you can't solve yourself. This chapter explains the following: I Solving problems with the image I Solving problems with the remote control I Contacting technical support Solving Problems 29 - Epson ELPDC02 | User Manual - Page 36
button. I The document camera may need to have its NTSC or PAL setting changed. See page 31 for instructions. The image contains static or noise. I If you're using cables that are longer than 6 feet (2 m), or an extension cable, the image quality may be reduced. I Keep your projector, computer, and - Epson ELPDC02 | User Manual - Page 37
. 2. Press and hold the Main button on the document camera's control panel. Control panel Main 3. Turn on the document camera. 4. Release the Main button. The document camera will remain in PAL mode, even after turning it off. To switch back to NTSC mode, repeat the same steps. Solving Problems 31 - Epson ELPDC02 | User Manual - Page 38
, especially fluorescent lights, may affect the document camera's infrared receivers. I Turn off any nearby equipment that emits infrared energy, such as a radiant room heater. Where to Get Help EPSON provides technical assistance through electronic support services 24 hours a day, as listed in - Epson ELPDC02 | User Manual - Page 39
Telephone Support Services To use the EPSON PrivateLine Support service, call (800) 637-7661 and enter the PIN on the EPSON PrivateLine Support card included with your document camera. This is the fastest way of speaking to a live representative, and it's free. This service is available 6 AM to 6 PM - Epson ELPDC02 | User Manual - Page 40
34 Solving Problems - Epson ELPDC02 | User Manual - Page 41
) from the stage surface using the close-up lens 3.6 feet (1.1 m) to ∞ with the camera positioned horizontally and without using the close-up lens 10× optical with double speed function Automatic/manual Automatic/manual Automatic ON (γ=0.6), OFF (γ=1.0) 50 or 60 Hz NTSC or PAL Lighting Upper lamps - Epson ELPDC02 | User Manual - Page 42
Remote Control Range 23 feet (7 m) Batteries Alkaline AAA (2) Dimensions Weight Folded (h × w × d) Unfolded (h × w × d) 22.1 lb (10 kg) 6.6 × 15.7 × 26.0 in. (168 × 400 × 660 mm) 24.6 × 27.6 × 21.3 - Epson ELPDC02 | User Manual - Page 43
ICES-003 CSA C22.2 No.1-94 (cUL) Directive 89/336/EEC EN 55022, EN 55024 Directive 73/23/EEC EN 60950 Compatible Video Formats The document camera supports NTSC and PAL video standards, as well as the monitor display formats listed below. Mode VGA1 VGA2 VGA3 VGA-60 VGA-72 VGA-75 VGA - Epson ELPDC02 | User Manual - Page 44
Mode SXGA1 SXGA2 SXGA3 SXGA-60 SXGA-75 SXGA-85 UXGA-60 UXGA-65 UXGA-70 UXGA-75 UXGA-85 MAC 13 MAC 16 MAC 19 MAC 21 PC98 Refresh Rate (Hz) 75 60 85.002 60.02 75.025 85.024 60 65 70 75 85 66.667 74.55 74.927 75.062 56.42 Resolution 1152 × 864 1280 × 960 1280 × 960 1280 × 1024 1280 × 1024 1280 × 1024 - Epson ELPDC02 | User Manual - Page 45
and other important information about your EPSON document camera. Important Safety Instructions Follow these safety instructions when setting up and using the document camera: I Read Instructions - All the safety and operating instructions should be read before the appliance is operated. I Retain - Epson ELPDC02 | User Manual - Page 46
be placed in a built-in installation such as a bookcase or rack unless proper ventilation is provided or the manufacturer's instructions have been adhered to. I Place the document camera near a wall outlet where the plug can be easily unplugged. I Placez l'appareil près d'une prise de courant où la - Epson ELPDC02 | User Manual - Page 47
spill liquid of any kind on the product. I Servicing - Do not attempt to service this product yourself as opening or removing covers may expose normally by following the operating instructions. Adjust only those controls that are covered by the operating instructions as an improper adjustment of - Epson ELPDC02 | User Manual - Page 48
commonly cause problems for most infrared-controlled equipment. Try the following: I The remote control batteries may be low on power; replace them. I Dim the ambient lighting and/or turn off any fluorescent lights. I Close any window coverings and/or move the document camera out of direct - Epson ELPDC02 | User Manual - Page 49
or CPU Boards and Power Supplies used with Class B Personal Computers We: Located at: EPSON AMERICA, INC. 3840 Kilroy Airport Way MS: 6-43 Long Beach, CA 90806-2469 Telephone that may cause undesired operation. Trade Name: EPSON Type of Product: Document Camera Model: ELPDC02 Notices 43 - Epson ELPDC02 | User Manual - Page 50
installation. This equipment generates, uses, and can radiate radio frequency energy and, if not installed and used in accordance with the instructions, may cause harmful interference to radio or television reception. However, there is no guarantee that interference will not occur in a particular - Epson ELPDC02 | User Manual - Page 51
purchase (except that the warranty period is 90 days for lamps). For warranty service, you must provide proof of the date of original purchase. What Epson Will Do To Correct Problems: Should your EPSON product prove defective during the warranty period, please bring the product securely packaged in - Epson ELPDC02 | User Manual - Page 52
THE REMEDY ABOVE FAILS, EPSON'S ENTIRE LIABILITY SHALL BE LIMITED TO A REFUND OF THE PRICE PAID FOR THE EPSON PRODUCT COVERED BY THIS from jurisdiction to jurisdiction. To locate an Authorized EPSON Servicer nearest you, call the EPSON Connection at (562) 276-4394 in the U.S. and (905) 709 - Epson ELPDC02 | User Manual - Page 53
document camera to a computer, 14 to a monitor, 11 to 12 to a projector, 11 to 12 to RGB video sources, 14 D Declaration of Conformity, 43 Document camera , 36 EPSON technical support, 3, 32 to 33 F Far button, 20 FCC compliance statement, 44 Focusing image, 20 Folding document camera, 23 - Epson ELPDC02 | User Manual - Page 54
buttons, 21 Positioning document camera, 10 image, 21 Power specifications, 36 switch, 17 Printouts, presenting, 19 PrivateLine Support, 3, 33 Problems blank screen, 18 image, 30 to 31 remote control, 32, 42 Projector, connecting, 11 to 12 R Registration, 3 Remote control batteries, 7 specifications - Epson ELPDC02 | User Manual - Page 55
, 19 Transporting, 28 Troubleshooting image problems, 18, 30 to 31 remote control problems, 32, 42 Turning off document camera, 23 Turning on document camera, 16 to 17 U Unfolding document camera, 8 to 9 Upper button, 19 V Video camera, using camera as, 22 Video formats, supported, 37 to 38
-
 1
1 -
 2
2 -
 3
3 -
 4
4 -
 5
5 -
 6
6 -
 7
7 -
8
-
9
-
10
-
11
-
12
-
13
-
14
-
15
-
16
-
17
-
18
-
19
-
20
-
21
-
22
-
23
-
24
-
25
-
26
-
27
-
28
-
29
-
30
-
31
-
32
-
33
-
34
-
35
-
36
-
37
-
38
-
39
-
40
-
41
-
42
-
43
-
44
-
45
-
46
-
47
-
48
-
49
-
50
-
51
-
52
-
53
-
54
-
55
 |
 |

EPSON
®
ELPDC02
High Resolution Document Imager
User’s Guide