Epson ELPDC07 Quick Start and Warranty
Epson ELPDC07 Manual
 |
View all Epson ELPDC07 manuals
Add to My Manuals
Save this manual to your list of manuals |
Epson ELPDC07 manual content summary:
- Epson ELPDC07 | Quick Start and Warranty - Page 1
Epson® DC-07 Document Camera (ELPDC07) Quick Start Follow these instructions to display pages from books and documents, and three-dimensional objects. To use other features, see the online User's Guide. It provides instructions for using the microscope adapter and the built-in microphone, and - Epson ELPDC07 | Quick Start and Warranty - Page 2
. For further instructions, see the online Easy Interactive Tools Operation Guide. Where to get help Manuals See the online User's Guide and online Easy Interactive Tools Operation Guide (Internet connection required). Telephone support services To use the Epson PrivateLine® Support service, call - Epson ELPDC07 | Quick Start and Warranty - Page 3
Caméra de documents Epson® DC-07 (ELPDC07) Installation rapide Suivez les directives ci-après pour projeter les pages de livres et de documents et des objets en trois dimensions. Pour utiliser les autres fonctionnalités, consultez le Guide de l'utilisateur en ligne. Il fournit les instructions pour - Epson ELPDC07 | Quick Start and Warranty - Page 4
plus près de chez vous, visitez notre site Web à l'adresse www.epson.ca. Pour trouver le centre de service agréé Epson le plus près de chez vous, visitez notre site Web à l'adresse : www.epson.ca/support. Pour communiquer avec Epson ConnectionMS, veuillez composer le 1 800 637-7661, le 905 709-3839
-
 1
1 -
 2
2 -
 3
3 -
 4
4
 |
 |

Quick Start
Follow these instructions to display pages from books and documents, and
three-dimensional objects. To use other features, see the online
User’s Guide
.
It provides instructions for using the microscope adapter and the built-in
microphone, and capturing still images.
Before using the product, make sure you read the safety instructions in the
online
User’s Guide
.
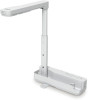
Setting up the product
1
Extend the foot, then raise the camera arm with one hand while holding
the base with your other hand.
2
Rotate the camera arm and position the camera head above the
projection area. Pull up on the arm to adjust the height as needed.
3
Connect your projector directly to the document camera using a
USB cable (included). Or, use the included USB cable to control your
document camera from a computer using the camera software (see
“Using the software”).
USB cable
4
Select the source (port) on the projector that lets you display the
camera image. On the document camera, press the
Source
button, if
necessary.
Using the product
1
Place your document on the table under the camera head. Raise or lower
the camera arm to adjust the image size, if needed.
2
Turn the rotation dial on the camera head to rotate the image, if
necessary.
3
Press the
Focus
button on the document camera to automatically focus
the image.
4
To zoom in or out on part of the image, press the
or
button on the
document camera.
5
Press the
button to illuminate the image.
When you’re done using the product, disconnect the USB cable, lower the
camera arm, and push in the foot as shown.
Using the software
The included software lets you capture live audio and video, as well as still
images. You can also use it to make time-lapse movies and annotate captured
images.
Installing the software
Note:
If your computer does not have a CD/DVD drive or you are using a Mac,
an Internet connection is required to obtain the product software.
1
Make sure the product is
NOT CONNECTED
to your computer.
Windows
®
:
If you see a Found New Hardware screen, click
Cancel
and
disconnect the USB cable.
2
Insert the product CD or download and run your product’s software
package:
www.epson.com/support/elpdc07downloads
(U.S.) or
www.epson.ca/support/elpdc07downloads
(Canada)
3
Follow the instructions on the screen to run the setup program.
4
When you see the license agreement, accept the terms and click
Next
.
5
Select
Drawing on the Camera screen
, then follow the on-screen
instructions to install all the software.
Epson
®
DC-07 Document Camera (ELPDC07)