Epson FX-980 Product Information Guide
Epson FX-980 - Impact Printer Manual
 |
View all Epson FX-980 manuals
Add to My Manuals
Save this manual to your list of manuals |
Epson FX-980 manual content summary:
- Epson FX-980 | Product Information Guide - Page 1
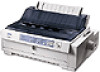
EPSON FX-980 paper guide cover printer cover rear edge guides paper guide base paper release lever front paper guide (closed) control panel knob paper thickness lever serial interface ribbon cartridge shield plate parallel interface tractor paper tension unit front paper guide (open) - Epson FX-980 | Product Information Guide - Page 2
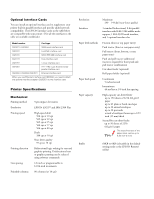
interface adapter (C825251) to the interface card. Printer Specifications Mechanical Printing method Emulation Printing speed Printing direction Line spacing Printable columns 9-pin impact dot matrix EPSON ESC/P® and IBM 2380 Plus High-speed draft 506 cps at 10 cpi 569 cps at 12 cpi 569 cps at - Epson FX-980 | Product Information Guide - Page 3
EPSON FX-980 Built-in fonts Character tables Character sets Reliability Dimensions and weight Ribbon Bitmap fonts EPSON Draft 10, 12, 15 cpi EPSON Roman 10, 12, 15 cpi, proportional EPSON Sans Serif 10 on the back of the printer for the printer voltage. Environmental Operation Storage - Epson FX-980 | Product Information Guide - Page 4
(23.8 × 63.5 mm) 0.1 inch (2.5 mm) corner radius Backing sheet width 4 to 10 inches (101 to 254 mm) Backing sheet length 4 to 22 inches (101 to 558 mm) Backing sheet thickness 0.0028 to 0.0035 inch (0.07 to 0.09 mm) Total thickness 0.0063 to 0.0075 inch (0.16 to 0.19 mm) 4 - EPSON FX-980 4/99 - Epson FX-980 | Product Information Guide - Page 5
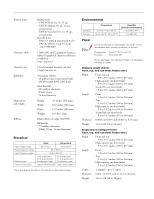
EPSON FX-980 A B printable area B A A A The minimum top and bottom margins (above and below the perforation) are 0.17 inch (4 mm). B The minimum left and right margins are 0.12 inch (3 mm). The maximum width is 10 EMI UL 1950 CSA C22.2 No. 950 FCC part 15 subpart B class B CSA C108.8 class B - Epson FX-980 | Product Information Guide - Page 6
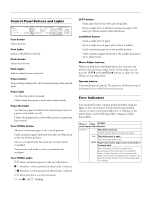
problem. State of Beep Problem panel lights pattern Solution n Pause - The printer is paused. Press the Pause button to resume printing. ••• The printer cover is open. Close the paper guide want to use. Press the Pause button to turn off the Pause light, if necessary. 6 - EPSON FX-980 4/99 - Epson FX-980 | Product Information Guide - Page 7
EPSON FX-980 State of Beep Problem panel lights pattern Solution n Paper Out ••• No paper is loaded in the selected paper source. n Pause Load paper in the printer. Then press the Pause button to turn off the Pause light, if necessary. ••• The paper is not loaded correctly. Remove your paper - Epson FX-980 | Product Information Guide - Page 8
also load single sheets from the paper guide without removing the continuous paper from the printer and cause a paper jam. Paper loaded from the rear slot results in a curved paper path, which may affect loading performance, so use the front or bottom slot whenever possible. 8 - EPSON FX-980 - Epson FX-980 | Product Information Guide - Page 9
with labels onto the rear push and pull tractor, the labels may come off their backing sheet inside the printer and cause a paper jam. Because thick multipart forms require a straight paper path, load them in the front -sheet multipart forms bound at the side of the form. 4/99 EPSON FX-980 - 9 - Epson FX-980 | Product Information Guide - Page 10
EPSON FX-980 Paper Release Lever Positions You can load continuous paper in the printer from various unit in the front push or pull position. *** Always load multipart forms with seven parts (one original plus six copies) from the front or bottom slot onto the pull quality. 10 - EPSON FX-980 4/99 - Epson FX-980 | Product Information Guide - Page 11
EPSON FX-980 Paper Handling Loading Multipart Forms You can use carbonless multipart forms of up to seven parts (the original the printer. Never press the Load/Eject or Tear Off/Bin button. When fed backward, labels can easily come off the backing sheet and cause a paper jam. 4/99 EPSON FX-980 - - Epson FX-980 | Product Information Guide - Page 12
1. Make sure the printer is turned off. Open the front paper guide by pulling the tab at the center of the guide. Then remove the guide by grasping both sides and pulling it straight out of the printer. Check that the the front push tractor as described in the next section. 12 - EPSON FX-980 4/99 - Epson FX-980 | Product Information Guide - Page 13
EPSON FX-980 4. Slide the left sprocket to the left margin of your paper using the arrow mark inside the printer. (Printing starts at the arrow mark.) Then pull the lever forward to lock it in place. 8. Attach the front paper guide by sliding it along the mounting slots. Then close the front paper - Epson FX-980 | Product Information Guide - Page 14
page 22. 3. Close the paper guide cover. When you send a print job to the printer, paper automatically feeds to the top- printer and cause a paper jam. To avoid paper jams, it is best to load thick multipart forms using the front or bottom slot and the pull or front push tractor. 14 - EPSON FX-980 - Epson FX-980 | Product Information Guide - Page 15
EPSON FX-980 To load paper onto the rear push tractor, follow these steps: 1. Make sure the printer is turned off. Open the paper guide cover (Œ) and remove the paper guide (). 4. Slide the left sprocket to the left margin of the paper using the scale on the printer paper support midway between - Epson FX-980 | Product Information Guide - Page 16
the paper. When you resume printing, the printer automatically feeds the paper back to the top-of-form position and starts printing. Always tear off your printed document before you press the Load/Eject button. Reverse feeding several pages at a time may cause a paper jam. 16 - EPSON FX-980 4/99 - Epson FX-980 | Product Information Guide - Page 17
the printer and guides to the middle of the paper guide. Lift the center section of the paper guide up and lay it flat. 3. Set the paper release lever to the pull tractor position. Then set the paper thickness lever to accommodate your paper thickness. pull tractor position 4/99 - EPSON FX-980 - Epson FX-980 | Product Information Guide - Page 18
EPSON FX-980 4. Release the left and right sprockets by pulling the sprocket lock levers forward. 8. Insert the paper into the front, bottom, or rear paper slot until it emerges between the platen and the ribbon guide not lock it. Move the paper support midway between the two sprockets. 7. Make - Epson FX-980 | Product Information Guide - Page 19
EPSON FX-980 11. Turn on the printer. Remove any slack in the paper and adjust the top-of-form position by pressing the LF/FF button or using the micro adjust feature. (To use the micro adjust feature, see "Adjusting the Top-of-Form Position" on page 21.) The printer will start printing at the - Epson FX-980 | Product Information Guide - Page 20
EPSON FX-980 4. Turn on the printer. Press the Load/Eject button to advance the paper to the top-of-form position. Then press the LF/FF button until the perforation between the first and second page is even with the top of the ribbon. Never use the knob to move the paper while the printer is - Epson FX-980 | Product Information Guide - Page 21
these limits, the printer beeps and stops moving the paper. When the paper reaches the default top-of-form position, the printer also beeps and stops moving the paper briefly. You can use the default setting as a reference point when adjusting the top-of-form position. 4/99 EPSON FX-980 - 21 - Epson FX-980 | Product Information Guide - Page 22
ribbon cover. This gives you an 0.33 inch (8.5 mm) margin on the next page, meaning the printer feature manually by For instructions, see " guide cover. 3. Hold down the Pause button for about 3 seconds. The Pause light begins flashing and the printer enters the micro adjust mode. 22 - EPSON FX-980 - Epson FX-980 | Product Information Guide - Page 23
when the print head is not in the ribbon installation position. 5. Remove the separator from the new ribbon cartridge and discard it. Then turn the ribbon tightening knob in the direction of the arrow to remove any slack in the ribbon. ribbon tightening knob separator 4/99 EPSON FX-980 - 23 - Epson FX-980 | Product Information Guide - Page 24
the printer or lose the top-of-form or tear-off position. 6. Replace the paper guide base, if necessary, and replace the printer cover. Then close the paper guide cover. 7. Press the Operate button to turn on the printer. Make sure the Paper Out and Pause lights are off. 24 - EPSON FX-980 4/99 - Epson FX-980 | Product Information Guide - Page 25
EPSON FX-980 Your Printer's Default Settings The default settings control many printer functions. While you can often set these functions through your application software or printer driver, you may need to change a default setting from the printer's control panel using the default setting mode. - Epson FX-980 | Product Information Guide - Page 26
EPSON FX-980 Aligning Vertical Lines in Your Printout If you notice that the vertical lines in your printout are not properly aligned, you can use the printer's bidirectional adjustment mode to correct this problem. To complete the steps below, you need four sheets of four pages of continuous paper - Epson FX-980 | Product Information Guide - Page 27
materials and place them in the printer's original box. Related Documentation 4010001 4010002 4010003 TM-FX980 PL-FX980 EPSON FX-980 Quick Reference Guide EPSON FX-980 User's Guide EPSON FX-980 Unpacking sheet EPSON FX-980 Service Manual EPSON FX-980 Parts Price List 4/99 EPSON FX-980 - 27
-
 1
1 -
 2
2 -
 3
3 -
 4
4 -
 5
5 -
 6
6 -
 7
7 -
8
-
9
-
10
-
11
-
12
-
13
-
14
-
15
-
16
-
17
-
18
-
19
-
20
-
21
-
22
-
23
-
24
-
25
-
26
-
27
 |
 |

EPSON FX-980
4/99
EPSON FX-980
- 1
User Replaceable Parts
Options
Paper Handling Options
High-capacity cut-sheet feeder (C806841)
Feeds up to 150 sheets of paper, 25 plain bond envelopes, or 30
postcards into the printer without reloading. You can also load a
stack of single-sheet multipart forms up to 0.59 inch (15 mm)
thick in this feeder.
Second bin cut-sheet feeder (C806851)
Connects to the high-capacity cut-sheet feeder to create a
double-bin cut-sheet feeder. You can load up to 50 sheets of
ordinary single-sheet paper in the second-bin cut-sheet feeder.
Pull tractor (C800331)
Improves continuous paper handling and reduces the chance of
paper jams. You can also use this tractor as a front push tractor.
Using a pull tractor in combination with a push tractor is
especially useful for printing on continuous preprinted forms,
multipart forms, labels, and for printing high-quality graphics.
Roll paper holder (#8310)
Allows you to use your printer with 8.5-inch roll paper like that
used with telex machines.
knob
paper guide
cover
paper guide
base
front paper
guide (closed)
rear edge
guides
printer cover
control panel
paper
release
lever
tractor
ribbon
cartridge
shield
plate
serial interface
parallel
interface
paper
tension unit
paper thickness lever
front edge guides
front paper guide
(open)
User Replaceable Part
Parts Price List Name
Part Number
Bottom cover
Bottom cover
1044121
Connector cover
Upper connector cover
1037223
Connector cover screws (2)
C.B.S-tite screw
1002674
Front edge guides
Front edge guides
1044192
Front paper guide
Front cover
1044120
Knob
Knob
1039462
Logo plate
Logo plate
1046472
Paper guide cover
Rear printer cover
1044112
Paper separator
Paper separator
1025296
Paper tension unit
Paper eject assembly
1044165
Paper thickness lever cap
Lever cap
1039412
Printer cover
Printer cover assembly
1044166
Rear edge guides
Rear edge guides
1044169
Rear push tractor
Rear tractor assembly
1044168
Ribbon cartridge
Ribbon cartridge
S015091
Tractor (pull or front push)
Front tractor assembly
1044167