Epson LX-300II Product Information Guide
Epson LX-300II - LX-300+ II Impact Printer Manual
 |
View all Epson LX-300II manuals
Add to My Manuals
Save this manual to your list of manuals |
Epson LX-300II manual content summary:
- Epson LX-300II | Product Information Guide - Page 1
Epson LX-300+II LX-300+II Parts Printer cover Paper supports Edge guides Paper guide User Replaceable Parts User replaceable part Knob Logo plate Paper supports Paper eject assembly Printer cover assembly Sheet guide assembly Reference number 106 120 180 570 105 109 Part number 1051718 - Epson LX-300II | Product Information Guide - Page 2
Epson LX-300+II Printer Specifications Mechanical Printing method Printing speed Printing direction Line spacing Printable columns Resolution Emulation Interfaces 9-pin impact dot matrix High-speed draft 300 cps at 10 cpi 337 cps at 12 or 15 cpi High-speed draft condensed 321 cps at 17 cpi 300 - Epson LX-300II | Product Information Guide - Page 3
) Weight 12 to 15 lb (40 to 58 g/m2) Binding Line-glued at the top or one side of form Envelopes: paper guide entry Size No. 6: 6.5 × 3.6 inches (165 × 92 mm) No. 10: 9.5 × 4.1 inches (241 × 105 mm 0.39 mm) Perforated edges (gathering area) up to 0.035 inch (0.9 mm) 7/06 Epson LX-300+II - 3 - Epson LX-300II | Product Information Guide - Page 4
Epson LX-300+II Weight (not multipart) 14 to 22 lb (52 to 82 g/m2) Weight (1 multipart sheet) 12 to 15 lb (40 to 58 g/m2) Binding wider than this, the side margins will be wider than the minimum, but the printable width does not increase beyond 8.0 inches (203.2 mm). 4 - Epson LX-300+II 7/06 - Epson LX-300II | Product Information Guide - Page 5
fonts using the buttons on the control panel, as described below. (The settings you make in application programs usually override settings you make from the printer's control panel.) ❏ Draft ❏ Roman ❏ Sans Serif ❏ Draft Condensed ❏ Roman Condensed ❏ Sans Serif Condensed 7/06 Epson LX-300+II - 5 - Epson LX-300II | Product Information Guide - Page 6
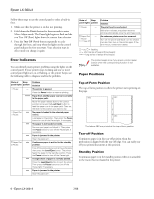
effect until you change it again. Error Indicators You can identify many printer problems using the lights on the control panel. If your printer stops working and one or more control panel lights are on or flashing is attached to the tractor but not loaded in the printer. 6 - Epson LX-300+II 7/06 - Epson LX-300II | Product Information Guide - Page 7
Epson LX-300+II Printing on Continuous Paper You can print on continuous paper using the on page 9 for instructions.) Printing with the push tractor Follow these steps to load continuous paper on the push tractor: 1. Turn off the printer. 2. Remove the printer cover and the paper guide, and pull the - Epson LX-300II | Product Information Guide - Page 8
Epson LX-300+II 9. To separate the incoming paper from the printed paper, attach the paper guide by holding it horizontally and fitting its notches over the printer's mounting posts as shown below. Then slide the paper guide toward the front of the printer until you feel it click. 2. Open the - Epson LX-300II | Product Information Guide - Page 9
rotate the tractor up to pull it away from the printer. 7. Feed the paper into the rear paper slot as shown below, and pull it up. Position the paper using the scale on the printer as a guide. Printing starts to the right of the position marked 0 (under the paper now). 7/06 Epson LX-300+II - 9 - Epson LX-300II | Product Information Guide - Page 10
top-of-form position, the printer beeps and stops moving the paper briefly. You can use the default position as a reference point when adjusting the top-of-form position. 5. After you set the top-of-form position, press the Pause button to exit the Micro Adjust mode. 10 - Epson LX-300+II 7/06 - Epson LX-300II | Product Information Guide - Page 11
. You can use the tear-off feature in two ways: ❏ Manually, by pressing the printer's Tear Off (Font) button ❏ Automatically, by turning on the printer. (If you want to restore the printer's default tear-off position, you can reset the printer. See page 14 for instructions.) 7/06 Epson LX-300+II - - Epson LX-300II | Product Information Guide - Page 12
: 1. Turn off the printer. 2. Lift up or remove the printer cover. The paper thickness lever is on the left side of the printer. 3. Slide the left edge guide until it locks in place at the guide mark. Then adjust the right edge guide to match the width of your paper. 12 - Epson LX-300+II 7/06 - Epson LX-300II | Product Information Guide - Page 13
you load ordinary continuous paper. See page 9 for loading instructions. ❏ Because labels are especially sensitive to temperature and humidity -edge-first, between the edge guides. Push it firmly and hold it until it feeds into the printer. ❏ Use envelopes only under 7/06 Epson LX-300+II - 13 - Epson LX-300II | Product Information Guide - Page 14
Epson LX-300+II Default Settings While you can often set the default settings through your application software or printer driver, you may need to change a default setting from the printer Serial 10 seconds, 30 seconds 19200, 9600, 4800, 2400, 1200, 600, 300 None The printer prints instructions for - Epson LX-300II | Product Information Guide - Page 15
electrical outlet; then disconnect the interface cable from the printer. 3. Remove the paper guide. If a pull tractor or an optional cutsheet feeder is installed, remove it. 4. Use a soft brush to carefully brush away all dust and dirt from the outer case and paper guide. 7/06 Epson LX-300+II - 15 - Epson LX-300II | Product Information Guide - Page 16
Do not use a hard or abrasive brush. Do not spray lubricants inside the printer; unsuitable lubricants can damage the printer mechanism. Related Documentation( Manual Epson LX-300+II User's Guide CD-ROM containing the on-screen Reference Guide Part number 4105348-00/CPD-21412 3101470-00/CPD-21416
-
 1
1 -
 2
2 -
 3
3 -
 4
4 -
 5
5 -
 6
6 -
 7
7 -
8
-
9
-
10
-
11
-
12
-
13
-
14
-
15
-
16
 |
 |

Epson LX-300+II
7/06
Epson LX-300+II
-
1
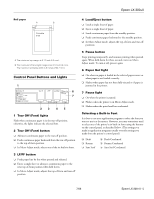
LX-300+II Parts
User Replaceable Parts
Options
You can purchase the following options from an Epson
authorized reseller. To find the nearest reseller, call
800-GO-EPSON (800-463-7766). Or you can purchase online
at
www.epsonstore.com
(U.S. sales) or
www.epson.ca
(Canada sales).
Single-bin Cut-sheet Feeder (C806371)
Feeds up to 50 sheets of ordinary single-sheet paper.
Additional Tractor Unit (C800301)
Used in combination with the other tractor, improves
continuous paper handling and reduces the chance of paper
jams. Two tractors are especially useful for printing on
continuous multipart forms.
Roll Paper Holder (C12C811141 or 8310)
Allows you to use 8.5-inch roll paper in your printer.
Black Ribbon Cartridge (#8750)
Expected ribbon life is approximately 3 million characters.
Paper guide
Paper supports
Printer
cover
Control panel
Paper release lever
Edge guides
Knob
Tractor
Ribbon cartridge
Serial
interface
Parallel
interface
Paper tension unit
Paper
thickness
lever (gap)
Power cord
USB cable holder
Power switch
USB interface
User replaceable part
Reference number
Part number
Knob
106
1051718
Logo plate
120
1056595
Paper supports
180
1054395
Paper eject assembly
570
1050616
Printer cover assembly
105
1050626
Sheet guide assembly
109
1050625