Epson NX100 Quick Guide - Page 26
Once you replace all the cartridges that need replacing, lift the scanner, slightly
 |
UPC - 010343869103
View all Epson NX100 manuals
Add to My Manuals
Save this manual to your list of manuals |
Page 26 highlights
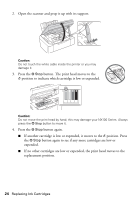
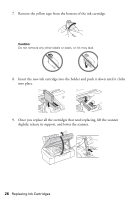
7. Remove the yellow tape from the bottom of the ink cartridge. Caution: Do not remove any other labels or seals, or ink may leak. 8. Insert the new ink cartridge into the holder and push it down until it clicks into place. 9. Once you replace all the cartridges that need replacing, lift the scanner slightly, release its support, and lower the scanner. 26 Replacing Ink Cartridges
-
 1
1 -
2
-
3
-
4
-
5
-
6
-
7
-
8
-
9
-
10
-
11
-
12
-
13
-
14
-
15
-
16
-
17
-
18
-
19
-
20
-
 21
21 -
 22
22 -
 23
23 -
 24
24 -
 25
25 -
 26
26 -
 27
27 -
 28
28 -
 29
29 -
 30
30 -
 31
31 -
32
-
33
-
34
-
35
-
36
-
37
-
38
-
39
-
40
 |
 |

26
Replacing Ink Cartridges
7.
Remove the yellow tape from the bottom of the ink cartridge.
Caution:
Do not remove any other labels or seals, or ink may leak.
8.
Insert the new ink cartridge into the holder and push it down until it clicks
into place.
9.
Once you replace all the cartridges that need replacing, lift the scanner
slightly, release its support, and lower the scanner.