Epson NX100 Quick Guide - Page 30
Paper Feeding Problems, Print Quality Problems, sheets of plain paper, Epson Bright White Paper - head cleaning
 |
UPC - 010343869103
View all Epson NX100 manuals
Add to My Manuals
Save this manual to your list of manuals |
Page 30 highlights
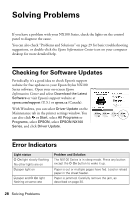
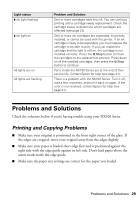
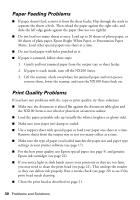
Paper Feeding Problems ■ If paper doesn't feed, remove it from the sheet feeder. Flip through the stack to separate the sheets a little. Then reload the paper against the right side, and slide the left edge guide against the paper (but not too tightly). ■ Do not load too many sheets at once. Load up to 20 sheets of photo paper, or 80 sheets of plain paper, Epson Bright White Paper, or Presentation Paper Matte. Load other special papers one sheet at a time. ■ Do not load paper with holes punched in it. ■ If paper is jammed, follow these steps: 1. Gently pull out jammed paper from the output tray or sheet feeder. 2. If paper is stuck inside, turn off the NX100 Series. 3. Lift the scanner, check everywhere for jammed paper and torn pieces, remove them, lower the scanner, and turn the NX100 Series back on. Print Quality Problems If you have any problems with the copy or print quality, try these solutions: ■ Make sure the document is placed flat against the document table glass and the NX100 Series is not tilted or placed on an uneven surface. ■ Load the paper printable side up (usually the whiter, brighter, or glossy side). ■ Make sure your paper isn't damp or curled. ■ Use a support sheet with special paper or load your paper one sheet at a time. Remove sheets from the output tray so not too many collect at a time. ■ Make sure the type of paper you loaded matches the paper size and paper type settings in your printer software (see page 17). ■ For the best print quality, use Epson special paper (see page 5) and genuine Epson ink cartridges (see page 22). ■ If you notice light or dark bands across your printouts or they are too faint, you may need to clean the print head (see page 21). This unclogs the nozzles so they can deliver ink properly. Run a nozzle check (see page 20) to see if the print head needs cleaning. ■ Clean the print head as described on page 21. 30 Problems and Solutions
-
 1
1 -
2
-
3
-
4
-
5
-
6
-
7
-
8
-
9
-
10
-
11
-
12
-
13
-
14
-
15
-
16
-
17
-
18
-
19
-
20
-
21
-
22
-
23
-
24
-
 25
25 -
 26
26 -
 27
27 -
 28
28 -
 29
29 -
 30
30 -
 31
31 -
 32
32 -
 33
33 -
 34
34 -
 35
35 -
36
-
37
-
38
-
39
-
40
 |
 |