Epson P5000 Product Information Guide
Epson P5000 - Digital AV Player Manual
 |
UPC - 010343860483
View all Epson P5000 manuals
Add to My Manuals
Save this manual to your list of manuals |
Epson P5000 manual content summary:
- Epson P5000 | Product Information Guide - Page 1
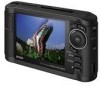
Epson P-3000/P-5000 Viewer Parts SD card slot CompactFlash card slot Memory card access light CF card slot eject button Host USB connector (for camera, flash drive, etc.) Device USB connector A/V Out connector (for computer) Headphone connector Power switch with Hold function Liquid - Epson P5000 | Product Information Guide - Page 2
Temperature Altitude Humidity (without condensation) Memory card Power sources TMS320DM320 4.0 inches, Epson Photo Fine Ultra TFT LCD; 640 × 480 pixels; 16,770,000 colors 64MB SDRAM; 4MB flash ROM 2.5 inch HDD 40GB (P-3000); 80GB (P-5000) Height 3.5 inches (88.7 mm) Width 5.9 inches (150 - Epson P5000 | Product Information Guide - Page 3
LCD screen when the viewer is on. : Battery is fully charged. : Battery power is about half full. : Battery power is low. : Battery power is running out. The viewer will shut down automatically. Charge the battery using the AC adapter. : Battery is charging. 9/06 Epson P-3000/P-5000 - 3 - Epson P5000 | Product Information Guide - Page 4
Epson P-3000/P-5000 Note: The battery may become hot when the viewer is operated during charging. Charging will stop until the battery cools down. Conserving Battery Power To conserve battery power and protect the LCD screen, the viewer has three power-saving features. ❏ The LCD screen turns dark - Epson P5000 | Product Information Guide - Page 5
Digital or MultiMedia cards in the SD Card slot. Insert the memory card into the slot with the label facing the LCD. Then push the memory card all the way into the slot. Caution: Make sure you insert memory cards in the correct orientation. Otherwise, the card and viewer may be damaged. 9/06 Epson - Epson P5000 | Product Information Guide - Page 6
viewer. Note: When the battery is low, copying may not be completed. Use the AC adapter if this happens. Supported Image Formats Supported see the User's Guide for instructions. When the backup is complete, you see thumbnail images of the copied photos. To check Epson P-3000/P-5000 9/06 Vista.JPG - Epson P5000 | Product Information Guide - Page 7
on each thumbnail image. Check box Epson P-3000/P-5000 Private folder Folder is set as screen saver My Photos PV 01002000 2006.1217 2006.1205 2006 photos, press OK. The files are copied to a folder that is automatically created in the Backup Files folder on the viewer. Viewing Photos - Epson P5000 | Product Information Guide - Page 8
5000 Using the Pop-up Menu Press the Menu button at any time to display a menu of the options currently available. These options vary, depending on what you are doing with the viewer. The following table summarizes the menu functions: Audio Track Setting Copy/Move Delete Display mode Display photo - Epson P5000 | Product Information Guide - Page 9
Photo Enhance. You can use the 4-way ring to view the next or previous photo in Display Photo Enhance. 2. To return to the normal display, press Back. Viewing Videos The viewer supports (peak) 4 Mbps (avg.) Note: DVD-Video, DivX menu, and WMV DRM are not supported. 9/06 Epson P-3000/P-5000 - 9 - Epson P5000 | Product Information Guide - Page 10
. You can create playlists using the Epson Link2 software on your computer, or using the viewer itself. Copying Music From Your Computer First, make sure you have installed the Epson Link2 software, following the instructions in your P-3000/P-5000 Basics guide. WMA and WAV files are automatically - Epson P5000 | Product Information Guide - Page 11
on the viewer asking you to update the music list, click OK. Note: Only audio files transferred from a computer can be displayed in My Music. If you want to play a music file copied from a memory card, select it in Backup Files, then press OK to play it. Supported Audio Formats The viewer can store - Epson P5000 | Product Information Guide - Page 12
From Your Computer You can use the Epson Link2 software to back up files from the viewer to your computer and copy files from your computer to the viewer. Make sure you have installed the software, following the instructions in your Epson P-3000/ P-5000 Basics guide. 1. Connect the AC adapter to the - Epson P5000 | Product Information Guide - Page 13
with the USB Mass Storage specification, including: ❏ Digital cameras ❏ Flash memory drives ❏ Memory card readers ❏ External hard drives ❏ Epson multimedia storage viewers Note: USB hubs are not supported, and some USB devices may not work without a power connection. Epson cannot guarantee the - Epson P5000 | Product Information Guide - Page 14
the instructions on page 13 to connect the USB device. 2. Select the file or folder you want to copy. The viewer shuts off, resets to its defaults and comes back on. Related Documentation CPD-22470 Epson P-3000/P-5000 Basics Epson P-3000 or P-5000 User's Guide installed with the viewer software
-
 1
1 -
 2
2 -
 3
3 -
 4
4 -
 5
5 -
 6
6 -
 7
7 -
8
-
9
-
10
-
11
-
12
-
13
-
14
 |
 |

Epson P-3000/P-5000
9/06
Epson P-3000/P-5000
-
1
Viewer Parts
BATT.
Liquid Crystal
Display (LCD)
SD card slot
CF card slot
eject button
Memory card
access light
Strap hook
Headphone
connector
CompactFlash card slot
Power switch
with Hold function
Battery cover
A/V Out connector
Host
USB connector
(for camera, flash drive, etc.)
AC adapter
connector
Speaker
Reset button
Rubber
cover
Device
USB
connector
(for computer)
Menu
Display
Charge
OK
Back
OK button
Press to select an option,
open a folder or photo, or
play music or video
Zoom buttons
Press to zoom in or out,
or adjust the volume for
music or video
Charge light
Green for battery
charging; orange
for problems
Menu button
Press to display a
pop-up menu.
Activity light
Flashes blue during
power on, printing,
file transfer, and
computer connection
4-way ring
Press to select a photo
or navigate the menus
button
Press to select a file or rate
a photo from 1 to 5 stars
Display button
Press to change the display
or view photo information
Back button
Press to cancel your selection
or return to the previous display
or menu item