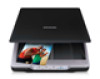
Epson Perfection V19 User Manual
Epson Perfection V19 Manual
 |
View all Epson Perfection V19 manuals
Add to My Manuals
Save this manual to your list of manuals |
Epson Perfection V19 manual content summary:
- Epson Perfection V19 | User Manual - Page 1
Perfection V19/V39 User's Guide - Epson Perfection V19 | User Manual - Page 2
- Epson Perfection V19 | User Manual - Page 3
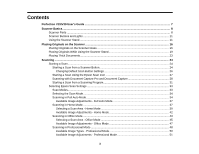
Contents Perfection V19/V39 User's Guide ...7 Scanner Basics...8 Scanner Parts ...8 Scanner Buttons and Lights ...11 Using the Scanner Stand ...11 Placing Originals on the Scanner ...16 Placing Originals on the Scanner Glass 16 Placing Originals While Using the Scanner Stand 19 Placing Thick - Epson Perfection V19 | User Manual - Page 4
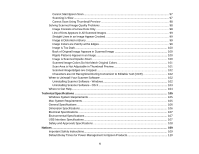
Settings 77 Restoring Photo Colors as You Scan 78 Scanning to a SharePoint Server or Cloud Service 78 Scanning Multi-Page Originals as Separate Files - Windows 80 Scanning Two Originals onto One Sheet (Stitching Images) (Windows 82 Scanning to a PDF File Using a Scanner Button 83 Available - Epson Perfection V19 | User Manual - Page 5
Text (OCR 102 When to Uninstall Your Scanner Software 102 Uninstalling Scanner Software - Windows 102 Uninstalling Scanner Software - OS X 103 Where to Get Help...104 Technical Specifications ...105 Windows System Requirements ...105 Mac System Requirements ...105 General Specifications ...106 - Epson Perfection V19 | User Manual - Page 6
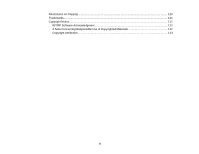
Restrictions on Copying ...110 Trademarks ...111 Copyright Notice...111 libTIFF Software Acknowledgment 112 A Note Concerning Responsible Use of Copyrighted Materials 112 Copyright Attribution ...113 6 - Epson Perfection V19 | User Manual - Page 7
Perfection V19/V39 User's Guide Welcome to the Perfection V19/V39 User's Guide. For a printable PDF copy of this guide, click here. 7 - Epson Perfection V19 | User Manual - Page 8
Scanner Basics See these sections to learn about the basic features of your scanner. Scanner Parts Scanner Buttons and Lights Using the Scanner Stand Scanner Parts 1 Scanner cover 8 - Epson Perfection V19 | User Manual - Page 9
1 Document mat 2 Scanner glass 3 Carriage (beneath scanner glass) 9 - Epson Perfection V19 | User Manual - Page 10
1 USB port 1 Scanner stand Parent topic: Scanner Basics 10 - Epson Perfection V19 | User Manual - Page 11
Scanner Buttons and Lights 1 The PDF button 2 The send button 3 The copy button 4 The start button 5 The status light Parent topic: Scanner Basics Related references Scanner Light Status Using the Scanner Stand The scanner can be used in an upright position if surface space is limited. 11 - Epson Perfection V19 | User Manual - Page 12
1. Stand the scanner upright. 12 - Epson Perfection V19 | User Manual - Page 13
2. Extend the scanner stand from the back of the scanner until it clicks into place. 13 - Epson Perfection V19 | User Manual - Page 14
3. Tilt the scanner until it rests on the scanner stand. 14 - Epson Perfection V19 | User Manual - Page 15
4. To put the scanner stand away, rotate it into the back of the scanner. Parent topic: Scanner Basics 15 - Epson Perfection V19 | User Manual - Page 16
on the Scanner Follow the instructions here to place your originals on the scanner. Caution: Do not place anything on top of your scanner or use its cover as a writing surface to avoid damaging it. Placing Originals on the Scanner Glass Placing Originals While Using the Scanner Stand Placing - Epson Perfection V19 | User Manual - Page 17
1. Open the scanner cover. 17 - Epson Perfection V19 | User Manual - Page 18
with the top edge facing as shown. Slide the original to the edges of the indicated corner. Note: You can place multiple originals on the scanner glass. Make sure they are at least 0.8 inch (20 mm) away from each other. Note: The edges of your original may be cropped by 0.1 inch - Epson Perfection V19 | User Manual - Page 19
While Using the Scanner Stand You can place originals directly on the scanner glass while the scanner stand is extended. Caution: Do not place heavy objects on the scanner glass and do not press on the glass with too much force, or it may damage the scanner. Do not leave photos on the scanner glass - Epson Perfection V19 | User Manual - Page 20
1. Open the scanner cover. 20 - Epson Perfection V19 | User Manual - Page 21
on the scanner glass with the top edge facing as shown. Slide the original to the edges of the indicated corner. Note: The edges of your original may be cropped by 0.1 inch (2.5 mm) from the left side and top edges. If you are scanning in Full Auto mode or using thumbnail preview - Epson Perfection V19 | User Manual - Page 22
Scan, the edges of your original may be cropped by about 0.24 inch (6 mm) from the top and side edges. 3. Close the scanner cover gently and hold it to keep your original in place. Parent topic: Placing Originals on the Scanner Related tasks Using the Scanner Stand 22 - Epson Perfection V19 | User Manual - Page 23
If you are scanning a book or other thick document, you can remove the scanner cover. 1. Hold the scanner cover near the hinges and pull straight up, keeping the cover horizontal. 2. Place your document facedown on the scanner glass. Note: Press down on your document gently to flatten it and hold - Epson Perfection V19 | User Manual - Page 24
or photos on your product for scanning, start scanning using one of these methods. Starting a Scan from a Scanner Button Starting a Scan Using the Epson Scan necessary. 1. Make sure you installed the scanner software and connected the scanner to your computer or network. 2. Place the original on your - Epson Perfection V19 | User Manual - Page 25
3. Press one of the following buttons on your scanner: 1 The PDF button starts the Scan to PDF utility so you can scan multiple originals directly to a PDF file 2 The send button starts Easy Photo Scan so you can scan your original and send it by email or upload it to a cloud destination. 3 The copy - Epson Perfection V19 | User Manual - Page 26
performed by each scanner button. You do this using the Event Manager program. 1. Do one of the following to open Event Manager: • Windows 8.x: Navigate to the Apps screen and select Event Manager. • Windows (other versions): Click or Start > All Programs or Programs > Epson Software > Event Manager - Epson Perfection V19 | User Manual - Page 27
scanning software. Epson Scan provides additional image adjustment and photo correction features for enhancing scanned images, and provides an interface for TWAIN-compliant OCR scanning software. To download Epson Scan, visit Epson's driver download site (U.S. downloads or Canadian downloads). 27 - Epson Perfection V19 | User Manual - Page 28
You see an Epson Scan window like this: Parent topic: Starting a Scan Scanning with Document Capture Pro and Document Capture When you scan with Document Capture Pro (Windows) or Document Capture (OS X), the program automatically saves your scanned file on your computer in the folder you specify. - Epson Perfection V19 | User Manual - Page 29
to the Apps screen and select Document Capture Pro. • Windows (other versions): Click or Start, and select All Programs or Programs. Select EPSON Software, then select Document Capture Pro. • OS X: Open the Applications folder, select the Epson Software folder, and select Document Capture. You see - Epson Perfection V19 | User Manual - Page 30
, and skip the rest of these steps. Note: If you selected Use EPSON Scan in the Scan menu under Scan Settings Screen, the Epson Scan main window opens instead of the Scan screen. 3. Select any displayed scan settings you want to use. Note: See the Help information in Document Capture Pro or Document - Epson Perfection V19 | User Manual - Page 31
may have to close the Epson Scan window to view your scan in the Document Capture Pro (Windows) or Document Capture (OS X) window. 7. If you would like to scan additional originals and add them to the current captured images, click the Add Page button, select Acquire from Scanner, and repeat steps - Epson Perfection V19 | User Manual - Page 32
need to select your product as the "source" first. If you see a Select Source option, choose it and select your product. You see an Epson Scan window like this: Note: In certain programs, you may see the program's scan window instead of the Epson Scan window. Select scanning options as necessary. 32 - Epson Perfection V19 | User Manual - Page 33
select various image adjustment options and preview your scanned image. Professional Mode You can manually customize all available settings, and preview and size your scanned image. Parent topic: Selecting Epson Scan Settings Related tasks Scanning in Full Auto Mode Scanning in Home Mode Scanning - Epson Perfection V19 | User Manual - Page 34
Mode Selecting the Scan Mode Select the Epson Scan mode you want to use from the Mode box in the upper right corner of the Epson Scan window: Parent topic: Selecting Epson Scan Settings Scanning in Full Auto Mode When you scan in Full Auto Mode, Epson Scan automatically saves your scanned file in - Epson Perfection V19 | User Manual - Page 35
You see this window: 35 - Epson Perfection V19 | User Manual - Page 36
change the scanned file settings, click File Save Settings. 3. Click Scan. Epson Scan scans your original, and saves the file in the selected folder or opens was saved directly to your computer, you see the file in the Windows Explorer or OS X Finder, where you can view and print the image, - Epson Perfection V19 | User Manual - Page 37
- Full Auto Mode You can select these image adjustment options in Epson Scan Full Auto Mode. Dust Removal Removes dust marks from your originals automatically. Color Restoration Restores the colors in faded photos automatically. Auto Photo Orientation Checks the preview image for faces, the sky, and - Epson Perfection V19 | User Manual - Page 38
You see this window: 2. Select the Document Type setting that matches your original, such as Photograph or Text/Line Art. 3. Select the Image Type setting that matches your original. 38 - Epson Perfection V19 | User Manual - Page 39
you will print or documents you will convert to editable text using OCR (Optical Character Recognition) software. • Other: Select this option if you want to to use. 10. Click Scan. You see the File Save Settings window. 11. Change any of the necessary file save settings and click OK. Epson Scan - Epson Perfection V19 | User Manual - Page 40
You can also use the scan area to select specific Image Adjustments settings for a scanned image. Just be sure to click inside the scan area before selecting the settings. 1. - Epson Perfection V19 | User Manual - Page 41
• Normal preview: Click the Auto Locate icon to create a marquee (dotted line) on the preview image. 2. Do the following, as necessary, to work with the selected scan area: • If the marquee is correct, continue with the next step. • To move the marquee, click inside the scan area and - Epson Perfection V19 | User Manual - Page 42
inside the scan area and make any necessary settings in the Epson Scan window. Parent topic: Scanning in Home Mode Available Image Adjustments - Home scanned image.) Color Restoration Restores the colors in faded photos automatically. Backlight Correction Removes shadows from photos that have too - Epson Perfection V19 | User Manual - Page 43
text recognition in OCR (Optical Character Recognition) programs. Parent topic: Scanning in Home Mode Scanning in Office Mode When you scan in Office Mode, Epson Scan automatically saves your scanned file in JPEG format in your operating system's Pictures or My Pictures folder, or opens it in your - Epson Perfection V19 | User Manual - Page 44
You see this window: 2. Select the Image Type setting that matches your original. 3. Select the Document Source setting indicating where you placed your original. 4. Select the Size and Orientation settings that match your original. 5. Select the Resolution setting you want to use for your scan. 44 - Epson Perfection V19 | User Manual - Page 45
of the image adjustment settings you want to use. Before making adjustments, click the image or scan area in the Preview window. 9. Click Scan. You see the File Save Settings window. 10. Change any of the necessary file save settings and click OK. Epson Scan scans your original, and saves the file - Epson Perfection V19 | User Manual - Page 46
1. In the Preview window, click the Auto Locate icon to create a marquee (dotted line) on the preview image. 2. Do the following, as necessary, to work with the selected scan area: • If the marquee is correct, continue with the next step. • To move the marquee, click inside the scan area and - Epson Perfection V19 | User Manual - Page 47
Rotate icons. 3. Click inside each scan area and make any necessary settings in the Epson Scan window. Parent topic: Scanning in Office Mode Available Image Adjustments - Office Mode You can select these Mask Makes the edges of certain image areas clearer. Turn off this option to leave softer edges. 47 - Epson Perfection V19 | User Manual - Page 48
if you select an Image Type of Grayscale or Black & White. Color Enhance Enhances the red, green, or blue shades in the scanned in Office Mode Scanning in Professional Mode When you scan in Professional Mode, Epson Scan automatically saves your scanned file in JPEG format in your operating system - Epson Perfection V19 | User Manual - Page 49
You see this window: 49 - Epson Perfection V19 | User Manual - Page 50
Type setting: Document or Photo. 5. Select the details of window. 10. If you want to reduce or enlarge your image as you scan, select the Target Size setting you want to use. 11. Click Scan. You see the File Save Settings window. 12. Change any of the necessary file save settings and click OK. Epson - Epson Perfection V19 | User Manual - Page 51
on other settings you have chosen. Click the image adjustment icon to access additional settings. Click the + (Windows) or (OS X) icon next to a setting to change the level of adjustment. Unsharp Mask Makes the edges of certain image areas clearer. Turn off this option to leave softer edges. 51 - Epson Perfection V19 | User Manual - Page 52
in your scanned image.) Color Restoration Restores the colors in faded photos automatically. Backlight Correction Removes shadows from photos that have too much button, click the Color tab, and select Continuous auto exposure. You can adjust the level of auto exposure using a slider. Histogram - Epson Perfection V19 | User Manual - Page 53
only.) Click the Color Palette icon to access photo size like 4 × 6 inches (102 × 152 mm). This places a scan area of that size on the preview image so you can use it to help crop the image in the correct proportions. 1. Click the Preview button to preview your image. 2. In the Epson Scan window - Epson Perfection V19 | User Manual - Page 54
proportioned for the size you selected. 3. Do the following, as necessary, to work with the selected scan area: • To move the marquee, click inside the marquee, then click and drag the edge where you want it. Note: Manually adjusting the marquee will not change the target size of the scanned file. - Epson Perfection V19 | User Manual - Page 55
4. To create a scanned image size that is not available in the Target Size list, click the Customize option. You see this window: 5. Name the custom size, enter the size, click Save, and click OK. Then adjust the marquee on the preview image. The marquee is automatically proportioned - Epson Perfection V19 | User Manual - Page 56
use additional sizing tools, click the + (Windows) or (OS X) icon next to the Target Size setting and select options as desired. • Scale: Reduces or enlarges your image by the percentage you enter. • Trimming: Turns using the preview as a guide settings manually. Parent topic: Selecting Epson Scan - Epson Perfection V19 | User Manual - Page 57
but enlarge it later in an image-editing program. Increase Epson Scan's Resolution setting in your scan. Increase the resolution by will scan the image at 100% or smaller size. Select Epson Scan's Resolution setting based on how you will use the scanned image: • Email/view on a computer screen/post - Epson Perfection V19 | User Manual - Page 58
behaves when you scan and save files. The File Save Settings window may appear after you click Scan on the Epson Scan window. You may also be able to access the window by clicking the icon on the Epson Scan window. 1. Do one of the following to select the folder in which you want to save - Epson Perfection V19 | User Manual - Page 59
is readable by Windows and OS X systems using Adobe Reader, Acrobat, or other programs. You can save multi-page documents in one PDF file. PICT (*.pct) A standard image file format for most OS X programs. PRINT Image Matching II (*.jpg or *.tif) File formats that include Epson PRINT Image Matching - Epson Perfection V19 | User Manual - Page 60
Using Easy Photo Scan Restoring Photo Colors as You Scan Scanning to a SharePoint Server or Cloud Service Scanning Multi-Page Originals as Separate Files - Windows Scanning Two Originals onto One Sheet (Stitching Images) (Windows) Scanning to a PDF File Using a Scanner Button Using the Scanner - Epson Perfection V19 | User Manual - Page 61
provides an interface for TWAIN-compliant OCR scanning software. To download Epson Scan, visit Epson's driver download site (U.S. downloads or Canadian downloads). 1. Place your original on your product for scanning. 2. Do one of the following to open Easy Photo Scan: • Windows 8.x: Navigate to the - Epson Perfection V19 | User Manual - Page 62
like this: 3. Click the Scan icon. Your scanning program launches. 4. Click Scan in the window that appears to scan your original. The scanned image is displayed in the Easy Photo Scan window with an automatically generated name. 5. To edit the name of the file, select the image thumbnail at the - Epson Perfection V19 | User Manual - Page 63
the icons in order to see all of them. The available icons may vary, depending on the software version you are using. Parent topic: Scanning to Online Destinations Using Easy Photo Scan Related tasks Uploading Scanned Images to Facebook Uploading Scanned Images to Picasa Uploading Scanned Images to - Epson Perfection V19 | User Manual - Page 64
You see a window like this: Note: If you have already configured a Facebook account in Easy Photo Scan, you can select the Setting Name or Destination Name for the account, click Login if necessary, and click Send to upload your images. 3. Click - Epson Perfection V19 | User Manual - Page 65
and click OK. 10. Click Send to upload the images to your Facebook account, or click Cancel to cancel the operation. Parent topic: Scanning to Online Destinations Using Easy Photo Scan Related references Epson JPEG File Settings Related tasks Scanning Using Easy Photo Scan Uploading Scanned Images - Epson Perfection V19 | User Manual - Page 66
You see a window like this: Note: If you have already configured a Picasa account in Easy Photo Scan, you can select the Setting Authentication screen, log into your Google account. 5. Click Accept to allow Easy Photo Scan to upload images to your account. An authentication code is generated. 6. - Epson Perfection V19 | User Manual - Page 67
10. Photo Scan Related references Epson JPEG File Settings Related tasks Scanning Using Easy Photo Scan Uploading Scanned Images to Evernote You can configure an Evernote account for use with Easy Photo Scan and upload your scanned images to it (Windows only). 1. Scan your original using Easy Photo - Epson Perfection V19 | User Manual - Page 68
You see a window like this: Note: You must install Evernote before you can use it with Easy Photo Scan. Note: If you have already configured an Evernote account in Easy Photo Scan, you can select the Setting Name or Destination Name for the account and click Send to upload your images. 3. Select a - Epson Perfection V19 | User Manual - Page 69
your Evernote account, or click Cancel to cancel the operation. Parent topic: Scanning to Online Destinations Using Easy Photo Scan Related references Epson JPEG File Settings Related tasks Scanning Using Easy Photo Scan Uploading Scanned Images to SugarSync You can configure a SugarSync account for - Epson Perfection V19 | User Manual - Page 70
You see a window like this: Note: If you have already configured a SugarSync account in Easy Photo Scan, you can select the Setting Name or Destination Name for the account and click Send to upload your images. 3. Enter the account information in - Epson Perfection V19 | User Manual - Page 71
the selected file format, click Options or Option and select the options you want. 10. If you also want to save the images to a local folder, select the Using Easy Photo Scan Related references Epson JPEG File Settings Epson TIFF and Multi-TIFF File Settings Related tasks Scanning Using Easy Photo - Epson Perfection V19 | User Manual - Page 72
You see a window like this: Note: If you have already configured a Web Folder account in Easy Photo Scan, you can select the Setting Name or Destination Name for the account and click Send to upload your pictures. 3. Enter the Web Folder URL - Epson Perfection V19 | User Manual - Page 73
. 10. Epson JPEG File Settings Epson TIFF and Multi-TIFF File Settings Related tasks Scanning Using Easy Photo Scan Uploading Scanned Images to Email You can save your scanned images to a local network folder and send them by email using Easy Photo Scan. Note: With Windows, Easy Photo Scan supports - Epson Perfection V19 | User Manual - Page 74
and email text in the window. If you have already configured email settings in Easy Photo Scan, you can select them using the Destination Name field. 3. Using Easy Photo Scan Related references Epson JPEG File Settings Epson TIFF and Multi-TIFF File Settings Related tasks Scanning Using Easy Photo - Epson Perfection V19 | User Manual - Page 75
You see a window like this: 3. Select Using Easy Photo Scan Related references Epson JPEG File Settings Epson TIFF and Multi-TIFF File Settings Related tasks Scanning Using Easy Photo Scan Epson JPEG File Settings You can select from the following settings in the JPEG settings window in Easy Photo - Epson Perfection V19 | User Manual - Page 76
resolution. Allows the ICC profile (information on color reproducibility of scanned image) to be embedded in the image. Programs that use color management software will display the colors of the image using the ICC profile. Parent topic: Scanning to Online Destinations Using Easy Photo Scan 76 - Epson Perfection V19 | User Manual - Page 77
higher quality. Allows the ICC profile (information on color reproducibility of scanned image) to be embedded in the image. Programs that use color management software will display the colors of the image using the ICC profile. Parent topic: Scanning to Online Destinations Using Easy Photo Scan 77 - Epson Perfection V19 | User Manual - Page 78
or a cloud service. 1. Do one of the following to start Document Capture Pro (Windows) or Document Capture (OS X): • Windows 8.x: Navigate to the Apps screen and select Document Capture Pro. • Windows (other versions): Click or Start, and select All Programs or Programs. Select EPSON Software, then - Epson Perfection V19 | User Manual - Page 79
• OS X: Open the Applications folder, select the Epson Software folder, and select Document Capture. You see a window like this: 2. Click the Scan icon. 3. Select any displayed scan settings you want to use. Note: See the Help information in Document Capture Pro or Document Capture for details. 4. - Epson Perfection V19 | User Manual - Page 80
-Page Originals as Separate Files - Windows You can use Document Capture Pro (Windows only) to scan multi-page originals Windows 8.x: Navigate to the Apps screen and select Document Capture Pro. • Windows (other versions): Click or Start, and select All Programs or Programs. Select EPSON Software - Epson Perfection V19 | User Manual - Page 81
: 3. Click the Scan icon. 4. Select any displayed scan settings you want to use. Note: See the Help information in Document Capture Pro for details. 5. Click Scan. You see a preview of your scan in the Document Capture Pro window. 6. Click one of the Destination icons to choose where to send your - Epson Perfection V19 | User Manual - Page 82
used to separate the originals, select a folder name specification, and click OK. 10 Perfection V39). 1. Do one of the following to start ArcSoft Scan-n-Stitch Deluxe: • Windows 8.x: Navigate to the Apps screen and select Scan-n-Stitch. • Windows see a window like this: 2. Follow the instructions on - Epson Perfection V19 | User Manual - Page 83
as you scan to PDF: • Scan multiple pages to one PDF file • Scan multiple pages to multiple PDF files • Create a searchable PDF file 1. Place your original on your product for scanning. 2. Press the PDF button on your scanner. You see this window: PDF button on your scanner. 3. Click Settings. 83 - Epson Perfection V19 | User Manual - Page 84
You see this window: 4. Select the Image Type setting for the type of original you are scanning. 5. Select the Size, Orientation, and Resolution settings for your scan. 6. Select any of the available Image Adjustments settings. 7. Click File save settings. 84 - Epson Perfection V19 | User Manual - Page 85
You see this window: 8. To change any of the displayed PDF Image Format settings, click the Options button. 85 - Epson Perfection V19 | User Manual - Page 86
You see this window: 9. Select one of the following options on the General tab to indicate the number of PDF files you want to create: • To create one PDF file of all the scanned pages, select Create file with all pages. • To create multiple PDF files of groups of scanned pages, select Select number - Epson Perfection V19 | User Manual - Page 87
10. Click OK. 11. Click Close to close the Scan to PDF Settings window. 12. Click the large Scan button. Epson Scan scans your page. 13. Choose one of the following options on the screen: • If you are scanning only one page, click Finish. • If you - Epson Perfection V19 | User Manual - Page 88
: Scanning to a PDF File Using a Scanner Button Using the Scanner as a Copier - Copy Utility You can use your scanner along with a printer connected to your computer just like you would use a copy machine. Using the Copy Utility, you can enlarge or reduce, restore faded colors, and adjust a variety - Epson Perfection V19 | User Manual - Page 89
You see a window like this: 2. Click the Scan icon. 89 - Epson Perfection V19 | User Manual - Page 90
You see a window like this: Note: If you started the scan from a scanner button, the Epson Scan window opens automatically. If you have previously used Epson Scan, it may start in a different mode. 3. Select any scan settings you want to use. Note: See the Help information in Epson Scan for details. - Epson Perfection V19 | User Manual - Page 91
4. Click Scan. You see a thumbnail of your scan in the Copy Utility window. You may need to click Close on the Epson Scan window to display the thumbnail. 5. If you would like to scan additional originals and add them to the current captured images, click Scan again. 6. Rotate the - Epson Perfection V19 | User Manual - Page 92
these sections if you need to clean or transport your scanner. Cleaning Your Scanner Transporting Your Scanner Cleaning Your Scanner To keep your product working at its best, you should clean it several times a year. Caution: Do not use a hard brush, alcohol, or paint thinner to clean the product - Epson Perfection V19 | User Manual - Page 93
moves to the home position. 2. Disconnect the USB cable. 3. Place the scanner in its original packing materials if possible, or use equivalent materials with cushioning around the scanner. Caution: Avoid turning the scanner upside down when transporting. Parent topic: Cleaning and Transporting Your - Epson Perfection V19 | User Manual - Page 94
sections for solutions to problems you may have using your product. Scanner Light Status Solving Scanning Problems Solving Scanned Image Quality Problems When to Uninstall Your Scanner Software Where to Get Help Scanner Light Status You can often diagnose problems with your scanner by checking the - Epson Perfection V19 | User Manual - Page 95
Epson for support. Off The scanner is turned off. Parent topic: Solving Problems Solving Scanning Problems Check these solutions if you have problems scanning with your product. Scanner Does Not Turn On or Turns Off Unexpectedly Scanner Buttons Do Not Work as Expected Scanning Software Does - Epson Perfection V19 | User Manual - Page 96
automatically. Start Epson Scan to turn on the scanner. Parent topic: Solving Scanning Problems Related tasks Starting a Scan Using the Epson Scan Icon Uninstalling Scanner Software - Windows Uninstalling Scanner Software - OS X Scanner Buttons Do Not Work as Expected If the scanner buttons do not - Epson Perfection V19 | User Manual - Page 97
• If you are using a TWAIN-compliant program, make sure that the correct product is selected as the Scanner or Source setting. Parent topic: Solving Scanning Problems Cannot Start Epson Scan If you cannot start Epson Scan, try these solutions: • Make sure your scanner is turned on and any interface - Epson Perfection V19 | User Manual - Page 98
using the thumbnail preview in Epson Scan, check the following: • Make sure you are using Home Mode or Professional Mode. • If you are using Home Mode, the Document Type must be set to Photograph. Parent topic: Solving Scanning Problems Scanned Image Colors Do Not Match Original Colors Scan Area - Epson Perfection V19 | User Manual - Page 99
with a soft, dry, lint-free cloth or use a small amount of glass cleaner on the cloth, if necessary. Paper towels are not recommended. Caution: Do not spray glass cleaner directly on the scanner glass. Parent topic: Solving Scanned Image Quality Problems Straight Lines in an Image Appear Crooked If - Epson Perfection V19 | User Manual - Page 100
select the Color tab and adjust these Epson Scan Epson Scan settings (if available) and try scanning again: • Select the Descreening setting. • Select a lower Resolution setting. Parent topic: Solving Scanned Image Quality Problems Image is Scanned Upside-Down Your product scans using the Auto Photo - Epson Perfection V19 | User Manual - Page 101
management capabilities of your computer, display adapter, and the software you are using to see if they are affecting the palette of colors you see on your screen. To adjust the colors in your scanned image, adjust these Epson Scan settings (if available) and try scanning again: • Change the Image - Epson Perfection V19 | User Manual - Page 102
instructions for your operating system. Uninstalling Scanner Software - Windows Uninstalling Scanner Software - OS X Parent topic: Solving Problems Uninstalling Scanner Software - Windows You can uninstall and then re-install your scanner software to solve certain problems. 1. Turn off the scanner - Epson Perfection V19 | User Manual - Page 103
here. Note: If you find that re-installing your scanner software does not solve a problem, contact Epson. 1. To download the Uninstaller utility, visit the Epson download site (U.S. downloads or Canadian downloads). 2. Follow the instructions on the screen to install the Uninstaller utility. 3. Quit - Epson Perfection V19 | User Manual - Page 104
contact Epson for technical support services, use the following support options. Internet Support Visit Epson's support website at epson.com/support (U.S.) or epson.ca/support (Canada) for solutions to common problems. You can download drivers and documentation, get FAQs and troubleshooting advice - Epson Perfection V19 | User Manual - Page 105
Windows 8.x, Windows 7, Windows Vista, Windows XP Service Pack 2 or later USB 2.0 (Type-B standard connector) Parent topic: Technical Specifications Mac System Requirements Make sure your system meets these requirements before using it with your scanner. System Interface OS X 10.10.x, 10.9.x, 10 - Epson Perfection V19 | User Manual - Page 106
Parent topic: Technical Specifications General Specifications Scanner type Photoelectric device Effective pixels Document size Scanning resolution Output resolution Image data Interface Light source Flatbed, color CIS 40800 × 56160 pixels at 4800 dpi Scanning area may be restricted if resolution - Epson Perfection V19 | User Manual - Page 107
Specifications Temperature Humidity (non-condensing) Operating conditions Operating: 50 to 95 °F (10 to 35 °C) Storage: -4 to 140 °F (-20 to 60 °C) Operating 80% RH Ordinary office or home conditions Note: Avoid operating the scanner in direct sunlight, near a strong light source, or in extremely - Epson Perfection V19 | User Manual - Page 108
Parent topic: Technical Specifications Safety and Approvals Specifications United States Canada EMC: FCC part 15 Subpart B class B EMC: CAN/CSA-CEI/IEC CISPR 22 Class B Parent topic: Technical Specifications 108 - Epson Perfection V19 | User Manual - Page 109
Epson Products Restrictions on Copying Trademarks Copyright Notice Important Safety Instructions Follow these safety instructions when setting up and using the scanner: • Read all these instructions, and follow all warnings and instructions marked on the scanner. • Place the scanner (10 cm scanner - Epson Perfection V19 | User Manual - Page 110
service personnel under the following conditions: Liquid has entered the scanner; the scanner has been dropped or the case has been damaged; the scanner does not operate normally or exhibits a distinct change in performance. (Do not adjust controls that are not covered by the operating instructions - Epson Perfection V19 | User Manual - Page 111
this product, or (excluding the U.S.) failure to strictly comply with Seiko Epson Corporation's operating and maintenance instructions. Seiko Epson Corporation shall not be liable for any damages or problems arising from the use of any options or any consumable products other than those designated - Epson Perfection V19 | User Manual - Page 112
OF DAMAGE, AND ON ANY THEORY OF LIABILITY, ARISING OUT OF OR IN CONNECTION WITH THE USE OR PERFORMANCE OF THIS SOFTWARE. Parent topic: Copyright Notice A Note Concerning Responsible Use of Copyrighted Materials Epson encourages each user to be responsible and respectful of the copyright laws when - Epson Perfection V19 | User Manual - Page 113
Copyright Attribution © 2015 Epson America, Inc. 1/15 CPD-42186 Parent topic: Copyright Notice 113
-
 1
1 -
 2
2 -
 3
3 -
 4
4 -
 5
5 -
 6
6 -
 7
7 -
8
-
9
-
10
-
11
-
12
-
13
-
14
-
15
-
16
-
17
-
18
-
19
-
20
-
21
-
22
-
23
-
24
-
25
-
26
-
27
-
28
-
29
-
30
-
31
-
32
-
33
-
34
-
35
-
36
-
37
-
38
-
39
-
40
-
41
-
42
-
43
-
44
-
45
-
46
-
47
-
48
-
49
-
50
-
51
-
52
-
53
-
54
-
55
-
56
-
57
-
58
-
59
-
60
-
61
-
62
-
63
-
64
-
65
-
66
-
67
-
68
-
69
-
70
-
71
-
72
-
73
-
74
-
75
-
76
-
77
-
78
-
79
-
80
-
81
-
82
-
83
-
84
-
85
-
86
-
87
-
88
-
89
-
90
-
91
-
92
-
93
-
94
-
95
-
96
-
97
-
98
-
99
-
100
-
101
-
102
-
103
-
104
-
105
-
106
-
107
-
108
-
109
-
110
-
111
-
112
-
113
 |
 |

Perfection V19/V39 User's Guide