Epson PowerLite500c Installation Guide - ELPMBUNI Universal Mount Assembly
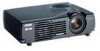
Epson PowerLite500c - PowerLite 500C SVGA LCD Projector Manual
 |
View all Epson PowerLite500c manuals
Add to My Manuals
Save this manual to your list of manuals |
Epson PowerLite500c manual content summary:
- Epson PowerLite500c | Installation Guide - ELPMBUNI Universal Mount Assembly - Page 1
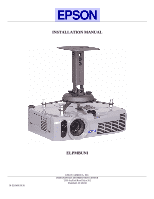
INSTALLATION MANUAL IN-ELPMBUNI.R3 ELPMBUNI EPSON AMERICA, INC. INDIANAPOLIS DISTRIBUTION CENTER 2350 Stafford Road Suite 101 Plainfield, IN 46168 - Epson PowerLite500c | Installation Guide - ELPMBUNI Universal Mount Assembly - Page 2
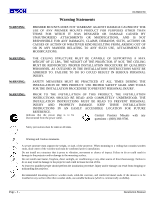
PURPOSE. Contact Premier Mounts In the event of missing and/or damage equipment, or technical questions, the following information can help in the completion of the installation. Customer Service - (800) 368-9700 Technical Support - [email protected] Installation Instructions Page - 3 - - Epson PowerLite500c | Installation Guide - ELPMBUNI Universal Mount Assembly - Page 3
is to be disconnected from the power outlet. Contact Premier Mounts with any questions - (800) 368-9700. Safety precautions must be taken at all times. Warning and Caution statements. A secure structure must support the weight, or load, of the projector. When mounting to a ceiling that contains - Epson PowerLite500c | Installation Guide - ELPMBUNI Universal Mount Assembly - Page 4
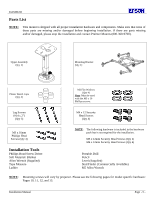
Head Screws (Qty 4) M6 x 12mm Security Head Screws (Qty 4) Portable Drill Pencil Level (Supplied) Stud Finder (Commercially Available) M5 Allen Wrench NOTE: Mounting screws will vary by projector. Please see the following pages for model specific hardware: Pages 10, 11, 12, and 13. Installation - Epson PowerLite500c | Installation Guide - ELPMBUNI Universal Mount Assembly - Page 5
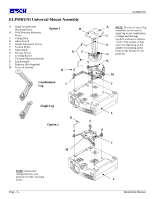
Security Screws I Leveling Barrels J Universal Mounting Bracket K Leg Assembly L Projector (Not Supplied) M Tri-Lock Opening Option 1 H B D F Combination I Leg Single Leg D Option 2 M NOTE: See the best configuration for your projector for filter and lamp access. Page - 6 - ELPMBUNI A NOTE - Epson PowerLite500c | Installation Guide - ELPMBUNI Universal Mount Assembly - Page 6
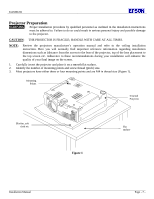
serious personal injury and possible damage to the projector. CAUTION: THE PROJECTOR IS FRAGILE; HANDLE WITH CARE AT ALL TIMES. NOTE: Review the projectors manufacture's operation manual and refer to the ceiling installation instruction. Here you will normally find important reference information - Epson PowerLite500c | Installation Guide - ELPMBUNI Universal Mount Assembly - Page 7
ELPMBUNI 4. Separate the upper assembly from the projector mounting bracket by slightly loosening the two tension knurl knobs to create free play between the bracket Tri-Lock Opening Rotate 180° To Unlock Tension Knobs Upper Assembly Safety Knob Figure 3 Figure 4 Page - 8 - Installation Manual - Epson PowerLite500c | Installation Guide - ELPMBUNI Universal Mount Assembly - Page 8
The levelers and leg assembly screws must be loose in order to adjust the height of the mounting bracket. FIGURE 6 Two-Piece Leg FIGURE 7 One-Piece Leg Allen Wrench Mounting Hardware Inverted Projector Leveling Barrels FIGURE A Installation Manual Figure 5 Line up the leveling barrels to the - Epson PowerLite500c | Installation Guide - ELPMBUNI Universal Mount Assembly - Page 9
: If your projector model is not shown, when arranging the leg combination, simply ensure access to filters and lamp housings when aligning brackets. This mount works with all sub-25 pound projectors. PowerLite S3, S4, 62C, 76C, 82C, Hardware: M4 x 12mm (Qty 3) Page - 10 - PowerLite 830p, 835p - Epson PowerLite500c | Installation Guide - ELPMBUNI Universal Mount Assembly - Page 10
ELPMBUNI Top View Front View PowerLite 732c, 737c, 740C, 745C, 750c, 755c, 760c, 765c Hardware: M4 x 12mm (Qty 3) Installation Manual Page - 11 - - Epson PowerLite500c | Installation Guide - ELPMBUNI Universal Mount Assembly - Page 11
ELPMBUNI PowerLite 7800p, 7850p, 7900p Hardware: M4 x 12mm (Qty 4) Page - 12 - PowerLite 61p, 81p, 821p Hardware: M4 x 12mm (Qty 4) Installation Manual - Epson PowerLite500c | Installation Guide - ELPMBUNI Universal Mount Assembly - Page 12
ELPMBUNI PowerLite S1, S1+ Hardware: M4 x 12mm (Qty 3) Installation Manual PowerLite 6100i Hardware: M4 x 12mm (Qty 4) Page - 13 - - Epson PowerLite500c | Installation Guide - ELPMBUNI Universal Mount Assembly - Page 13
bracket so that it avoids most, if not all, ventilation points (including lamp & filter access doors). 2. When the position desired is achieved tighten the mounting hardware to the projector then tighten the hex head leg screws with the Allen wrench (supplied) (Figure 8 and Figure 9). CAUTION - Epson PowerLite500c | Installation Guide - ELPMBUNI Universal Mount Assembly - Page 14
to parallel with the top image edge of the screen as well. 4. Before you mount your screen and projector, make sure the mounting location will safely support the weight of the projector. NOTE: Make sure to measure from the center of the mounting bracket to the front edge of the lens to determine - Epson PowerLite500c | Installation Guide - ELPMBUNI Universal Mount Assembly - Page 15
Profile Installation 1. If your installation requires the overall height of the mount to be less that the approximate 9" shown with the standard mount assembly, you can convert the height to only 2 ½" by simply , and Star Washers (Both Sides) Page - 16 - Figure 10 Bell Housing Installation Manual - Epson PowerLite500c | Installation Guide - ELPMBUNI Universal Mount Assembly - Page 16
the star washers on a close ceiling application. Allen Wrench Wood Stud Secure the Bell Housing with Two M8 x 16mm Screws and Flat Washers Only Installation Manual Page - 17 - - Epson PowerLite500c | Installation Guide - ELPMBUNI Universal Mount Assembly - Page 17
with the safety knob to lock the mounting bracket to the upper assembly Insert universal bracket to the tri-lock, then rotate the projector 180° Universal Mount Page - 18 - Safety Knurl Knob Tension Knurl Knobs Figure 13 Tri-Lock Opening Alignment Slot Projector Mount Installation Manual - Epson PowerLite500c | Installation Guide - ELPMBUNI Universal Mount Assembly - Page 18
ELPMBUNI Final Adjustments 1. With the projector secured in the mount and power on and signal supplied to the projector you can now proceed with the final height, tilt, and roll and yaw to optimize the projected image. 2. The height can be adjusted by slightly loosening the two 8mm height - Epson PowerLite500c | Installation Guide - ELPMBUNI Universal Mount Assembly - Page 19
ELPMBUNI Installing the Plastic Caps 1. Once all the final adjustments have been done, install the plastic caps on the leveling barrels (Figure 17). Figure 17 Page - 20 - Installation Manual
-
 1
1 -
 2
2 -
 3
3 -
 4
4 -
 5
5 -
 6
6 -
 7
7 -
8
-
9
-
10
-
11
-
12
-
13
-
14
-
15
-
16
-
17
-
18
-
19
 |
 |
INSTALLATION MANUAL
ELPMBUNI
EPSON AMERICA, INC.
INDIANAPOLIS DISTRIBUTION CENTER
2350 Stafford Road Suite 101
Plainfield, IN 46168
IN-ELPMBUNI.R3