Epson PowerLite700c User Manual
Epson PowerLite700c - PowerLite 700C XGA LCD Projector Manual
 |
View all Epson PowerLite700c manuals
Add to My Manuals
Save this manual to your list of manuals |
Epson PowerLite700c manual content summary:
- Epson PowerLite700c | User Manual - Page 1
EPSON® PowerLite® 500c/700c/710c Multimedia Projector User's Guide Supplement - Epson PowerLite700c | User Manual - Page 2
the projector, except the lamp and filter covers. Dangerous electrical voltages inside the projector can severely injure you. Except as specifically explained in the User's Guide or this Supplement, do not attempt to service this product yourself. Refer all servicing to qualified service personnel - Epson PowerLite700c | User Manual - Page 3
10 Connecting the Computer Cable 11 Connecting the Audio Cable 13 Connecting the Cable for Remote Mouse Control . . . . 13 Turning the Projector On and Off 14 Turning On Other Equipment 16 B Using the Projector Menus Changing Menu Settings 18 Video Menu (Computer Image Source 20 Video Menu - Epson PowerLite700c | User Manual - Page 4
C Technical Specifications Index General 33 Projection Lamp 34 Remote Control 34 Mouse Compatibility 34 Remote IR Receiver 34 Mechanical 34 Electrical 34 Environmental 34 Safety 35 CE Marking 35 Supported Monitor Displays 35 Computer Connector Pin Assignments 37 4 - Epson PowerLite700c | User Manual - Page 5
to control the screen cursor. s Provide audio for one or both image sources. The audio source can be the computer, video source, or another device such as a stereo. s Connect to an external speaker or PA system to amplify the audio (see your User's Guide for instructions). Positioning the Projector - Epson PowerLite700c | User Manual - Page 6
image high enough on the screen. Then you can use the projector's keystone control to correct the distortion caused by tilting up the front of the projector. The distance between the projector and the screen determines the actual image size. Use the general guidelines in the table below to determine - Epson PowerLite700c | User Manual - Page 7
configurations vary. See your computer manual for the location of the ports needed to connect your projector. Power Inlet Mouse/Com Mouse/ the mouse cable (if you want to use the remote control as a mouse) If you connect the projector to your desktop computer, you cannot view your images on - Epson PowerLite700c | User Manual - Page 8
to the projector's Computer port. 3. Connect the other end of the cable to your computer's video (monitor) port. 4. Tighten the screws on all connectors. If you don't need to make any other connections, you can plug in your projector and turn it on. See page 14 for instructions. 8 Connecting to - Epson PowerLite700c | User Manual - Page 9
system to the projector. See your User's Guide for instructions. Connecting the projector. Audio in jack audio cable 2. Connect the other end of the audio cable to the speaker or audio out port on your computer's sound card. Connecting the Cable for Remote Mouse Control Using the remote control - Epson PowerLite700c | User Manual - Page 10
mouse will be disabled while you are using the remote control as a mouse.) note Macintosh configurations vary. See your computer manual for the location of the ports needed to connect your projector. Connecting to a Desktop Macintosh To connect the projector to your desktop Macintosh,® you need to - Epson PowerLite700c | User Manual - Page 11
the documentation for your Macintosh to determine what type of connections are available. Connecting the Computer Cable Before you start, make sure your projector, computer, and all peripherals are all turned off. 1. Disconnect the monitor cable from the monitor port on the back of your Macintosh - Epson PowerLite700c | User Manual - Page 12
according to the resolution you want to use (such as 16-inch mode). See your Macintosh documentation for instructions. s Connect the small end of the Macintosh adapter to the connections, you can plug in your projector and turn it on. See page 14 for instructions. 12 Connecting to a Desktop Computer - Epson PowerLite700c | User Manual - Page 13
address system to the projector. See your User's Guide for instructions. Connecting the Audio Cable projector. Audio in jack audio cable 2. Connect the other end of the audio cable to the speaker jack on your Macintosh. Connecting the Cable for Remote Mouse Control Using the remote control - Epson PowerLite700c | User Manual - Page 14
s Flat USB mouse port 2. Connect one end of the appropriate mouse cable to the standard Mouse/Com port or the USB Mouse port on the projector. connecting Mac mouse cable connecting USB mouse cable 3. Connect the other end to the port on your Macintosh. Turning the - Epson PowerLite700c | User Manual - Page 15
remove the lens cap. Squeeze here warning Never look into the lens when the lamp is on. This can damage your eyes, and is especially dangerous for children. 5. Press the red Power button on top of the projector. power button power light The power light flashes green, and then stays on. You - Epson PowerLite700c | User Manual - Page 16
has cooled, the orange light stays on and the fan shuts off. If you want to turn the projector on again, wait until the orange light stops flashing. Then press the Power button. 3. When you are finished using the projector, replace the lens cap, retract the lens, and unplug the power cord. Turning - Epson PowerLite700c | User Manual - Page 17
available on the remote control. s Setting Controls settings such as menu language, use of startup screen, color temperature, and rear or ceiling projection. s About Provides information about lamp usage and the current display settings. s Reset All Restores the factory defaults for all the projector - Epson PowerLite700c | User Manual - Page 18
to change menu settings. To change a menu setting: 1. To access the menu system, open the cover on the lower part of the remote control and press the Menu button. Freeze A/V Mute E-Zoom Power R/C ON OFF 3 2 5 4 1 Enter Menu button Esc Menu Help Comp S-Video Video Auto Resize P in - Epson PowerLite700c | User Manual - Page 19
go back to the default settings on any menu, select Reset, press Enter, select Yes, and then press Enter. 7. Press the Esc button on the remote to go back to the main menu display. Your changes are saved automatically. 8. Press the Menu button to exit the menu system. The settings available - Epson PowerLite700c | User Manual - Page 20
options are limited to being enabled (turned on) or disabled (turned off). The computer must be connected and operating, and the image source on the projector must be set to Computer for you to access these menu options. The Video menu lets you make adjustments to the projected image. The following - Epson PowerLite700c | User Manual - Page 21
computer automatically optimize the image for projection. Adjusts the projected image for natural coloration. Returns all menu items to their initial factory defaults. Using the Projector Menus 21 - Epson PowerLite700c | User Manual - Page 22
Video, and the video source (such as a VCR or camcorder) must be connected and operating for you to access these menu options. For example, the projector must actually be projecting the image from your video tape if you're using a VCR. Video Menu (Video Image Source) The Video menu lets you - Epson PowerLite700c | User Manual - Page 23
the Audio menu to adjust the sound volume and quality of your audio. Menu item Volume Tone Reset Description Adjusts the volume level for the projector's speaker and audio-out terminal. Increase the setting to raise the volume, or decrease it to lower the volume. Adjusts the sound quality. Move - Epson PowerLite700c | User Manual - Page 24
Effect Menu The Effect menu lets you customize the drawing tools available on the remote control. Menu item Cursor/ Stamp Box Marker Freehand Cursor Speed Reset Description Selects the stamp , Middle, or High. Returns all menu items to their initial factory defaults. 24 Using the Projector Menus - Epson PowerLite700c | User Manual - Page 25
S-Video) for the picture-in-picture subscreen. Specifies whether no screen, a black screen, a blue screen, or a user logo is displayed when the projector is not receiving a signal. Turns off the message identifying the image source (computer or video). Specifies whether a blue, black, or user logo - Epson PowerLite700c | User Manual - Page 26
then use it as the screen displayed when the projector is not receiving a signal. You can also set it as a startup screen or to be displayed when you press the A/V Mute button on the remote. The image can be a company logo, slogan, photograph, or another other image you want to use. Capturing - Epson PowerLite700c | User Manual - Page 27
press Enter. A selection box displays over the image. 5. Use the Enter button on the remote control to select the area of the image you want to use. Once you have selected the Enter button on the remote control to select a zoom rate (display size), and then press Enter. Using the Projector Menus 27 - Epson PowerLite700c | User Manual - Page 28
8. When the following message appears, select Yes and press Enter. Saving the logo may take a few moments. Do not use the projector or other sources (computer, video, speaker, etc.) while the logo is being saved. 9. When you see the following message, press the Menu or Enter button - Epson PowerLite700c | User Manual - Page 29
highlight No-Signal Msg. 5. Press the right side of the Enter button to select Logo. This sets your image as the screen displayed when the projector is not receiving a signal. 6. If you want to set up your image as the A/V mute display, press the bottom edge of the Enter button (or - Epson PowerLite700c | User Manual - Page 30
menu lets you set additional projector options. Menu item Language Startup Screen Color Temp Rear Proj. Ceiling Reset Description Selects normal image). Flips the projected image so it looks correct when the projector is mounted upside-down from the ceiling. Selecting ON turns the feature on, while - Epson PowerLite700c | User Manual - Page 31
Source) When the image source is a computer, the About menu displays information about the projector's horizontal and vertical frequency, lamp hours, and computer connection. Menu item Lamp Frequency Sync Polarity Sync Mode Resolution Refresh Rate Description Displays the number of hours the - Epson PowerLite700c | User Manual - Page 32
Image Source) When the image source is video, the About menu displays information about the projector's lamp hours and video signal. Menu item Description Lamp Displays the number of hours the current lamp has been used. Video Signal Displays the input image signal mode. Reset All Feature The - Epson PowerLite700c | User Manual - Page 33
(ANSI) 700c: 800 lumens (ANSI) 710c: 1000 lumens (ANSI) 2.2 to 25 feet (0.7 to 7.6 meters) 3.6 to 45.3 feet (1.1 to 13.8 meters) Front, rear, upside-down (ceiling mount) 1 monaural 4:3 (horizontal:vertical) 1.2:1 ±15° NTSC, NTSC4.43, PAL, PAL-M, PAL-N, PAL60, SECAM Technical Specifications 33 - Epson PowerLite700c | User Manual - Page 34
120 W Lamp life About 2000 hours Part number ELPLP10S (710c) ELPLP10B (500c, 700c) Range 32.8 feet (10 meters) Batteries Alkaline AA (2) Supports PS/2, USB, Macintosh Supports EPSON Remote IR Receiver, 10-foot cable (typical use for rear screen projection) Height 2.8 to 3.0 inches (72 - Epson PowerLite700c | User Manual - Page 35
Monitor Displays United States FCC Part 15J Class B UL1950 Rev. 3 Canada DOC SOR/88-475 CSA C22.2 No. 950 Rev. 3 Directive 89/336/EEC EN 55022 Class B EN 50082-1 Directive 73/23/EEC EN 60950 The following table lists the display formats supported by the projector: Mode VGACGA VGAEGA NEC400 - Epson PowerLite700c | User Manual - Page 36
433 / 86.871 63.981 / 60.02 79.976 / 75.025 91.146 / 85.024 UXGA48i UXGA60 (these are not supported by PowerLite 500c) 1600 x 1200 1600 x 1200 62.5 / 96.08 75 / 60 MACLC13 MACII13 MAC16 MAC19-60 MAC19 MAC21 640 x 480 640 not allow the image to be displayed correctly. 36 Technical Specifications - Epson PowerLite700c | User Manual - Page 37
7 Green video GND 8 Blue video GND 9 Reserve 10 Synchronous GND 11 GND 12 SDA 13 Horizontal sync/composite sync 14 Vertical sync 15 SCL Technical Specifications 37 - Epson PowerLite700c | User Manual - Page 38
from projector to screen, 5 to 6 Drawing tools, 24 E Effect menu, 24 Electrical specifications, 34 Environmental specifications, 34 to 35 F Formats, supported display, 35 to 36 G Gamma setting, 21, 22 H Humidity requirements, 34 I Image adjusting position, 20, 22 adjusting quality, 20 to 22 size - Epson PowerLite700c | User Manual - Page 39
, 25 supply, 34 Projector distance to screen, 6 hanging from the ceiling, 30 lamp specifications, 34 positioning, 5 to 6 positioning the screen image, 20, 22 setting up, 5 turning off, 16 turning on, 14 R Rear projection, 30 Remote control buttons, 18 to 19 specifications, 34 Reset All feature - Epson PowerLite700c | User Manual - Page 40
EPSON® PowerLite® 500c/700c/710c Multimedia Projector User's Guide - Epson PowerLite700c | User Manual - Page 41
cover on the projector, except the lamp and filter covers. Dangerous electrical voltages inside the projector can severely injure you. Except as specifically explained in this User's Guide, do not attempt to service this product yourself. Refer all servicing to qualified service personnel. WARNING - Epson PowerLite700c | User Manual - Page 42
More Information 3 Warnings, Cautions, and Notes 4 Registering 4 Reading Your Electronic Manuals 4 1 Getting Started Unpacking the Projector 8 Installing Batteries in the Remote Control 9 Positioning the Projector 9 Choosing Your Connections 11 Connecting to a PC Laptop 12 Connecting the - Epson PowerLite700c | User Manual - Page 43
Remote Control 30 Operating the Projector with the Remote Control . . . . 31 Using the Remote Control as a Wireless Mouse 32 Zooming Your Image with the Remote When the Lights Flash 40 Using the On-Screen Help 41 Shutting Down the Projector 42 3 Fine-Tuning Your Projector Using the Menus 46 - Epson PowerLite700c | User Manual - Page 44
Cleaning the Projector 60 Cleaning the Air Filter 61 Replacing the Lamp 62 Transporting the Projector 64 Projector Operation Problems 65 Problems with the Remote Control 67 Image or Sound Problems 68 Where To Get Help 71 Telephone Support Services 72 Important Safety Instructions 73 Remote - Epson PowerLite700c | User Manual - Page 45
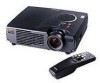
WWelcome Your EPSON® PowerLite® is the smallest, most lightweight projector to offer powerful 3-LCD performance. It weighs less than 6 pounds and displays full-color images at a resolution of 1024 × 768 pixels (PowerLite 700c/710c) or 800 × 600 pixels (PowerLite 500c). Producing up to 1000 ANSI - Epson PowerLite700c | User Manual - Page 46
Your PowerLite projector gives for tips on the best way to set up the projector based on room size. s Focus your content. Try to narrow down the as an authority. Using your projector and remote control will be easy with a little practice. See Chapter 2 for instructions. s Prepare for takeoff. - Epson PowerLite700c | User Manual - Page 47
Setup sheet, warranty brochure, CD-ROM, and EPSON PrivateLine Support card. Store this User's Guide in the folder and keep the folder with your projector at all times. s Quick Setup sheet Gives you all the instructions you need to get your PowerLite set up and connected to a laptop or PowerBook - Epson PowerLite700c | User Manual - Page 48
came with your EPSON PowerLite projector. This enables you to receive special information on accessories, new products, and services. You can register through the Internet, by e-mail or 800-number modem connection, or by printing out the form to fax or mail. Reading Your Electronic Manuals To read - Epson PowerLite700c | User Manual - Page 49
When you open an electronic manual, you'll see this toolbar: show navigation pane first buttons in the toolbar or the vertical scroll bar on the right side of the document to move through a manual. (The box to the left of the scroll bar displays the current page number.) s When your mouse pointer - Epson PowerLite700c | User Manual - Page 50
the Quick Setup sheet that came with the projector. You'll find more detailed information and additional instructions in this chapter, including: s Unpacking the projector s Installing batteries in the remote control s Positioning the projector s Choosing your connections s Connecting to a PC laptop - Epson PowerLite700c | User Manual - Page 51
Make sure you have all the parts shown: Freeze A/V Mute E-Zoom Power R/C ON OFF 3 2 5 4 1 Enter Esc batteries power cord computer cable projector remote control PS/2 mouse cable USB mouse cable A/V cable computer audio cable Macintosh mouse cable information packet Save all - Epson PowerLite700c | User Manual - Page 52
. If fluid gets on your hands, wash them immediately. Remove batteries if you will not be using the remote for a long period of time. Installing Batteries in the Remote Control The remote control operates the projector and lets you access its setup menus. You can also run your presentation with the - Epson PowerLite700c | User Manual - Page 53
The distance from the projector to the screen determines the actual size of the projected image, as shown: 37.7 ft 7.5 ft 3.6 ft note It is easier to position the projector when the screen is directly in front of the room. If the screen is placed diagonally in a corner, it is much more difficult - Epson PowerLite700c | User Manual - Page 54
presentation. s Computer connection For many presentations, the only connection you'll need is between your computer and the projector. To connect a PC laptop, see page 12. To connect a Macintosh PowerBook, see page 15. s Remote control connection To use the remote control as a wireless mouse, you - Epson PowerLite700c | User Manual - Page 55
-held devices. This section includes instructions for the following: s Connecting the computer cable s Connecting the audio cable s Connecting the mouse cable for remote mouse control Connecting the Computer Cable Before you start, make sure your laptop and the projector are turned off. 1. Connect - Epson PowerLite700c | User Manual - Page 56
display to appear on both the laptop's screen and the projector. Some laptops let you change this setting with the function keys or by using a setup utility provided by the computer manufacturer. Check your laptop's manual or online help for instructions. note If you need maximum volume (in a large - Epson PowerLite700c | User Manual - Page 57
Connecting the Cable for Remote Mouse Control Using the remote control as a wireless mouse gives you more flexibility. You can deliver your presentation from anywhere in the room and interact with the audience. You don't need to stand near your computer or near the projector. You'll use different - Epson PowerLite700c | User Manual - Page 58
to a PowerBook You can connect your projector to any PowerBook that supports an external monitor. This section includes instructions for the following: s Connecting the computer cable s Connecting the audio cable s Connecting the mouse cable for remote mouse control note If you have an older - Epson PowerLite700c | User Manual - Page 59
on the Macintosh adapter and set its DIP switches according to the resolution you want to use (such as 16-inch mode). See your PowerBook documentation for instructions. s Connect the small end of the Macintosh adapter to the computer cable. s Connect the computer cable (with the Macintosh adapter - Epson PowerLite700c | User Manual - Page 60
and turn it on. See page 22 for instructions. After you turn on the projector and computer, you'll need to choose Mirroring in the Display Control Panel of your PowerBook if you want to display on the LCD screen as well as the projector screen. note If you need maximum volume (in a large auditorium - Epson PowerLite700c | User Manual - Page 61
mouse port s Flat USB port 2. Connect one end of the mouse cable to the standard Mouse/Com port or the USB Mouse port on the projector. connecting MAC mouse cable connecting USB mouse cable 3. Connect the other end to the port on your PowerBook. 18 Getting Started - Epson PowerLite700c | User Manual - Page 62
, laser disc player, DVD player, digital camera, or any other video source to your projector. You can connect the video source and a computer at the same time, and easily switch between sources. The projector supports NTSC, PAL, and SECAM video formats, and automatically detects the one you're using - Epson PowerLite700c | User Manual - Page 63
the corresponding audio output jacks on your video source. Connecting S-Video Cables If your video source supports S-video, and you have an S-video cable, follow these instructions. Before you start, make sure the projector and your VCR or other video source are turned off. 1. Insert one end of an - Epson PowerLite700c | User Manual - Page 64
use an external audio system. Connecting to External Speakers or a PA System The projector's internal speaker is loud enough for most smallor medium-size rooms. For large rooms or maximum volume, you can connect the projector to external speakers or a public address (PA) system. You will need an - Epson PowerLite700c | User Manual - Page 65
light Kensington lock port 2. Plug the other end of the cord into a grounded electrical outlet. The power light on top of the projector turns orange. This indicates that the projector is receiving power, but is not yet turned on. 3. Use the tab on the lens ring to rotate the ring and pop - Epson PowerLite700c | User Manual - Page 66
a function key on your laptop to switch between the LCD screen and the projector, or to display on both at the same time. Check your laptop's manual or online help for instructions. On a PowerBook, you'll need to choose Mirroring in the Display Control Panel of your PowerBook if you want to display - Epson PowerLite700c | User Manual - Page 67
has cooled, the orange light stays on and the fan shuts off. If you want to turn the projector on again, wait until the orange light stops flashing. Then press the Power button. 3. When you are finished using the projector, replace the lens cap, retract the lens, and unplug the power cord. Turning - Epson PowerLite700c | User Manual - Page 68
PowerLite connected (as described in Chapter 1), you're ready to adjust the image and give your presentation. This chapter covers the following: s Displaying your image s Adjusting your image s Using the remote control s Zooming your image with the remote s Resizing your - Epson PowerLite700c | User Manual - Page 69
look into the lens when the lamp is on. This can damage your eyes, and is especially dangerous for children. Displaying Your Image Make sure your projector and other equipment are set up and connected correctly, following these guidelines: s Place the projector on a sturdy, level surface, between - Epson PowerLite700c | User Manual - Page 70
a function key on your laptop to switch between the LCD screen and the projector, or to display on both at the same time. Check your laptop's manual or online help for instructions. On a PowerBook, you'll need to choose Mirroring in the Display Control Panel of your PowerBook if you want to display - Epson PowerLite700c | User Manual - Page 71
you want is displayed, you may need to adjust the size, focus, position, and image shape. Focusing and Zooming Your the projector farther away from the screen. You can also use the E-Zoom button on the remote control to zoom in on a portion of the image. See page 33 for instructions. s If only part - Epson PowerLite700c | User Manual - Page 72
hold it while you press the blue foot release levers. This unlocks the feet. 2. While pressing the foot release levers, raise or lower the projector until the image is positioned where you want it. 3. Release the levers to lock the feet in the new position. 4. To fine-tune the height - Epson PowerLite700c | User Manual - Page 73
the Keystone button to adjust the image shape. 2. Press and hold either side of the Keystone button until the image is rectangular. Using the Remote Control The remote control lets you access all of your projector's features from anywhere in the room (up to 30 feet away). You can use it to turn the - Epson PowerLite700c | User Manual - Page 74
buttons, pull down the cover below the Esc button. The additional buttons on the lower part of the remote are shown at the left. See pages 33 to 36 for instructions on using these buttons to control the projector. Esc Menu Help Comp S-Video Video Auto Resize P in P - Volume + additional - Epson PowerLite700c | User Manual - Page 75
-in mouse pointer. Using the Remote Control as a Wireless Mouse Using the remote control as a wireless mouse gives you projector and your computer. See page 14 (PC laptop) or page 17 (PowerBook) for instructions. Freeze A/V Mute E-Zoom Power R/C ON OFF 3 2 5 4 1 Enter Esc s Point the remote - Epson PowerLite700c | User Manual - Page 76
the button to zoom in to the size you want. 2. Use the Enter projector's "native" display-1024 × 768 pixels (PowerLite 700c/710c) or 800 × 600 pixels (PowerLite 500c). You can resize the image to fit the resolution of your projector. s Press the Resize button on the lower part of the remote control - Epson PowerLite700c | User Manual - Page 77
. However, you may find it more convenient to select your source with the remote control. Esc Menu Help Comp S-Video Video Auto Resize P in P - Volume + You can connect two video sources to the projector if one supports S-video and you have an S-video cable (not included). Then you can - Epson PowerLite700c | User Manual - Page 78
your computer presentation. Make sure you have connected your VCR or other video source as described in Chapter 1. 1. Press the P in P button on the remote control. The screen goes dark for a moment, and then your video image appears in a small window on the screen. A menu appears in the lower left - Epson PowerLite700c | User Manual - Page 79
the window is located and sized the way you want, freehand erase The projector's drawing controls or "special effects" let you highlight areas on the screen using the numbered buttons on the remote control. You can use the drawing tools. See page 51 for instructions. 36 Projecting a Presentation - Epson PowerLite700c | User Manual - Page 80
page 52 for instructions on customizing the cursor stamp tool. Using the Cursor/Stamp Arrow You can use the cursor stamp tool as a pointer and place bright yellow arrows anywhere on your screen. 1. To activate the cursor stamp arrow, press the 1 button on the remote control. A yellow arrow appears - Epson PowerLite700c | User Manual - Page 81
can use the projector's menu system to change it. You can also change the box shape to have rounded corners. See page 53 for instructions on customizing To activate the line or marker tool, press the 3 button on the remote control. A pink marker icon appears in the upper left corner of the screen. - Epson PowerLite700c | User Manual - Page 82
the projector's menu system. See page 53 for instructions on customizing the marker and freehand tools. Drawing Freehand Lines The freehand drawing tool lets you click and drag to draw opaque marks anywhere on the screen. 1. To activate the freehand tool, press the 4 button on the remote control - Epson PowerLite700c | User Manual - Page 83
burned out. This is a good time to replace it. See Chapter 4 for instructions. The lamp is burned out. Replace the lamp, following the instructions in Chapter 4. There is a problem with the lamp, power supply, fuse, or circuit. Contact EPSON for help. The projector is too hot. Turn it off and let - Epson PowerLite700c | User Manual - Page 84
on the remote control to access and navigate the help system. note Wherever you see Return listed on the screen, you can select it and press the Enter (Source) button to return to the previous menu. Using the On-Screen Help If you have a problem while setting up or using your PowerLite, you can - Epson PowerLite700c | User Manual - Page 85
side of the Select (Keystone) button to highlight the problem you want to solve. Then press the Enter ( lamp and ensures efficient operation. Turn your computer off first, before you turn off the projector. 1. To turn off the projector, press the red Power button on the projector or remote control. - Epson PowerLite700c | User Manual - Page 86
the lamp, never unplug the power cord when the power light is green. If you want to turn the projector on again, wait until the orange light stops flashing. Then press the Power button. 3. Replace the lens cap, retract the lens, and unplug the power cord. 4. Turn off the remote control. 5. If - Epson PowerLite700c | User Manual - Page 87
44 Projecting a Presentation - Epson PowerLite700c | User Manual - Page 88
menus to adjust the image, sound, and other features of your projector. You can also create your own startup screen, customize the "drawing" controls, and view information about the current display settings and lamp status. This chapter covers the following information: s Using the menu system - Epson PowerLite700c | User Manual - Page 89
bass). s Effect Customizes the drawing tools available on the remote control. s Setting Adjusts features such as the keystone setting, Controls settings such as menu language, use of startup screen, color temperature, and rear or ceiling projection. See the User's Guide Supplement on the projector - Epson PowerLite700c | User Manual - Page 90
You use the Menu, Enter and Esc buttons on the remote control to change menu settings. 1. To access the menu system, open the cover on the lower part of the remote control and press the Menu button. You see the following: menus tilt it to the side) to change the setting. Fine-Tuning Your Projector 47 - Epson PowerLite700c | User Manual - Page 91
select Yes, and then press Enter. 7. Press the Esc button on the remote to go back to the main menu display. Your changes are saved automatically. to change these settings unless you have a problem with your projector. See the User's Guide Supplement for more information. Repositioning the Image - Epson PowerLite700c | User Manual - Page 92
have repositioned the image or adjusted the sync setting, you can use the Auto button on the remote control to restore the default settings. 3. Press Enter to select the Position option. You see the Video menu highlighted. 2. Press Enter to select the Video menu. Fine-Tuning Your Projector 49 - Epson PowerLite700c | User Manual - Page 93
listing, with the Video menu highlighted. 2. Press the bottom edge of the Enter button (or tilt it down) to highlight Audio. 50 Fine-Tuning Your Projector - Epson PowerLite700c | User Manual - Page 94
increase the volume or the left side to decrease it. This works the same as the Volume button on the remote control. 5. To select the Tone setting, press the bottom edge of the Enter button (or tilt it down). 6. return all the drawing tools to their default settings. Fine-Tuning Your Projector 51 - Epson PowerLite700c | User Manual - Page 95
, balls, a pointing hand, and a cross. Scroll through the icons until the one you want to use appears in the pink box. 52 Fine-Tuning Your Projector - Epson PowerLite700c | User Manual - Page 96
or line width, press the bottom edge of the Enter button (or tilt it down) to highlight the Shape or Width setting. Fine-Tuning Your Projector 53 - Epson PowerLite700c | User Manual - Page 97
can select another drawing tool to customize or press Esc again to return to the main menu. Customizing Projector Features You can use the Setting menu to turn on the projector's power management system, adjust the image shape, and customize several other features. 1. Press the Menu button. You see - Epson PowerLite700c | User Manual - Page 98
or image to display when you press the AV/Mute button. The logo setting displays an image that you have transferred to the projector. See page 56 for instructions on transferring an image to use for the A/V Mute display. s Power Mgmt Sys Turns on the power management system, which takes effect when - Epson PowerLite700c | User Manual - Page 99
camera. Then follow these steps to capture the image and transfer it to the projector: 1. Press the Menu button. You see the main menu listing, with shown at the left. 7. Use the Enter button on the remote control to select a zoom rate (display size), and then press Enter. 8. When the message "Do - Epson PowerLite700c | User Manual - Page 100
the logo may take a few moments. Do not use the projector or other sources (computer, video, speaker, etc.) while the side of the Enter button to select Logo. This sets your image as the screen displayed when the projector is not receiving a signal. 6. If you want to set up your image as the A/V mute - Epson PowerLite700c | User Manual - Page 101
access the About menu when the projector display is set to video, you only see the lamp life and the video signal setting. Viewing Information You can use the About menu to view information about the display settings of your computer and the number of hours the lamp has been used. 1. Press the - Epson PowerLite700c | User Manual - Page 102
. The only parts you should replace are the lamp and air filter. If any other part needs replacing, contact your dealer or a qualified service person. This chapter covers the following: s Cleaning the lens s Cleaning the projector s Cleaning the air filter s Replacing the lamp s Transporting the - Epson PowerLite700c | User Manual - Page 103
remove dirt or smears, moisten a soft cloth with an alcohol-based cleaner and gently wipe the lens surface. Wipe here to clean the lens. Cleaning the Projector Before you clean the projector, make sure you turn it off and unplug the power cord. s To remove dirt or dust, wipe the outside with a soft - Epson PowerLite700c | User Manual - Page 104
replacement lamp for your projector, a new air filter is included. You should replace the filter when you replace the lamp. Cleaning the Air Filter Clean the air filter after every 100 hours of use, or if the temperature warning light on top of the projector turns red. If the filter is not cleaned - Epson PowerLite700c | User Manual - Page 105
dealer or call EPSON Accessories at (800) 873-7766 in the United States and Canada for a replacement lamp. Use the following part number when you order a lamp: s ELPLP10B (PowerLite 700c/500c) s ELPLP10S (PowerLite 710c) Follow these steps to replace the lamp: 1. Turn off the projector and allow it - Epson PowerLite700c | User Manual - Page 106
screwdriver that came with the replacement lamp, loosen the lamp cover screw. You won't be able to remove the screw. 5. Remove the cover. You may need to use a small flat-head screwdriver to pry it off. 6. Remove the two mounting screws on the lamp. Then pull out the lamp using the handle. 7. Gently - Epson PowerLite700c | User Manual - Page 107
8. Replace the mounting screws. 9. Snap the cover back into place. Then tighten the screw. note EPSON shall not be liable for any damages incurred during transportation. Transporting the Projector The projector contains many glass and precision parts. If you need to transport it, please follow - Epson PowerLite700c | User Manual - Page 108
helps you diagnose and solve problems with your projector, and provides technical support information for problems you can't solve yourself. You can also check the on-screen help by pressing the Help button on the control panel or remote control. See page 41 for instructions on using the help system - Epson PowerLite700c | User Manual - Page 109
burned out. This is a good time to replace it. See Chapter 4 for instructions. The lamp is burned out. Replace the lamp, following the instructions in Chapter 4. There is a problem with the lamp, power supply, fuse, or circuit. Contact EPSON for help. The projector is too hot. Turn it off and let - Epson PowerLite700c | User Manual - Page 110
as specifically explained in this User's Guide, do not attempt to service this product yourself. Projected images get darker or start to deteriorate, or the lamp warning light is red or flashing orange. Replace the lamp as described on page 62. The temperature warning light is red. s The projector - Epson PowerLite700c | User Manual - Page 111
pointer with the remote control. s Make sure the mouse cable is securely connected to both your computer's mouse port and one of the projector's mouse ports. on both the LCD screen and the projector, or to switch between them. Check your laptop's manual or on-screen help for instructions. s If you - Epson PowerLite700c | User Manual - Page 112
Macintosh Hi-Res Display or another 1024 × 768 setting (PowerLite 710c/700c) or 800 × 600 setting (PowerLite 500c). For more information, see your PowerBook documentation. For supported display settings, see the User's Guide Supplement on the projector CD-ROM. s You also may need to modify existing - Epson PowerLite700c | User Manual - Page 113
quality is poor on a laptop computer. The video signal may be split between the computer and the projector. Try turning off the laptop LCD display. See your laptop manual or on-screen help for instructions. The colors of the image are not right. s If you're displaying a computer image, use the Color - Epson PowerLite700c | User Manual - Page 114
remote control to make sure this feature is not enabled. s Make sure the right source is selected. Press the Source button on top of the projector to select the right source. Where To Get Help EPSON provides technical assistance through electronic support services and automated telephone services - Epson PowerLite700c | User Manual - Page 115
apply. Before you call, please have the following information ready: s Product name (EPSON PowerLite projector) s Product serial number (located on the bottom of the projector) s Computer configuration s Description of the problem You can purchase screens, carrying cases, or other accessories from - Epson PowerLite700c | User Manual - Page 116
and other important information about your EPSON PowerLite projector. Important Safety Instructions Follow these safety instructions when setting up and using the projector: s Do not place the projector on an unstable cart, stand, or table. s Do not use the projector near water or sources of heat - Epson PowerLite700c | User Manual - Page 117
kind through cabinet slots. Never spill liquid of any kind into the projector. s Except as specifically explained in this User's Guide, do not attempt to service this product yourself. Refer all servicing to qualified service personnel. Opening or removing covers may expose you to dangerous voltages - Epson PowerLite700c | User Manual - Page 118
Information You can operate the projector by remote control via a line-of-sight infrared (IR) receiver at the front and rear of the projector. The projector may not respond to remote control commands under the following conditions: s There is an object between the remote control IR emitter and the - Epson PowerLite700c | User Manual - Page 119
EPSON AMERICA, INC. 3840 Kilroy Airport Way MS: 6-43 Long Beach, CA 90806-2469 (562) 290-5254 Declare under sole responsibility that the product identified herein, complies with 47CFR Part undesired operation. Trade Name: EPSON Type of Product: LCD Projector Model: EMP-710/700/500 76 Notices - Epson PowerLite700c | User Manual - Page 120
comply with the limits for a Class B digital device, pursuant to Part 15 of the FCC Rules. These limits are designed to provide reasonable energy and, if not installed and used in accordance with the instructions, may cause harmful interference to radio or television reception. However, there - Epson PowerLite700c | User Manual - Page 121
sound, 50 to 51 Batteries, remote control, 9 Blurry image, 70 Box tool customizing, 53 using, 37 Brightness setting, 49 C Cable audio, 13, 17 computer, 12, 15 mouse, 14, 17 to 18 Camcorder, connecting, 19 to 20 Case, cleaning, 60 Cleaning air filter, 61 lens, 60 projector, 60 Color adjusting, 49 to - Epson PowerLite700c | User Manual - Page 122
resizing, 33 size and distance from screen, 10 turning off, 34 zooming, 28, 33 Installing batteries in remote control, 9 Internet, 3, 71 K Kensington anti-theft device, 22 Keystone button, 30, 69 L Lamp automatic shut-off, 27, 55 number of hours used, 58 replacing, 62 to 64 warning light, 40, 65 to - Epson PowerLite700c | User Manual - Page 123
projector, 15 to 17 displaying on, 23, 27 Presentation tips, 2 PrivateLine Support, 3, 72 Projection lamp light, 40, 65 to 66 Projector cleaning the projector, 4 Remote control connecting cable for wireless mouse, 14, 17 to 18 information, 75 installing batteries, 9 light button, 31 problems, 67 - Epson PowerLite700c | User Manual - Page 124
warning light, 40, 65 to 67 Tone setting, 50 to 51 82 Index Tracking, 48, 70 Transporting the projector, 64 Trapezoid image, 30, 54, 69 Treble, adjusting sound, 50 to 51 Troubleshooting color problems, 70 image and sound problems, 68 to 71 projector problems, 65 to 67 remote control problems, 67 to
-
 1
1 -
 2
2 -
 3
3 -
 4
4 -
 5
5 -
 6
6 -
 7
7 -
8
-
9
-
10
-
11
-
12
-
13
-
14
-
15
-
16
-
17
-
18
-
19
-
20
-
21
-
22
-
23
-
24
-
25
-
26
-
27
-
28
-
29
-
30
-
31
-
32
-
33
-
34
-
35
-
36
-
37
-
38
-
39
-
40
-
41
-
42
-
43
-
44
-
45
-
46
-
47
-
48
-
49
-
50
-
51
-
52
-
53
-
54
-
55
-
56
-
57
-
58
-
59
-
60
-
61
-
62
-
63
-
64
-
65
-
66
-
67
-
68
-
69
-
70
-
71
-
72
-
73
-
74
-
75
-
76
-
77
-
78
-
79
-
80
-
81
-
82
-
83
-
84
-
85
-
86
-
87
-
88
-
89
-
90
-
91
-
92
-
93
-
94
-
95
-
96
-
97
-
98
-
99
-
100
-
101
-
102
-
103
-
104
-
105
-
106
-
107
-
108
-
109
-
110
-
111
-
112
-
113
-
114
-
115
-
116
-
117
-
118
-
119
-
120
-
121
-
122
-
123
-
124
 |
 |
User’s Guide
Supplement
EPSON
®
PowerLite
®
500c/700c/710c
Multimedia Projector